Chris Tyler - Fedora Linux
Здесь есть возможность читать онлайн «Chris Tyler - Fedora Linux» весь текст электронной книги совершенно бесплатно (целиком полную версию без сокращений). В некоторых случаях можно слушать аудио, скачать через торрент в формате fb2 и присутствует краткое содержание. Год выпуска: 2006, ISBN: 2006, Издательство: O'Reilly, Жанр: ОС и Сети, на английском языке. Описание произведения, (предисловие) а так же отзывы посетителей доступны на портале библиотеки ЛибКат.

- Название:Fedora Linux
- Автор:
- Издательство:O'Reilly
- Жанр:
- Год:2006
- ISBN:978-0-596-52682-5
- Рейтинг книги:5 / 5. Голосов: 1
-
Избранное:Добавить в избранное
- Отзывы:
-
Ваша оценка:
Fedora Linux: краткое содержание, описание и аннотация
Предлагаем к чтению аннотацию, описание, краткое содержание или предисловие (зависит от того, что написал сам автор книги «Fedora Linux»). Если вы не нашли необходимую информацию о книге — напишите в комментариях, мы постараемся отыскать её.
Fedora Linux: A Complete Guide to Red Hat's Community Distribution In this book, you'll learn how to:
Install Fedora and perform basic administrative tasks
Configure the KDE and GNOME desktops
Get power management working on your notebook computer and hop on a wired or wireless network
Find, install, and update any of the thousands of packages available for Fedora
Perform backups, increase reliability with RAID, and manage your disks with logical volumes
Set up a server with file sharing, DNS, DHCP, email, a Web server, and more
Work with Fedora's security features including SELinux, PAM, and Access Control Lists (ACLs)
Whether you are running the stable version of Fedora Core or bleeding-edge Rawhide releases, this book has something for every level of user. The modular, lab-based approach not only shows you how things work - but also explains why--and provides you with the answers you need to get up and running with Fedora Linux.
Fedora Linux — читать онлайн бесплатно полную книгу (весь текст) целиком
Ниже представлен текст книги, разбитый по страницам. Система сохранения места последней прочитанной страницы, позволяет с удобством читать онлайн бесплатно книгу «Fedora Linux», без необходимости каждый раз заново искать на чём Вы остановились. Поставьте закладку, и сможете в любой момент перейти на страницу, на которой закончили чтение.
Интервал:
Закладка:
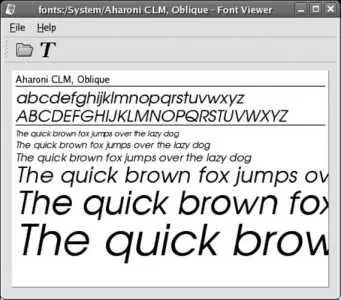
Figure 2-27. KFontView window
To add fonts, simply drag and drop them into the font window. If you drop them into the system font window, you will be prompted to enter the root password.
To delete a font, treat it like a file: drag and drop it onto the trash can, or right-click and select Delete. As with installation, you will be prompted for the root password if the font is from the system font window.
You can also install and remove fonts through the KDE Control Panel.
2.7.1.3. Adding and removing fonts from the command line
When an application starts, the font configuration system automatically scans ~/.fonts (your personal font directory) as well as /usr/share/fonts (which is the system-wide font directory). Any changes to the fonts contained in those directories are detected automatically, so adding fonts is simply a matter of placing files into those directories, and removing fonts is simply a matter of deleting them.
For example, if you have a compressed tar file named /tmp/newfonts.tgz containing a folder named newfonts full of TrueType fonts and wish to install them for your own private use, you can use these commands:
$ cd ~/.fonts
$ tar xvzf /tmp/newfonts.tgz "*.ttf" "*.TTF"
Or, to install the fonts so that they are accessible to all users system-wide:
# cd /usr/share/fonts
# mkdir newfonts
# cd newfonts
# tar xvzf /tmp/newfonts.tgz "*.ttf" "*.TTF"
To delete all of your personal fonts:
$ rm -rf ~/.fonts/*
And to delete the system-wide fonts installed in newfonts :
# rm -rf /user/share/fonts/ newfonts
2.7.1.4. Installing the Microsoft fonts
Web pages and documents created on Microsoft systems often use fonts that are distributed with Windows. For a time, Microsoft made these fonts available free of charge on its web site; although they are no longer available directly from Microsoft, they are available from fontconfig.org under Microsoft's fairly simple licensing terms, documented in http://fontconfig.org/webfonts/Licen.TXT .
Installing these fonts makes it possible to view Word and Excel documents and web pages created under Windows as they were originally designed. Mozilla, Firefox, OpenOffice, and other applications can all use these fonts.
In order to install these fonts, you'll need to obtain a copy of the cabextract program to extract the fonts from archives created in Microsoft's proprietary CAB format:
# yum install cabextract
Once cabextract is installed, you can easily install the Microsoft fonts from the command line:
# wget http://fontconfig.org/webfonts/webfonts.tar.gz
# tar xvzf webfonts.tar.gz
# cd msfonts
# cabextract *.exe
# mkdir /usr/share/fonts/microsoft
# cp *.[tT]* /usr/share/fonts/microsoft
# cd ..
# rm -rf msfonts
# fc-cache
2.7.1.5. Using newly installed fonts
Applications load their font lists at startup time, so simply relaunching an application is usually all that is required before you can start using new fonts.
The command fc-cache will create an index cache to speed application startup. To use it:
$ fc-cache
# fc-cache
Running fc-cache as a regular user will create the index cache for ~/.fonts , which is not really necessary because the index cache will be created automatically. Running it as root will create the index cache for /usr/share/fonts and is strongly recommended; otherwise, an index of the system-wide fonts will be created for each individual user, wasting time and storage space.
2.7.1.6. Configuring font rendering options
Font rendering can be tuned to adjust the font appearance to suit user preferences and the display hardware in use. Both GNOME and KDE provide configuration tools to configure font rendering.
The GNOME configuration window shown in Figure 2-28 is accessed from the menu item System→Preferences→Font. The KDE rendering configuration panel shown in Figure 2-29 is accessed through the KDE Control Panel under Appearance & Themes→Fonts.
Figure 2-28. GNOME font-rendering preferences tool

Figure 2-29. KDE font rendering preferences tool
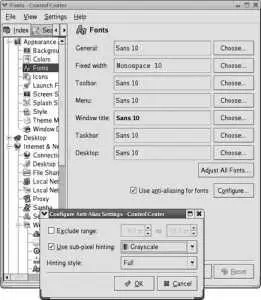
In both cases, you can enable or disable antialiasing, adjust the level of antialiasing hinting, and set subpixel order.
On an older system with a slow CPU and/or low memory resources, turning off antialiasing can make enough of a performance difference to turn an unbearably slow system into one that performs reasonably.
When antialiasing is enabled, the hinting level can be set according to user preferenceexperiment and see what looks best.
If you have an LCD screen, select "Smoothing: Subpixel (LCD)" in GNOME or "Use Subpixel Smoothing" in KDE. You'll also need to select the order of the red, green, and blue elements on your screen; since this information is almost never documented in the hardware specifications, use a large magnifying glass or experiment until you find the setting that looks the best.
2.7.2. How Does It Work?
X Window System programs use one of two different font systems. The old system, known as core fonts , is still used by a few applications and is needed to start the X server. Almost all current applications use a system comprising two components: FreeType and fontconfig , two software libraries that provide high-quality font rendering and font matching. Since these are client-side libraries accessed by applications, each application separately handles its own font operations.
FreeType's sub-pixel rendering capability is, by and large, useful only on LCDs. It involves treating each of the RGB color elements in a pixel as a partial pixel. Figure 2-30 shows an enlarged diagonal line border between black and white regions on an LCD screen, rendered using subpixel hinting.
Figure 2-30. Subpixel rendering on an LCD panel
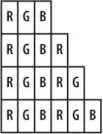
Note that each pixel is comprised of a red, green, and a blue element; on this display, they are arranged horizontally in R-G-B order. In the first row, there is one white pixel. In the second row, there is a white pixel followed by one-third of a white pixelwhich, in this case, means a red pixel. The third row consists of a white pixel followed by two-thirds of a pixela red-plus-green pixel, which displays as yellow. The fourth row contains two white pixels.
Читать дальшеИнтервал:
Закладка:
Похожие книги на «Fedora Linux»
Представляем Вашему вниманию похожие книги на «Fedora Linux» списком для выбора. Мы отобрали схожую по названию и смыслу литературу в надежде предоставить читателям больше вариантов отыскать новые, интересные, ещё непрочитанные произведения.


Обсуждение, отзывы о книге «Fedora Linux» и просто собственные мнения читателей. Оставьте ваши комментарии, напишите, что Вы думаете о произведении, его смысле или главных героях. Укажите что конкретно понравилось, а что нет, и почему Вы так считаете.