Bruce Barnbaum - The Art of Photography - An Approach to Personal Expression
Здесь есть возможность читать онлайн «Bruce Barnbaum - The Art of Photography - An Approach to Personal Expression» весь текст электронной книги совершенно бесплатно (целиком полную версию без сокращений). В некоторых случаях можно слушать аудио, скачать через торрент в формате fb2 и присутствует краткое содержание. Жанр: Старинная литература, на английском языке. Описание произведения, (предисловие) а так же отзывы посетителей доступны на портале библиотеки ЛибКат.

- Название:The Art of Photography: An Approach to Personal Expression
- Автор:
- Жанр:
- Год:неизвестен
- ISBN:нет данных
- Рейтинг книги:5 / 5. Голосов: 1
-
Избранное:Добавить в избранное
- Отзывы:
-
Ваша оценка:
The Art of Photography: An Approach to Personal Expression: краткое содержание, описание и аннотация
Предлагаем к чтению аннотацию, описание, краткое содержание или предисловие (зависит от того, что написал сам автор книги «The Art of Photography: An Approach to Personal Expression»). Если вы не нашли необходимую информацию о книге — напишите в комментариях, мы постараемся отыскать её.
The Art of Photography: An Approach to Personal Expression — читать онлайн бесплатно полную книгу (весь текст) целиком
Ниже представлен текст книги, разбитый по страницам. Система сохранения места последней прочитанной страницы, позволяет с удобством читать онлайн бесплатно книгу «The Art of Photography: An Approach to Personal Expression», без необходимости каждый раз заново искать на чём Вы остановились. Поставьте закладку, и сможете в любой момент перейти на страницу, на которой закончили чтение.
Интервал:
Закладка:
Make Test Prints, Not Test Strips
I don’t make test strips because I find them confusing. They show too small an area (usually) and cannot give much information if the final image has a variety of tonalities and contrasts. Based on the contrast level of the contact proof, I simply guess at the contrast grade of the enlarged print, recognizing that different parts may require different contrast levels. I also guess at the length of exposure needed based on the amount of light projected from the enlarger down to the easel. Then I proceed to make an 8″ × 10″ print (extrapolating from the contact proof that I have been studying), which I develop in Dektol (diluted approximately 1:4 or 1:5) for about five minutes. My approach works for me, but it may not for you at first. So let’s get you started on a good track to making prints efficiently.
Some printers start their process by making test strips. Let me explain more fully why I don’t make test strips. My experience teaching workshops indicates to me that most photographers don’t make the best use of test strips and don’t approach them correctly. Most photographers choose a section of the image that could yield useful information, then make eight to ten exposures on that narrow strip of paper, strategically placed at that chosen location, with each exposure generally three to four seconds. The developed test strip usually has two or three segments that are far too light to be usable, two or three that yield useful information, and three or four that are far too dark. This represents an unthinking approach to test strips. Let me suggest a far more useful approach—one that turns test strips into a thinking process rather than a mindless one.
I recommend a test print rather than a test strip . If you’re about to make an 8″ × 10″ print, use the full 8″ × 10″ sheet as a test rather than a skinny test strip. Here’s how to do it: first, based on your study of the contact proof, choose the contrast level that you think the print will require. If the contact proof has good contrast, start with about 60 units of yellow filtration. If the proof seems a bit low in contrast, reduce the yellow filtration to 40 or 30 units, thereby increasing the contrast a bit. If the proof seems slightly muddy, remove all yellow filtration or consider going into a small amount of magenta filtration (after removing all of the yellow filtration, of course). If the proof seems quite muddy, go to 50 or 70 units of magenta. If it looks really muddy, go all the way to the top, maybe 170 units of magenta. Make your test print with that filtration dialed in, or with that filter placed in the enlarger or under the lens.
Next, study the amount of light falling on the easel or on the back of the sheet of paper you use for focusing (with the contrast filtration in), and guess at the correct length of exposure. In doing this, you are actually trying to correlate the amount of light to the length of exposure. If you have a dense negative, you may want to have the aperture nearly wide open to get a reasonable amount of light on the easel; if you have a thin negative, you may need to stop down several stops to get a reasonable amount of light. Try to get the amount of light that you think will yield an exposure in the range of 12 to 18 seconds, if possible.
Stop down to a seemingly reasonable amount of light hitting the easel (i.e., not so bright that you know an exposure will be too short, and not so dark that you can’t see the image clearly on the easel). Guess at your exposure and set the timer to exactly half of your guess. Suppose you stop down several stops and guess that your exposure will be 15 seconds. Then set your timer for exactly half of that, i.e., 7½ seconds. Now make a three-part test print: cover about  of the print with heavy cardboard and expose
  of it for 7½ seconds. Then move the cardboard to expose of the enlarging paper and expose that for 7½ seconds. Finally, remove the cardboard entirely and expose the entire sheet another 7½ seconds. The first third gets 3 × 7½ = 22½ seconds. The middle third gets 2 × 7½ = 15 seconds, your initial guess. The final third gets 7½ seconds. This way your “guess exposure” is in the middle. One side gets 50 percent less than your guess; the other side gets 50 percent more than your guess (Figure 10-2 and Figure 10-2).
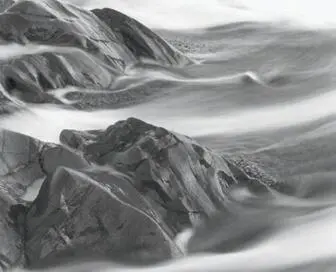
The proof print made at 60 units of yellow light gives me usable detail everywhere (except the far upper right corner, which remains blank white). It tells me that I need to raise contrast to get the glow on the rocks, indicating that when I increase contrast, the upper right corner will need additional exposure to bring out detail there .
Figure 10-2. Proof Print of Rocks and Receding Wave
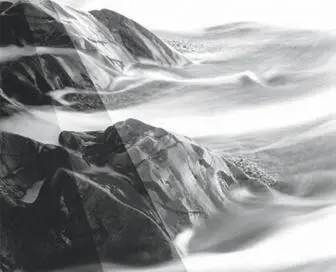
To make a three-part test print, guess your expected exposure at the contrast level you have chosen in advance. Set the timer for ½ that guess. Then make three exposures across the print to get the major tonal areas into each of the sections. Note that all three sections contain rock, moving water, and pebbles. The “guess” was 15 seconds at the chosen aperture, so the three sections received 7½, 15, and 22½ seconds of exposure respectively .
In the 15-second exposure the rocks are too dark. The foamy water in the left center looks good at 22½ seconds of exposure. This indicates that a basic exposure of 13 or 14 seconds may be appropriate for the rocks, but that the water has to be burned to 22½ seconds or more to gain detail on the foam. A review of Figure 10-1 shows the final print compared to the basic proof print (Figure 10-2), with additional printing information coming from the three-part test print .
A better proof would have given the right side the 22½-second exposure and the left side the 7½-second exposure, yielding more information about the additional exposure needed on the upper right .
Figure 10-3. Three-Part Test Print of Rocks and Receding Wave
You can segment the three-part test print horizontally, vertically, or diagonally, or fan out from a point. The important thing is to get highlights and shadows into each of the three sections so you can truly evaluate how to choose a reasonable exposure for the full print.
If you’re way off in your guess, try it again until your guess is about right. No problem. Once you’ve guessed about right, work on that print until it’s refined and you’re used to seeing that level of light on the easel. Then, when you start working on the next negative, you’ll look for roughly the same amount of light hitting the easel, guess correctly, and look for that amount of light the next time around. This way, you’ll begin to see the relationship between the amount of light hitting the easel and the length of exposure you need for the print you want. In other words, you’re thinking about what you’re doing, rather than just mindlessly making test strips.
I suspect that if you do this several times, your guesses will become quite accurate. In time, you may be able to dispense with the test print entirely, as I do, but that’s up to you and your level of confidence. Don’t worry about negatives of varying density. For a dense negative, keep the aperture more open to get the needed amount of light onto the easel; if it’s a thin negative, close down several more stops.
Читать дальшеИнтервал:
Закладка:
Похожие книги на «The Art of Photography: An Approach to Personal Expression»
Представляем Вашему вниманию похожие книги на «The Art of Photography: An Approach to Personal Expression» списком для выбора. Мы отобрали схожую по названию и смыслу литературу в надежде предоставить читателям больше вариантов отыскать новые, интересные, ещё непрочитанные произведения.


Обсуждение, отзывы о книге «The Art of Photography: An Approach to Personal Expression» и просто собственные мнения читателей. Оставьте ваши комментарии, напишите, что Вы думаете о произведении, его смысле или главных героях. Укажите что конкретно понравилось, а что нет, и почему Вы так считаете.