Bruce Barnbaum - The Art of Photography - An Approach to Personal Expression
Здесь есть возможность читать онлайн «Bruce Barnbaum - The Art of Photography - An Approach to Personal Expression» весь текст электронной книги совершенно бесплатно (целиком полную версию без сокращений). В некоторых случаях можно слушать аудио, скачать через торрент в формате fb2 и присутствует краткое содержание. Жанр: Старинная литература, на английском языке. Описание произведения, (предисловие) а так же отзывы посетителей доступны на портале библиотеки ЛибКат.

- Название:The Art of Photography: An Approach to Personal Expression
- Автор:
- Жанр:
- Год:неизвестен
- ISBN:нет данных
- Рейтинг книги:5 / 5. Голосов: 1
-
Избранное:Добавить в избранное
- Отзывы:
-
Ваша оценка:
The Art of Photography: An Approach to Personal Expression: краткое содержание, описание и аннотация
Предлагаем к чтению аннотацию, описание, краткое содержание или предисловие (зависит от того, что написал сам автор книги «The Art of Photography: An Approach to Personal Expression»). Если вы не нашли необходимую информацию о книге — напишите в комментариях, мы постараемся отыскать её.
The Art of Photography: An Approach to Personal Expression — читать онлайн бесплатно полную книгу (весь текст) целиком
Ниже представлен текст книги, разбитый по страницам. Система сохранения места последней прочитанной страницы, позволяет с удобством читать онлайн бесплатно книгу «The Art of Photography: An Approach to Personal Expression», без необходимости каждый раз заново искать на чём Вы остановились. Поставьте закладку, и сможете в любой момент перейти на страницу, на которой закончили чтение.
Интервал:
Закладка:
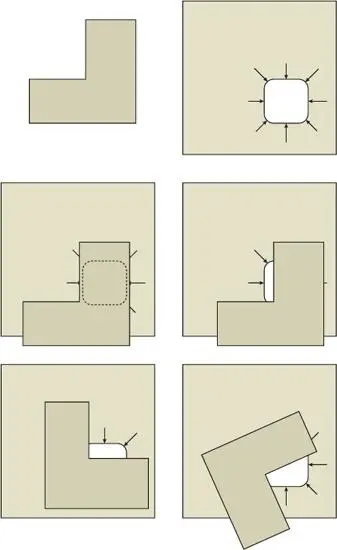
Two pieces of cardboard are needed for this precise burning tool: an L-shaped card (as shown in the diagram at top left), and a square card with a hole cut in its lower right corner and with arrows drawn that point toward the hole (top right in diagram).
To start, place the L-shaped card atop the square one, cover the hole completely (see left center), and hold both cards under the enlarging lens so the enlarging paper is not exposed when the enlarger is turned on. Both cards should have a white surface on the upper side to allow the projected image from the enlarger to be easily visible; the underside of each should be black to minimize the light reflection onto the enlarging paper .
Turn on the enlarger light. The arrows on the lower card indicate the location of the hole when the L-shaped card covers it. With the negative image visible on the cards—and the hole still covered by the L-shaped card—move them as a unit to the location where the hole is at the point of desired burning. (The arrows on the lower card will easily show the proper location.) Then slide the L-shaped card away from the hole at the desired location—and in the optimum shape—for burning (right center and bottom in the diagram). As shown, you may need to rotate the L-shaped card for best results. The size and shape of the opening can be controlled during burning by moving the L-shaped card around the hole while moving the lower card over the enlarging paper .
The same two-card system can be used for flashing (see Figure 10-2) .
Figure 10-4.
For dodging, I use small pieces of cardboard cut into geometric shapes (rectangles, circles, squares, ellipses), each taped to the end of a hanger wire. I hold the wire at one end beyond the projected negative image and block light from the enlarging paper with the appropriately shaped cardboard. If dodging is required in a larger area, say the lower third of the print, I use a large piece of cardboard with a straight or curved edge. If dodging is needed along an edge or at a corner, I may use my hands and fingers—sometimes running them back and forth along the edge and often following contours of shapes along the edge as if I were playing scales on the piano.
For burning, I use cardboard sheets with straight edges or with gentle convex or concave curves. To burn interior sections of a print, I cut rounded holes at key locations (near one corner, in the center, midway along an edge, etc.) so I can burn areas of the print along the edges, in the center, near corners, etc., as I please. Whether I’m burning or dodging, I keep the cardboard in constant motion to soften the edge of the manipulated area, allowing it to smoothly mesh with the unaltered adjacent area.
My dodging and burning cardboards are all black mat board with the reverse side white. This allows me to see the projected negative on the white (top) side, while the black (lower) side absorbs light reflected upward from the enlarging paper. For burning, I can alter the size and shape of the hole in the cardboard by holding a second, L-shaped piece of cardboard over it and opening up only part of the pre-cut hole. In this way, I can burn oddly configured areas, even down to narrow slits when necessary. I accomplish this by holding one cardboard atop the other, using the upper one to cover the hole of the lower one (Dodging and Burning). Then I turn on the enlarger, holding the two cardboards under the lens so that no light hits the paper. The negative image is visible on the cardboard’s white top side, allowing me to position the hole precisely over the area to be burned (still holding the second cardboard over the hole, so the enlarging paper is still not exposed). Then I slowly uncover part—or all—of the hole by sliding the upper cardboard across the opening, allowing light to go through the hole in the appropriate shape. Both cards must be kept in constant motion in order to smoothly mesh the tonalities of the burned area with its surroundings. As soon as I burn the area for the desired length of time, I close the hole again and turn off the enlarger light.
I always make sure that the dodging or burning is not apparent, no matter how extensive it may be, by keeping the dodging or burning tools (hands or cardboards) moving during the exposure to produce smooth, undetectable gradations between manipulated and unmanipulated areas. Too often, a printer darkens a stormy sky for dramatic effect but burns the upper portion of the mountains, trees, or church steeple along with the sky. This obviously represents sloppy technique. Furthermore, too much darkening of the sky may look artificial and phony, not dramatic. The light depicted in a print should be logical. If it isn’t, it simply appears contrived. When manipulation is visible, people see poor technique rather than the visual statement of the image.
One might ask how much burning or dodging is acceptable in a print. The answer is: as much as is necessary to direct the viewer’s attention (perhaps I should say, “as much as is necessary to force the viewer’s attention”). However, even if the dodged or burned areas mesh smoothly with the adjacent areas, the manipulation should not be so great that the altered areas appear artificially or unnaturally light or dark. The image must possess coherence, logic, and a realistic feeling of light. There is a logic to light that cannot be violated. That is the only constraint.
This must be done with cunning and subtlety, but not with timidity. I have printed negatives that require as much as 500–1000 percent additional burning of selected areas beyond the basic exposure. The goal is to bring out all the desired detail and mold the light in a way that strengthens the composition wherever possible. Burning or dodging can also be used to add snap to selected areas. There are, of course, any number of reasons for burning or dodging. Use them, but use them sensibly for your goals.
Integrating the Entire Process: Visualization, Exposure, Development, and Printing
When I stand behind the camera composing the scene, I consider camera position, lens focal length, filtration, negative exposure, and development. I also think ahead to the darkroom possibilities of burning and dodging, and I have a strong feeling of the size I’ll print the final image for display purposes. This allows me to fully integrate the entire photographic process and maximize my interpretive capabilities. This is also part of the process fully discussed in Chapter 4, which may be worth rereading at this point. In visualizing the final print, I try to see the steps needed to get there, and darkroom considerations are key among them.
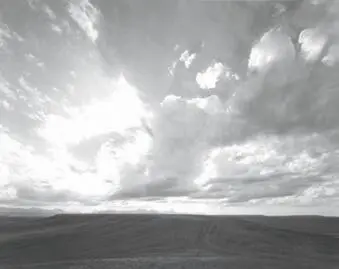
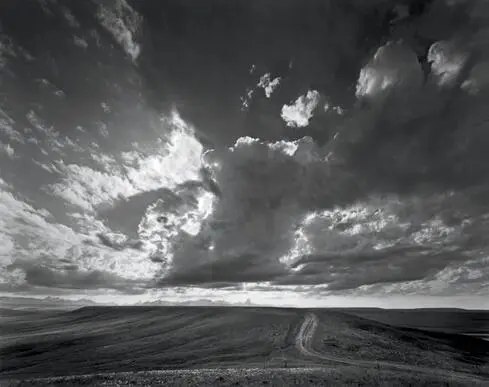
Figure 10-5 shows the straight proof print. Figure 10-5 shows the final print in which the sky and ground are printed separately, as if they were two separate negatives. The sky alone is exposed first for 35 seconds at a contrast level lower than the proof print (80 units of yellow), with additional burning in the upper portion to bring out cloud detail. Then the lower (ground) portion is exposed at 70 units of magenta for just 13 seconds, enough to give it strong tonalities. The jagged summits of the northern Montana Rockies can be seen just above the grasslands .
Figure 10-5. Approaching the Rocky Mountains
Читать дальшеИнтервал:
Закладка:
Похожие книги на «The Art of Photography: An Approach to Personal Expression»
Представляем Вашему вниманию похожие книги на «The Art of Photography: An Approach to Personal Expression» списком для выбора. Мы отобрали схожую по названию и смыслу литературу в надежде предоставить читателям больше вариантов отыскать новые, интересные, ещё непрочитанные произведения.


Обсуждение, отзывы о книге «The Art of Photography: An Approach to Personal Expression» и просто собственные мнения читателей. Оставьте ваши комментарии, напишите, что Вы думаете о произведении, его смысле или главных героях. Укажите что конкретно понравилось, а что нет, и почему Вы так считаете.