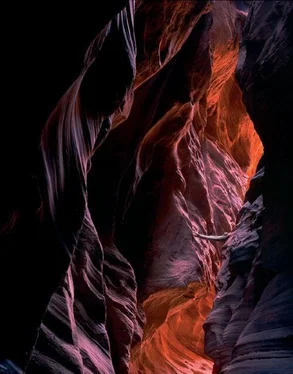
Bruce Barnbaum - The Art of Photography - An Approach to Personal Expression
Здесь есть возможность читать онлайн «Bruce Barnbaum - The Art of Photography - An Approach to Personal Expression» весь текст электронной книги совершенно бесплатно (целиком полную версию без сокращений). В некоторых случаях можно слушать аудио, скачать через торрент в формате fb2 и присутствует краткое содержание. Жанр: Старинная литература, на английском языке. Описание произведения, (предисловие) а так же отзывы посетителей доступны на портале библиотеки ЛибКат.
- Название:The Art of Photography: An Approach to Personal Expression
- Автор:
- Жанр:
- Год:неизвестен
- ISBN:нет данных
- Рейтинг книги:5 / 5. Голосов: 1
-
Избранное:Добавить в избранное
- Отзывы:
-
Ваша оценка:
- 100
- 1
- 2
- 3
- 4
- 5
The Art of Photography: An Approach to Personal Expression: краткое содержание, описание и аннотация
Предлагаем к чтению аннотацию, описание, краткое содержание или предисловие (зависит от того, что написал сам автор книги «The Art of Photography: An Approach to Personal Expression»). Если вы не нашли необходимую информацию о книге — напишите в комментариях, мы постараемся отыскать её.
The Art of Photography: An Approach to Personal Expression — читать онлайн бесплатно полную книгу (весь текст) целиком
Ниже представлен текст книги, разбитый по страницам. Система сохранения места последней прочитанной страницы, позволяет с удобством читать онлайн бесплатно книгу «The Art of Photography: An Approach to Personal Expression», без необходимости каждый раз заново искать на чём Вы остановились. Поставьте закладку, и сможете в любой момент перейти на страницу, на которой закончили чтение.
Интервал:
Закладка:
Review of Negative Exposure Procedure
Let’s quickly review the procedure for obtaining a proper exposure. In a sense, you must start at the end, jump to the beginning, then work back to the end . It works this way: when you see something you want to photograph, first decide the tonalities you want in the final print (that is the end point!) . Then take your meter reading, which always gives you a Zone 5 exposure (that is the starting point!) . Then decide how many stops (i.e., zones) you must open up or close down to reach the desired tones (that is working back toward the end point!) .
This tells you that the use of the zone system is integrally tied together with previsualization, for you must be able to visualize the way you want the final print to look in order to follow this procedure. Most of the time, if you follow your light meter (the gray meter) blindly, you’ll probably come out relatively close to the proper exposure because the eye is somewhat of a gray meter also. After all, you see things almost equally well outdoors or indoors, even though the light levels are very far apart. This is due to the fact that the eye and brain compensate wonderfully within a very wide range of brightness levels—in other words, you average out the light levels, just like the meter does. But when you encounter an exceptional situation such as the sunlit snow, following the gray meter can be disastrous. You will end up with Zone 5 snow! Therefore, keep in mind that the gray meter is a dumb robot. It is your tool, and it gives you a starting point—middle gray—a point of departure. It is up to you to depart with intelligence.
Consider another example, along with several variations, to help solidify these ideas. Suppose you travel to Hawaii and are standing on a field of black lava rock on a cloudy day. You decide you want to photograph the rock. First, look at it and decide what tonal values you want it to have. Using a mental picture of the zone scale, you might choose an average tone of about Zone 3½, so that the textures are quite dark yet easily seen.
Next, take a meter reading with your gray meter. Suppose the meter reads f/5.6 @  second. Of course, if you use that shutter speed and aperture, you will get Zone 5 (medium gray) textures. So, if you stop down one stop (i.e., one zone), either by cutting the shutter speed in half or closing down the aperture one stop, you will get Zone 4 textures.
This time, let’s leave the shutter speed at  and close the aperture down to f/8. Then stop down another ½ stop to a point between f/8 and f/11. That puts you at Zone 3½. (Remember, you can always place the aperture at intermediate points between listed settings. However, the shutter speed must be on a listed setting; otherwise, it won’t open or it will make a choice between the two nearby speeds.)
In this example, you cut down on the exposure from the meter reading in order to make the object (the lava rock) appear as dark in the print as it did to your eye. You started with the Zone 5 reading and closed down 1½ zones to Zone 3½. Suppose the field of lava rock also includes a bush with delicate, lacy branches that sway gently in the breeze. If you want to arrest the movement of those branches,  second may not be a short enough exposure, but
  second may. In this case, close down the shutter speed from
  second to
  second and compensate for the loss of one zone by opening up the aperture from the halfway point between f/8 and f/11 to the halfway point between f/5.6 and f/8. The total exposure will be the same, but the faster shutter speed may stop the motion of the bush, as you desired. You can always use this reciprocal relationship (i.e., ½ × 2 = 1) between f/stops and shutter speeds to gain the optimum exposure for your purposes.
Note
The zone system is a method of precise exposure, and that precision can be applied to literal interpretations or to vast departures from reality. It is a remarkably useful and flexible system of exposure for creative photographers .
Now, suppose there is no wind and you want maximum depth of field. Smaller apertures (i.e., the higher f/stop numbers) yield greater depth of field, and the setting between f/8 and f/11 may not yield sharpness from the immediate foreground to distant areas. If you stop down to a point halfway between f/11 and f/16, and compensate for the loss of one zone by increasing the shutter speed from  second to
  second, you may get just what you want. Now you have achieved your goals of getting the rock texture at Zone 3½ while obtaining great depth of field.
As in the first example, you start by defining the tonalities you want to have in the print. Then you meter the scene with your gray meter to determine what exposure will yield a Zone 5 result. Then you change the metered exposure by the amount needed to go from Zone 5 to your desired exposure. It’s really quite simple! It’s also very exact, and that’s the chief attraction of the zone system. By using it carefully, you can get precisely the exposure you want.
Using the Zone System to Depart from Reality
Although the two examples just presented show how to obtain a literal rendition of the objects photographed, the zone system can be employed perfectly well in creative departures from reality—ones that may present your interpretation more effectively. Suppose, for instance, that you want to present the tones of the lava rock in a high key (i.e., light-toned) rendition of Zones 6, 7, and 8. Perhaps you feel that a section of rock is sharded, with jagged edges that remind you of broken glass or crystal, and you want to render it as such. This would not be a literal rendition of the scene, but a fascinating transformation of it to something abstract or unreal, perhaps even surreal.
The method of obtaining this interpretation is exactly the same as for the literal rendition. First, determine the tone you want ( the end point; in this case, Zones 6, 7, and 8). Then take the meter reading (the starting point), which is f/5.6 @  second. This time, however, you want to make the tones lighter than the gray meter’s Zone 5 reading by an average of two zones ( working back to the end point by using Zone 7 as the average of the three desired zones). Open up two stops via either the shutter speed or aperture. If you want to maintain depth of field and you have a tripod, then do it via shutter speed, going from
  second exposure to
  second (remember that doubling the shutter speed from
  second exposure to
  second adds one stop, and then opening from
  second to
  second adds another stop). Now the exposure will yield the rocks with an average Zone 7 tonality. This could produce a spectacular departure from the reality of the scene.
Интервал:
Закладка:
Похожие книги на «The Art of Photography: An Approach to Personal Expression»
Представляем Вашему вниманию похожие книги на «The Art of Photography: An Approach to Personal Expression» списком для выбора. Мы отобрали схожую по названию и смыслу литературу в надежде предоставить читателям больше вариантов отыскать новые, интересные, ещё непрочитанные произведения.
Обсуждение, отзывы о книге «The Art of Photography: An Approach to Personal Expression» и просто собственные мнения читателей. Оставьте ваши комментарии, напишите, что Вы думаете о произведении, его смысле или главных героях. Укажите что конкретно понравилось, а что нет, и почему Вы так считаете.
