Bruce Barnbaum - The Art of Photography - An Approach to Personal Expression
Здесь есть возможность читать онлайн «Bruce Barnbaum - The Art of Photography - An Approach to Personal Expression» весь текст электронной книги совершенно бесплатно (целиком полную версию без сокращений). В некоторых случаях можно слушать аудио, скачать через торрент в формате fb2 и присутствует краткое содержание. Жанр: Старинная литература, на английском языке. Описание произведения, (предисловие) а так же отзывы посетителей доступны на портале библиотеки ЛибКат.

- Название:The Art of Photography: An Approach to Personal Expression
- Автор:
- Жанр:
- Год:неизвестен
- ISBN:нет данных
- Рейтинг книги:5 / 5. Голосов: 1
-
Избранное:Добавить в избранное
- Отзывы:
-
Ваша оценка:
The Art of Photography: An Approach to Personal Expression: краткое содержание, описание и аннотация
Предлагаем к чтению аннотацию, описание, краткое содержание или предисловие (зависит от того, что написал сам автор книги «The Art of Photography: An Approach to Personal Expression»). Если вы не нашли необходимую информацию о книге — напишите в комментариях, мы постараемся отыскать её.
The Art of Photography: An Approach to Personal Expression — читать онлайн бесплатно полную книгу (весь текст) целиком
Ниже представлен текст книги, разбитый по страницам. Система сохранения места последней прочитанной страницы, позволяет с удобством читать онлайн бесплатно книгу «The Art of Photography: An Approach to Personal Expression», без необходимости каждый раз заново искать на чём Вы остановились. Поставьте закладку, и сможете в любой момент перейти на страницу, на которой закончили чтение.
Интервал:
Закладка:
Zone 1 density—the threshold density—is the same on all negatives. It is always thin but easily perceived. Since all higher zones are obtained by successively doubling either exposure or light levels, Zone 2 density is the same on all negatives, as is Zone 3 density, Zone 4 density, Zone 5 density, and so on. Keep this in mind: Zone densities are the same for all negatives .
You can continue doubling the exposure, thereby increasing the negative density of the developed negative—but there is a limit. Eventually you’ll reach a density level that cannot be increased; the negative will “max out.” It turns out that on nearly all black-and-white films, the maximum density usually goes up to Zone 16 or even 18! Most photographers think it goes only to Zone 10, but in fact, it goes well beyond that. Zone 10 is just above the halfway mark on the density scale. When you fully comprehend how much the negative can encompass and learn how to control that immense range (which will become clear in the next two chapters), you can then appreciate how extraordinarily flexible and powerful photography can be.
Translating Negative Densities to Print Tonalities
Negative densities mean nothing until a print is made. What happens to those densities when they are printed, when the negative is placed in the enlarger and exposed onto a normal grade enlarging paper?
We begin this determination by defining a “standard exposure”. A standard exposure is the minimum length of exposure time through the enlarger required to achieve a maximum black from the Zone 0 portion of the negative. Suppose we require a 20-second exposure of the negative under the enlarger to achieve a maximum black on your enlarging paper from Zone 0 (i.e., the clearest portion of the negative). Any exposure greater than 20 seconds will produce a black that is no blacker; anything less fails to achieve maximum black. At best, any exposure less than 20 seconds will yield a very dark gray, but not black. Using the 20-second exposure on a normal contrast paper (generally a grade 2 paper or a mid-contrast level on variable contrast paper), you get the table shown below.
Note
On nearly all black-and-white films, the maximum density is achieved high into the teens: usually it goes up to about Zone 16 or even 18! Most photographers think it goes only to about Zone 10, but in fact, it goes well beyond that.
At first glance the table seems to indicate that Zone 1 has no real meaning, since it is essentially as black as Zone 0 in the print. But remember, Zone 1 represents the amount of light needed to sensitize the film just enough to produce visible density when the negative is developed, i.e., the threshold exposure. From this level of exposure, we begin the doubling of exposures (or light levels) to obtain the successive zones. For this reason, Zone 1 is especially important—though it is essentially unimportant for printing purposes. Because it has so little density, it blocks almost none of the light coming from the enlarger, so it prints virtually as black as Zone 0.
Surprisingly, the print reaches pure white by Zone 9, although the negative continues to show separations up to Zones 15, 16, 17, and even 18 (beyond the table)! These extremely dense zones will print as pure white in a “straight print,” but they are very usable. (A straight print is one with a single exposure; no additional exposure, known as “burning”, is used on any portion of the image.) In Chapter 9 you’ll see how those zones can be controlled in development, and in Chapter 10 you’ll see further methods of making the higher zones visible, meaningful, and essential in the print. They should not be excluded from consideration in exposure. Those zones are part of the zone system, and you’ll soon see how to fully use them. At that point, your artistic and creative potential will rocket upward immeasurably (Figure 8-1).
For now, however, we will confine ourselves to the range of printable values in a straight print, Zones 0 to 9. I have mentioned several times that by doubling the exposure, you can jump from one zone to the next higher one; but how do you double the exposure? Simple! A quick glance at your camera shows that the shutter speeds are (in fractions of a second) 1, ½, ¼,  ,
,  ,
,  ,
,  ,
,  ,
,  ,
,  , and perhaps
  . Each speed is half the exposure of the previous one. If you go the other way, each is twice the speed of the previous one. Thus, if your exposure is second, you double the exposure by going to second. If your exposure is ¼ second, you double it by going to ½ second. So the camera’s shutter speeds tie in immediately with the zones.
There is another way to open up or close down a zone: by closing the aperture (i.e., the opening) of the lens. Look at the aperture settings, also known as the f/stops. They are f/2, f/2.8, f/4, f/5.6, f/8, f/11, f/16, f/22, and perhaps f/32, f/45, and f/64. Each of these numbers represents a halving of the aperture from the previous setting. Thus, f/5.6 admits half the light that f/4 admits. F/16 allows only half the light through the lens that f/11 allows. The higher the number, the smaller the aperture and the less light passes through the lens. Again, the camera and the zone system work together in harmony
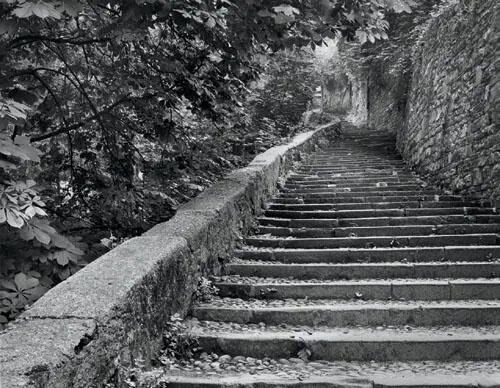
The photograph contains a full range of tonalities from black to white, yet there appear to be no jarring contrasts. There are small amounts of dodging and burning, but no extensive alterations.
Figure 8-2. Stairway to Cittá Alta, Bergamo, Italy
Table 8-1. Negative density and print tonal scale
Negative Density and Print Tonal Scale
THE NEGATIVE
ZONES
THE PRINT
″
″
″
″
12
13
Double the exposure of Zone
11
12
Paper Base white
Double the exposure of Zone
10
11
Paper Base white
Double the exposure of Zone
9
10
Paper Base white
Double the exposure of Zone
8
9
Paper Base white
Double the exposure of Zone
7
8
Very light gray—no visible textures, but tonally darker than pure white
Double the exposure of Zone
6
7
Light gray—clearly visible light textures
Double the exposure of Zone
5
6
Medium light gray
Double the exposure of Zone
4
5
Medium gray—the 18% gray card
Double the exposure of Zone
3
4
Medium dark gray
Double the exposure of Zone
2
3
Dark gray—clearly visible textures
Double the exposure of Zone
1
2
Very dark gray—no visible textures, but tonally lighter than black
First obvious density
1
Black (no real difference from Zone 0)
No density—film base fog
Читать дальшеИнтервал:
Закладка:
Похожие книги на «The Art of Photography: An Approach to Personal Expression»
Представляем Вашему вниманию похожие книги на «The Art of Photography: An Approach to Personal Expression» списком для выбора. Мы отобрали схожую по названию и смыслу литературу в надежде предоставить читателям больше вариантов отыскать новые, интересные, ещё непрочитанные произведения.


Обсуждение, отзывы о книге «The Art of Photography: An Approach to Personal Expression» и просто собственные мнения читателей. Оставьте ваши комментарии, напишите, что Вы думаете о произведении, его смысле или главных героях. Укажите что конкретно понравилось, а что нет, и почему Вы так считаете.