David Karlins - Adobe Illustrator CC For Dummies
Здесь есть возможность читать онлайн «David Karlins - Adobe Illustrator CC For Dummies» — ознакомительный отрывок электронной книги совершенно бесплатно, а после прочтения отрывка купить полную версию. В некоторых случаях можно слушать аудио, скачать через торрент в формате fb2 и присутствует краткое содержание. Жанр: unrecognised, на английском языке. Описание произведения, (предисловие) а так же отзывы посетителей доступны на портале библиотеки ЛибКат.
- Название:Adobe Illustrator CC For Dummies
- Автор:
- Жанр:
- Год:неизвестен
- ISBN:нет данных
- Рейтинг книги:5 / 5. Голосов: 1
-
Избранное:Добавить в избранное
- Отзывы:
-
Ваша оценка:
Adobe Illustrator CC For Dummies: краткое содержание, описание и аннотация
Предлагаем к чтению аннотацию, описание, краткое содержание или предисловие (зависит от того, что написал сам автор книги «Adobe Illustrator CC For Dummies»). Если вы не нашли необходимую информацию о книге — напишите в комментариях, мы постараемся отыскать её.
offers the guidance you need to turn your ideas into real drawings.
Written by an Illustrator trainer and expert, this book walks those new to the tool through the basics of drawing, editing, and applying the unique tools found in this popular program.
Create illustrations using simple shapes Touch up images using pen, pencil, and brush tools Import your illustrations into other graphic apps Apply special effects and add type This book is essential reading for new and beginning illustrators who are either adopting a digital tool for the first time, switching from an existing tool to Illustrator, or adding Illustrator know-how to existing Adobe knowledge.
Adobe Illustrator CC For Dummies — читать онлайн ознакомительный отрывок
Ниже представлен текст книги, разбитый по страницам. Система сохранения места последней прочитанной страницы, позволяет с удобством читать онлайн бесплатно книгу «Adobe Illustrator CC For Dummies», без необходимости каждый раз заново искать на чём Вы остановились. Поставьте закладку, и сможете в любой момент перейти на страницу, на которой закончили чтение.
Интервал:
Закладка:
Width and Height boxes define the width and height of your project. If you are generating multiple artboards, all the artboards will inherit this width and height. The Orientation options toggle between portrait and landscape orientation.
Units is where you choose a unit of measurement appropriate to your project: pixels for digital output or points, picas, inches, millimeters, or centimeters for print.
Bleed is relevant only for files sent directly to print production, such as postcards, posters, or other print media (for example, shirts or mugs). If you're preparing graphics to send directly to a print shop, consult with the printer on what kind of bleed to define, if any. (For an explanation of when and how to apply bleeds, see the “ Communicating with your printer” section, later in this chapter.
Color Mode options are RGB for screen output and CMYK for commercial printing.
Raster Effects settings define the resolution of bitmap effects (such as Photoshop Effects) applied to your illustration. For an explanation of raster effects, see Chapter 14.
Preview mode is normally left at the default setting. The Overprint option allows you to preview how commercial print output will look. Consult with your commercial printer on if, when, and how to use this option.
After you configure document settings, click Create Document.
 What if you change your mind about a document setting? You can change settings at any stage of a project by choosing File ⇒ Document Color Settings (for color mode) or File ⇒ Document Setup (for everything else, including units of measurement).
Deploying Artboards
As I briefly noted, the canvas is the area of the Illustrator workspace where you create graphics. The canvas is basically everything you see on the screen except the interface (such as the menu, Control panel, and other panels). I walk through the non-canvas sections of the workspace in Chapter 1.
Within the canvas, artboards are discrete, sized spaces that make it easy to export, share, or print sections of the canvas. That’s a lot of workflow help!
Here’s how I like to think about artboards: They are both coherent and discrete. Too philosophical? Okay, here’s the point: Artboards inherit and share many properties of the document they lie within, such as color mode or raster effect resolution. (I explain these options earlier in the chapter in the “ Defining color mode, artboard size, and raster resolution” section.) And that’s nice because it means you can work on different graphics, including differently sized graphics, with shared properties.
For example, you might have a project where you design a print poster, palm card, and plastic banner for an event. Although these will be different in size, they will likely use the same set of colors and maybe other features such as symbols (which I explain in Chapter 10).
Or you might use multiple artboards of the same size to prepare a prototype of a mobile app that shows different states of user interaction. Here, dozens of artboards might be helpful. Again, this project has common document properties that apply to all artboards, such as RGB color and pixels as the unit of measurement.
To help you get your money’s worth out of artboards, I first review some basic rules for creating and using them. Then I walk you through the two scenarios I just identified — print project and app prototype — to help you understand the efficacy of artboards and to expose you to key techniques for deploying artboards.
Defining artboards
You can have 1 to 1,000 artboards per document. I’ve never used 1,000 artboards in a project, but it’s nice to know they’re there if I need them. As I explain in the beginning of this chapter, you can set the number of artboards for a document when you first create it, but you can also add and remove artboards after you begin work on a document.
The Artboard tool is part of the Basic toolset (I explain how to manage tools in Chapter 1). You create artboards in a document by selecting the Artboard tool and drawing interactively on the canvas, as shown in Figure 2-3.
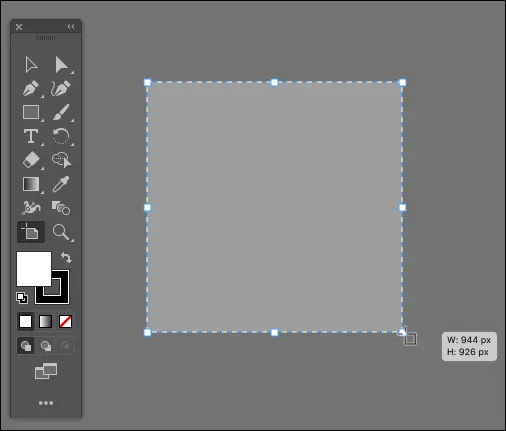
FIGURE 2-3:Drawing an artboard.
Or you can generate an artboard by clicking the New Artboard icon in the Artboard pane or the Control (or Properties) panel. The Artboard Options dialog shown in Figure 2-4 opens.
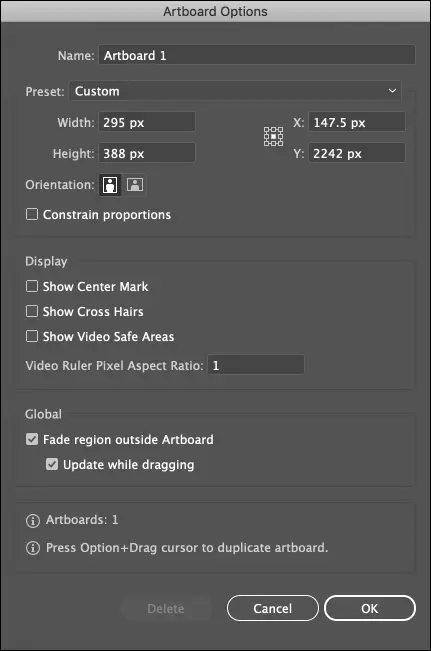
FIGURE 2-4:Generating an artboard with the Artboard Options dialog.
Generating an artboard allows you to name the artboard as you create it, along with defining the dimensions and location digitally.
You can manage artboards in many ways. The following shows you how to define and take advantage of the artboard options I think you’ll find helpful in organizing and sharing projects.
To resize or move an artboard interactively, follow these steps:
1 With the Artboard tool, click once inside the artboard.
2 Drag to move the artboard, as shown in Figure 2-5.
3 Click and drag on a side or corner (square-shaped) bounding box to resize the artboard, as shown in Figure 2-6.
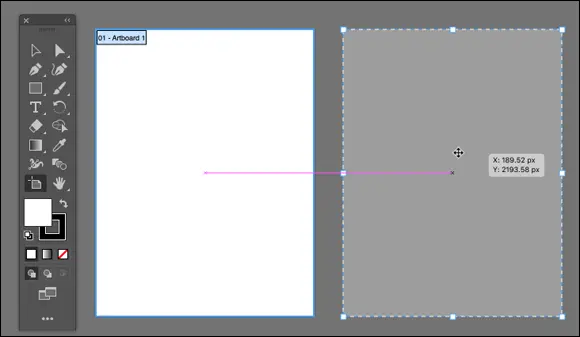
FIGURE 2-5:Moving an artboard.
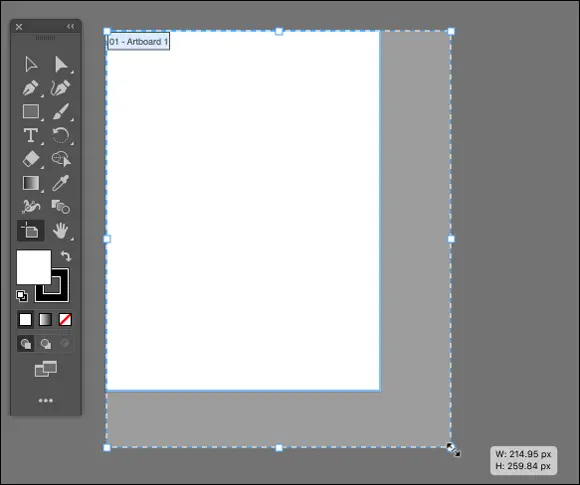
FIGURE 2-6:Resizing an artboard.
You can change any artboard property by using the Control or Properties panel:
The Presets drop-down provides quick access to commonly used sizes. My favorite feature here is the Fit to Artwork Bounds option, which resizes the selected artboard to shrink in size to where it just fits around all the artwork within it. By sizing an artboard to an exact fit around its content, you avoid exporting or printing blank space in your graphic.
The Name box is the easiest way to change the selected artboard name.
The Move/Copy Artwork with Artboard option is on by default but can be turned off if you want to move an artboard while leaving the content where it is.
The Artboard Options box opens a dialog with options that apply to all selected artboards in a document. I find the Show Center Mark useful when centering content in an artboard. You can use this dialog also to rename multiple selected artboards with sequential numbering. For example, if I rename a bunch of selected artboards DK, I end up with DK-1, DK-2, DK-3, and so on.
The X value in the Control panel defines the vertical location; the Y value defines the horizontal location.
The Width and Height values resize the artboard. Use the lock icon to lock the height-to-width aspect ratio while you resize.
The Rearrange All icon opens up a panel with different options for arranging your artboards in an orderly way on the canvas.
A couple of other artboard essential tips:
To hide all objects that are not within an artboard, choose View ⇒ Trim.
To delete an artboard, select it with the Artboard tool and click Delete.
Using artboards for a multidimensional project
Интервал:
Закладка:
Похожие книги на «Adobe Illustrator CC For Dummies»
Представляем Вашему вниманию похожие книги на «Adobe Illustrator CC For Dummies» списком для выбора. Мы отобрали схожую по названию и смыслу литературу в надежде предоставить читателям больше вариантов отыскать новые, интересные, ещё непрочитанные произведения.


Обсуждение, отзывы о книге «Adobe Illustrator CC For Dummies» и просто собственные мнения читателей. Оставьте ваши комментарии, напишите, что Вы думаете о произведении, его смысле или главных героях. Укажите что конкретно понравилось, а что нет, и почему Вы так считаете.