Bill Evans - Banjo For Dummies
Здесь есть возможность читать онлайн «Bill Evans - Banjo For Dummies» — ознакомительный отрывок электронной книги совершенно бесплатно, а после прочтения отрывка купить полную версию. В некоторых случаях можно слушать аудио, скачать через торрент в формате fb2 и присутствует краткое содержание. Жанр: unrecognised, на английском языке. Описание произведения, (предисловие) а так же отзывы посетителей доступны на портале библиотеки ЛибКат.
- Название:Banjo For Dummies
- Автор:
- Жанр:
- Год:неизвестен
- ISBN:нет данных
- Рейтинг книги:3 / 5. Голосов: 1
-
Избранное:Добавить в избранное
- Отзывы:
-
Ваша оценка:
Banjo For Dummies: краткое содержание, описание и аннотация
Предлагаем к чтению аннотацию, описание, краткое содержание или предисловие (зависит от того, что написал сам автор книги «Banjo For Dummies»). Если вы не нашли необходимую информацию о книге — напишите в комментариях, мы постараемся отыскать её.
Thanks to its prevalence in folk and bluegrass, the banjo is almost the very essence of Americana. And now a new generation of musicians from the country, pop, and jazz worlds have made the sound of the banjo new again. This book is for anyone who wants to pay their respects to tradition as well as those who want to create the next chart-topper … or both! Packed with the essentials you need to know—from top techniques to choosing the right instrument—you'll learn, and be able to show off, just why the banjo is
out of style!
Tackle the basics with chords and simple picking patterns Explore historic, traditional, and modern styles Get connected with the banjo world Go beyond the book with online lessons
Banjo For Dummies — читать онлайн ознакомительный отрывок
Ниже представлен текст книги, разбитый по страницам. Система сохранения места последней прочитанной страницы, позволяет с удобством читать онлайн бесплатно книгу «Banjo For Dummies», без необходимости каждый раз заново искать на чём Вы остановились. Поставьте закладку, и сможете в любой момент перейти на страницу, на которой закончили чтение.
Интервал:
Закладка:
 You can find out just how much pressure you need by placing a finger in a fretted position, just barely touching the string. Now gradually apply more pressure on the string with the left-hand finger, striking it repeatedly with the right hand as you go. You literally hear the sound come into focus as you fret. After you've passed the threshold where the sound is clear, note how much pressure you're using with the left-hand finger. If you're like most people, you may be surprised at how little effort it takes to cleanly fret with the left-hand fingers. The goal is to use just as much pressure as you need to get a clear fretted sound, but no more.
 Watch Video Clip 2 to see how I put these fretting tips into action, and if you want to check out some more advanced left-hand techniques such as the slide, hammer-on, pull-off, and choke, turn to Chapter 6with your right hand as soon as possible.
Fingering G, D7, and C Chords
The first time you discover how to fret a chord on your banjo is a very big moment in your burgeoning playing career. Whether you're blazing through a banjo breakdown or accompanying a campfire singer, chords are essential to playing the banjo. In this section, you master the three basic chords used in thousands of songs. If the world suddenly seems like a much better place after you've successfully fretted each of the chords in this section, that's a good indication that you were born to be a banjo player.
After you've mastered each chord by itself, try moving from one chord to the next, in any order that strikes your fancy. Strum with a downward right-hand thumb motion across all five strings a few times for each new chord and strive for a clear, ringing sound from each string for all three chords. This stuff is pretty exciting, isn't it? You'll put these chords to use later in this chapter.
Try to keep the tips of your left-hand fingers close to the neck and pointed towards the fingerboard at all times as you move from one chord to the next. At first, you may have to move one left-hand fretting finger at a time as you work the different chord fingerings into your motor memory. However, in the long run, fretting all the strings you need for a chord at the same time is more efficient. After you've mastered this skill, you can switch between chords with greater speed and accuracy.
The G chord: Real easy
Although people very seldom associate the banjo with Zen, you really don't have to fret anything at all to play the G chord, grasshopper! A G chord is just the sound of your right hand strumming the open strings in G tuning (see Chapter 2for more tuning info). You could use your left hand to wave to your adoring fans, but I think it may be a little early for these kinds of grand gestures.
The D7 chord: A little harder
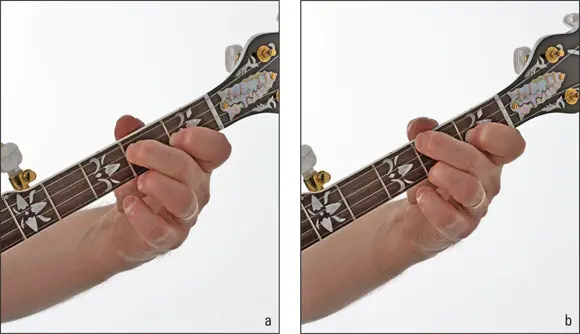
For the D7 chord, you place your middle finger just behind the 2nd fret of the 3rd string and your index finger behind the 1st fret of the 2nd string. Try strumming down across all five strings with your right-hand thumb, starting with the 5th string and striking each note down to the 1st string. Try a slow strum to check the accuracy of your fretting on each individual string, but then don't be afraid to go wild with some fast strumming to strut your stuff!
The C chord: More challenging still
The C chord is a bit harder than the D7 chord (see the preceding section) because you use one more left-hand finger to fret this chord. Here, the left-hand index frets the 2nd string, 1st fret — just as with the D7 chord. However, now you move your middle finger to the 4th string, 2nd fret, and you also need to fret the 1st string at the 2nd fret. Be careful that you fret the 4th and 2nd strings with enough of a vertical angle with your left-hand fingers so you don't block the sound of the open 3rd string.
Your hand should look something like Figure 3-7 when you fret the D7 and C chords.
Seeing is believing, so if you're having trouble figuring out how to fret these chords, take a look at Video Clip 2, where I provide left-hand technique tips and show you how to fret the C and D7 chords.
Photographs by Anne Hamersky
FIGURE 3-7:Here's how your hand looks fretting the D7 (a) and C (b) chords. Note the position of the thumb.
Checking Out Chord Diagrams
Looking for an easy way to remember how to fret a chord with your left-hand fingers? A chord diagram not only communicates which strings are fretted for a particular chord but also where on the fingerboard you put those fingers and which left-hand finger you use to fret each string.
 Chord diagrams aren't the same as banjo tablature, which is the written form of banjo music that I explain in Chapter 4. Chord diagrams show you how to fret a chord with the left hand, but they don't tell you what to play with it. However, when you play with others, you use chords all the time. Chords are also the basic building blocks of just about every melody, and the following sections help you get comfortable reading chord diagrams.
Reading a chord diagram
If you're already familiar with reading chord diagrams for the guitar, you’ll find that banjo players use the same system. If you turn your banjo around so that the fingerboard faces you, that's how the banjo neck is represented in a chord diagram (check out Figure 3-8 to more fully break down the parts of a chord diagram):
From left to right, the vertical lines represent the 4th, 3rd, 2nd, and 1st strings on your banjo. Most banjo chord diagrams don't include the 5th string, because you rarely fret it, especially when you're just beginning to play.
The top horizontal line represents the banjo nut. The nut is what guides the strings from the fingerboard to the peghead. One way to think of the nut is as a “0” fret, because your banjo strings are open at this location on the neck.
The second line from the top stands for your banjo's 1st fret, and the line below that represents the 2nd fret, and so on.
The black dots that appear on the vertical string lines indicate behind what fret and on what strings you should fret.
The letters located underneath the chord diagram indicate the left-hand finger you use to fret each string. For the left hand, I = index finger; M = middle finger; R = ring finger; and P (or sometimes L) = pinkie (or little) finger. Some books use the numbers 1 through 4 to represent the left-hand fingers in the same way.
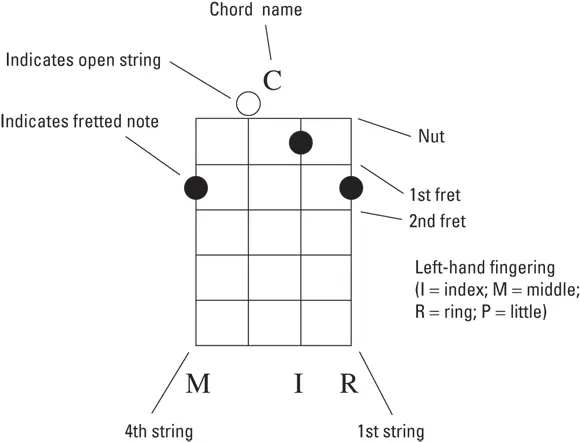
Illustration by Wiley, Composition Services Graphics
FIGURE 3-8:The chord diagram for a C chord.
Check out the chord diagrams for G, D7, and C chords in Figure 3-9. Of course, there are lots of other chords you can play on the banjo, and Appendix Ahas most of them. My advice is to tackle just one or two new chords at a time, practicing them when they appear in a new song. Don't try to learn them all at once without playing a song where you can put them to good use.
Интервал:
Закладка:
Похожие книги на «Banjo For Dummies»
Представляем Вашему вниманию похожие книги на «Banjo For Dummies» списком для выбора. Мы отобрали схожую по названию и смыслу литературу в надежде предоставить читателям больше вариантов отыскать новые, интересные, ещё непрочитанные произведения.


Обсуждение, отзывы о книге «Banjo For Dummies» и просто собственные мнения читателей. Оставьте ваши комментарии, напишите, что Вы думаете о произведении, его смысле или главных героях. Укажите что конкретно понравилось, а что нет, и почему Вы так считаете.