Inserting Symbols and Special Characters
Sometimes you need to add symbols and special characters in a document that aren't keys on your keyboard. For example, you may need to insert the copyright symbol into a copyright statement.
It's easy to insert symbols and other special characters into your text. Start by placing your cursor where you want to insert the symbol and/or special character. Next follow these steps:
1 Click the Insert menu option.
2 In the ribbon, click the Symbol icon in the Symbols area.
3 Click More Symbols in the drop‐down menu.
The Symbols dialog box appears and displays 20 common symbols in the drop‐down menu. Add one of the symbols to your text by clicking it. If you want to view all the symbols and special characters that you can add, click More Symbols.
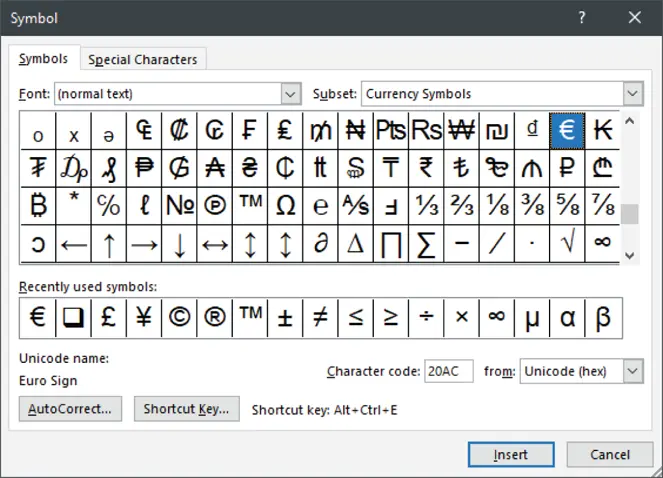
The Symbol window appears, as shown in Figure 2.3, and displays many more common symbols on the Symbols tab.

FIGURE 2.3Symbol window
Scroll up and down the list of symbols. When you find the one you want, click it and select Insert.
Different font sets often have different symbols in them. You can change the font by clicking (Normal Text) in the Font box to choose the font set that you want to use from the drop‐down list.
You can also choose from font subsets so you don't have to scroll through hundreds of symbols to find the right one. For example, subsets include currency, subscript, and superscript symbols. Click Currency Symbols in the Subset box to view all the subsets in the drop‐down list. When you select a subset, the symbols in that subset appear in the dialog box so that you can select one.
Click the AutoCorrect button to add a word or phrase. You can type text within parentheses to insert a symbol or special character automatically. For example, when you type (c), AutoCorrect replaces that text with the © symbol.
Click the Shortcut Key button under the list of symbols to open the Customize Keyboard dialog box and tell Word to add the symbol when you press a combination of keys on your keyboard. Many symbols already have a shortcut key combination assigned to them. If one is assigned, the combination appears to the right of the Shortcut Key button.
Word also allows you to insert a variety of special characters. Click the Special Characters tab to view the list of characters. The list shows you what the character looks like (if applicable), the name of the character, and the corresponding shortcut key.
Click Insert to insert the symbol or special character where your cursor is positioned in the document. The dialog box stays open in the Word window so that you can insert multiple symbols and/or special characters if you want. When you're done, click the Close button.
EXERCISE 2.1 Finding and Replacing Text
1 Open a new document and type several paragraphs of text or open an existing document.
2 Move the cursor to the beginning of your document.
3 Open the Find And Replace dialog box.
4 Enter a word that contains at least one capital letter that you want to replace.
5 Enter the replacement word.
6 Match the case of the word that you want to replace from step 4.
7 Click the Replace All button.
8 Click OK in the dialog box that tells you how many changes Word made.
9 Save and close your document.
Formatting Text and Paragraphs
Word processors have always had the ability to format text and paragraphs from the time Michael Shrayer Software produced the program Electric Pencil in December 1976. As word processors have grown in ability and complexity over the years, especially on Windows and other graphical user interfaces (GUIs) , you can create and apply all sorts of formatting that conveys the message you want to send in your documents.
Word includes several text effects that not only ensure that your text appears the way you want it to, but that also apply graphical pizzazz to your text to make it stand out. Here's how to apply text effects:
1 Select the text that you want to change.
2 In the Home ribbon, click the Text Effects And Typography icon in the Font area.
3 Click one of the 15 text effects icons shown in Figure 2.4to apply that effect. FIGURE 2.4Text Effects menu
4 Move the mouse pointer over one of the following seven effects to customize each effect in the side menu before you apply them:
Outline: Sets outline colors, weights, and line styles
Shadow: Changes shadow settings
Reflection: Changes settings for a reflection, which is a drop shadow underneath the word that fades from top to bottom
Glow: Sets the glow type, colors, and other options
Number Styles: Sets one of five numbering format styles, such as proportional old‐style numbering
Ligatures: Sets the ligature style for your text
Stylistic Sets: Selects one of the built‐in style sets that come with your font
Applying Formatting by Using Format Painter
The Format Painter feature is a quick and easy way to apply formatting from selected text or an entire paragraph to another block of text or a paragraph. Follow this process to get started:
1 Select the text or click text in a paragraph that has the formatting you want to copy.
2 Click the Home menu option if it's not selected already.
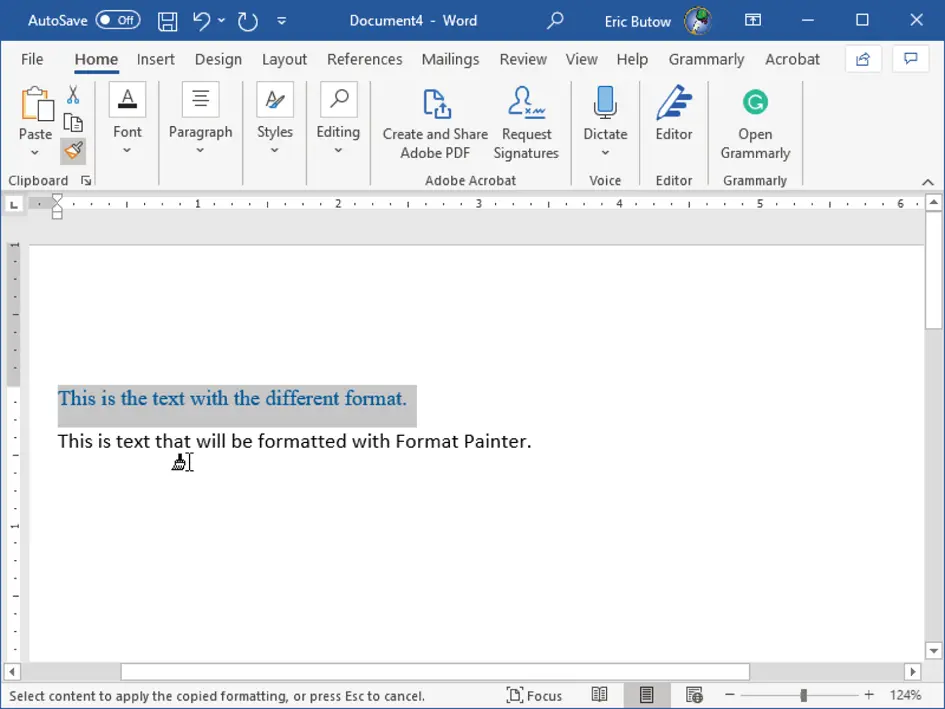
3 In the Home ribbon, click the Format Painter icon in the Clipboard area, as shown in Figure 2.5.
The mouse pointer changes to a cursor icon combined with a paintbrush. Now you can select a block of text or click inside a paragraph. The text or paragraph that you selected now shows the format you copied.
 This process works only once, but you can change the format of multiple blocks of text or paragraphs. After you select the text with the formatting you want to copy, double‐click the Format Painter icon in the Home toolbar and then select the text and/or paragraphs. When you're done, press the Esc key.
Setting Line and Paragraph Spacing and Indentation
You may need to change spacing between lines and/or paragraphs for readability, or because of requirements from another company or people (like book editors).

FIGURE 2.5Format Painter icon
When you want to set line spacing, place the cursor where you want to start the different line and paragraph spacing, or select the text that will have the different line spacing. In the Home ribbon, click the Line And Paragraph Spacing icon in the Paragraph area.
Now you can select one of the built‐in line spacing amounts, as shown in Figure 2.6. For example, clicking 2.0 means that you will see double‐spaced lines as you type.
Below the list of built‐in line spacing amounts, click Line Spacing Options to open the Paragraph dialog box to set line and paragraph spacing (as well as indents).
You can change paragraph spacing from the Home and Layout menu ribbons.
Home Ribbon If you want to look at a paragraph's spacing as you make changes, click Add Space Before Paragraph and/or Remove Space After Paragraph in the menu. Word adds a small space above or below so that you can see if you like it.
Читать дальше


 This process works only once, but you can change the format of multiple blocks of text or paragraphs. After you select the text with the formatting you want to copy, double‐click the Format Painter icon in the Home toolbar and then select the text and/or paragraphs. When you're done, press the Esc key.


