Doug Lowe - Electronics All-in-One For Dummies
Здесь есть возможность читать онлайн «Doug Lowe - Electronics All-in-One For Dummies» — ознакомительный отрывок электронной книги совершенно бесплатно, а после прочтения отрывка купить полную версию. В некоторых случаях можно слушать аудио, скачать через торрент в формате fb2 и присутствует краткое содержание. Жанр: unrecognised, на английском языке. Описание произведения, (предисловие) а так же отзывы посетителей доступны на портале библиотеки ЛибКат.
- Название:Electronics All-in-One For Dummies
- Автор:
- Жанр:
- Год:неизвестен
- ISBN:нет данных
- Рейтинг книги:5 / 5. Голосов: 1
-
Избранное:Добавить в избранное
- Отзывы:
-
Ваша оценка:
Electronics All-in-One For Dummies: краткое содержание, описание и аннотация
Предлагаем к чтению аннотацию, описание, краткое содержание или предисловие (зависит от того, что написал сам автор книги «Electronics All-in-One For Dummies»). Если вы не нашли необходимую информацию о книге — напишите в комментариях, мы постараемся отыскать её.
Electronics All-in-One For Dummies,
Electronics All-in-One For Dummies
Electronics All-in-One For Dummies — читать онлайн ознакомительный отрывок
Ниже представлен текст книги, разбитый по страницам. Система сохранения места последней прочитанной страницы, позволяет с удобством читать онлайн бесплатно книгу «Electronics All-in-One For Dummies», без необходимости каждый раз заново искать на чём Вы остановились. Поставьте закладку, и сможете в любой момент перейти на страницу, на которой закончили чтение.
Интервал:
Закладка:
Wire comes in these two basic types:
Solid wire: Made from a single piece of metal
Stranded wire: Made of a bunch of smaller wires woven together
Figure 3-11 shows both types of wire with the insulation stripped back so you can see the difference.
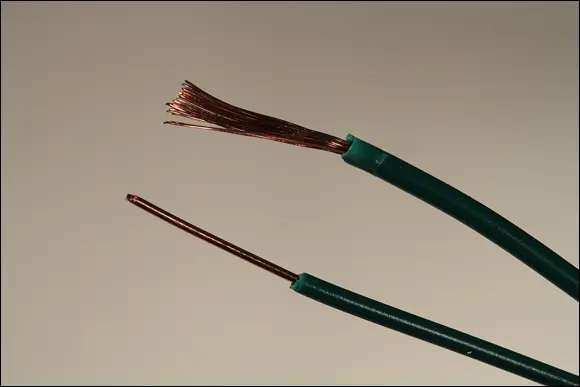
FIGURE 3-11:Solid and stranded wire.
For most purposes in this book, you’ll want to work with solid wire because it’s easier to insert into breadboard holes and other types of terminal connections. Solid wire is also easier to solder. When you try to solder stranded wire, inevitably one of the tiny strands gets separated from the rest of the strands, which can create the potential for a short circuit.
On the other hand, stranded wire is more flexible than solid wire. If you bend a solid wire enough times, you’ll eventually break it. For this reason, wires that are frequently moved are usually stranded.
Wire comes in a variety of sizes, which are specified by the wire’s gauge, and is generally coiled in or on the packaging. Strangely, the larger the gauge number, the smaller the wire. For most electronics projects, you’ll want 20- or 22-gauge wire. You’ll need to use large wires (usually 14 or 16 gauge) when working with household electrical power.
Finally, you may have noticed that the insulation around a wire comes in different colors. The color doesn’t have any effect on how the wire performs, but it’s common to use different colors to indicate the purpose of the wire. For example, in DC circuits it’s common to use red wire for positive voltage connections and black wire for negative connections.
To get started, I suggest you purchase a variety of wires — at least four rolls: 20-gauge solid, 20-gauge stranded, 22-gauge solid, and 22-gauge stranded. If you can find an assortment of colors, all the better.
 In addition to wires on rolls, you may also want to pick up jumper wires, which are precut, stripped, and bent for use with solderless breadboards. Figure 3-12 shows an assortment I bought at RadioShack for about $6.
Batteries
Don’t forget the batteries! Most of the circuits covered in this book use either AA or 9-volt batteries, so you’ll want to stock up.
If you want, you can use rechargeable batteries. They cost more initially, but you don’t have to replace them when they lose their charge. If you use rechargeables, you’ll also need a battery charger.
To connect the batteries to the circuits, you’ll want to get several AA battery holders. Get one that holds two batteries and another that holds four. You should also get a couple of 9-volt battery clips. These holders and clips are shown in Figure 3-13.
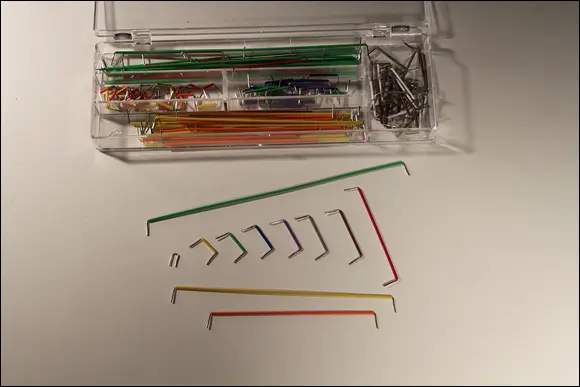
FIGURE 3-12:Jumper wires for working with a solderless breadboard.
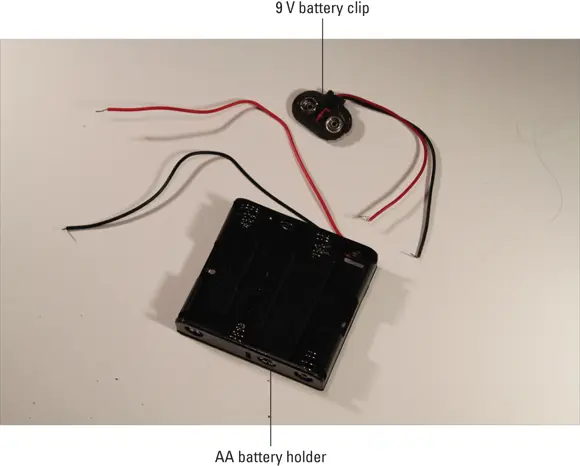
FIGURE 3-13:Battery holders will help deliver power to your circuits.
Other things to stock up on
Besides all the stuff I’ve listed so far, here are a few other items you may need from time to time:
Electrical tape: Get a roll or two of plain black electrician’s tape. You’ll use it mostly to wrap around temporary connections to hold them together and keep them from shorting out. Do yourself a favor, and don’t waste time with cheap electrical tape. There’s a huge difference in quality. In my opinion, far and away the best electrical tape is Scotch Super 33+ Vinyl Electrical Tape. It’s about twice as expensive as bargain-basement tape, but you won’t regret spending a few extra dollars.
Compressed air: A small can of compressed air can come in handy to blow dust off an old circuit board or component.
Cable ties: Also called zip ties , these little plastic ties are handy for temporarily (or permanently) holding wires and other things together.
Jumper clips: These are short (typically 12 or 18 inches) wires that have alligator clips attached on either end, as shown in Figure 3-14. You’ll use them to make quick connections between components for testing purposes.
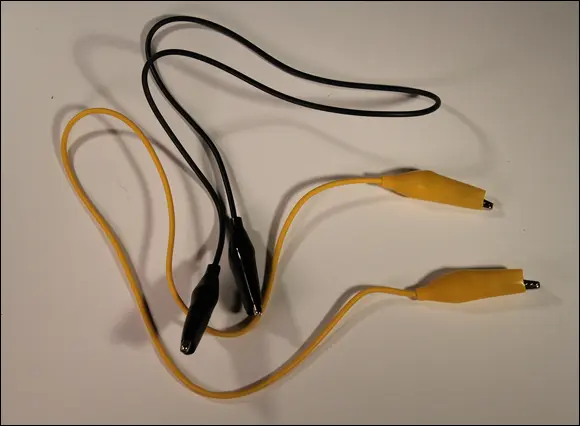
FIGURE 3-14:Jumper clips are great for making quick connections.
Stocking up on Basic Electronic Components
Besides all the tools and supplies I’ve described so far in this chapter, you’ll also need to gather a collection of inexpensive electronic components to get you started with your circuits. You don’t have to buy everything all at once, but you’ll want to gather at least the basic parts before you go much farther in this book.
Unfortunately, most communities don’t have a store where you can buy these components in person. (If you’re lucky enough to have a specialty electronics store in your community, purchase your parts from them to help these local businesses stay open!) If you don’t have a local supplier, you can buy the parts online from Amazon ( www.amazon.com ), Jameco ( www.jameco.com ), RadioShack ( www.radioshack.com ), or any other electronic parts distributor.
Resistors
A resistor is a component that resists the flow of current. It’s one of the most basic components used in electronic circuits; in fact, you won’t find a single circuit anywhere in this book that doesn’t have at least one resistor. Figure 3-15 shows three resistors, next to a penny so you can get an idea of how small they are. You’ll learn all about resistors in Book 2, Chapter 2.
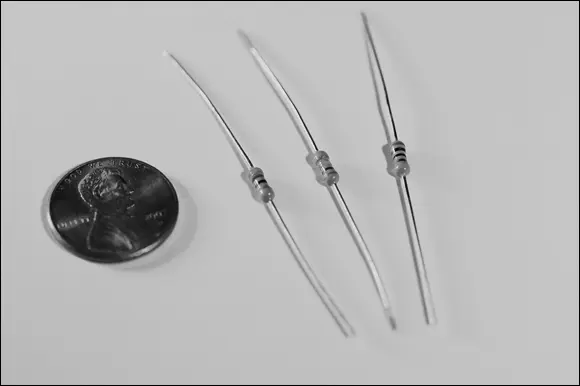
FIGURE 3-15:Resistors are one of the most commonly used circuit components.
Resistors come in a variety of resistance values (how much they resist current, measured in units called ohms and designated by the symbol Ω) and power ratings (how much power they can handle without burning up, measured in watts).
All the circuits in this book can use resistors rated for one-half watt. You’ll need a wide variety of resistance values. I recommend you buy at least 10 each of the following 12 resistances:
| 470 Ω | 4.7 kΩ | 47 kΩ | 470 kΩ |
| 1 kΩ | 10 kΩ | 100 kΩ | 1 MΩ |
| 2.2 kΩ | 22 kΩ | 33 kΩ | 220 kΩ |
You can save money by purchasing a package that contains a large assortment of resistors. For example, most suppliers sell a package that contains an assortment of 500 or so resistors — at least 10 of all values listed here, plus a few others, for about $15.
Capacitors
Next to resistors, capacitors are probably the second most commonly used component in electronic circuits. A capacitor is a device that can temporarily store an electric charge. You learn all about capacitors in Book 2, Chapter 3. Figure 3-16 shows some capacitors.
Читать дальшеИнтервал:
Закладка:
Похожие книги на «Electronics All-in-One For Dummies»
Представляем Вашему вниманию похожие книги на «Electronics All-in-One For Dummies» списком для выбора. Мы отобрали схожую по названию и смыслу литературу в надежде предоставить читателям больше вариантов отыскать новые, интересные, ещё непрочитанные произведения.


Обсуждение, отзывы о книге «Electronics All-in-One For Dummies» и просто собственные мнения читателей. Оставьте ваши комментарии, напишите, что Вы думаете о произведении, его смысле или главных героях. Укажите что конкретно понравилось, а что нет, и почему Вы так считаете.