Heather Smith - Xero For Dummies
Здесь есть возможность читать онлайн «Heather Smith - Xero For Dummies» — ознакомительный отрывок электронной книги совершенно бесплатно, а после прочтения отрывка купить полную версию. В некоторых случаях можно слушать аудио, скачать через торрент в формате fb2 и присутствует краткое содержание. Жанр: unrecognised, на английском языке. Описание произведения, (предисловие) а так же отзывы посетителей доступны на портале библиотеки ЛибКат.
- Название:Xero For Dummies
- Автор:
- Жанр:
- Год:неизвестен
- ISBN:нет данных
- Рейтинг книги:5 / 5. Голосов: 1
-
Избранное:Добавить в избранное
- Отзывы:
-
Ваша оценка:
Xero For Dummies: краткое содержание, описание и аннотация
Предлагаем к чтению аннотацию, описание, краткое содержание или предисловие (зависит от того, что написал сам автор книги «Xero For Dummies»). Если вы не нашли необходимую информацию о книге — напишите в комментариях, мы постараемся отыскать её.
Xero For Dummies,
Xero For Dummies
Xero For Dummies
Xero For Dummies — читать онлайн ознакомительный отрывок
Ниже представлен текст книги, разбитый по страницам. Система сохранения места последней прочитанной страницы, позволяет с удобством читать онлайн бесплатно книгу «Xero For Dummies», без необходимости каждый раз заново искать на чём Вы остановились. Поставьте закладку, и сможете в любой момент перейти на страницу, на которой закончили чтение.
Интервал:
Закладка:
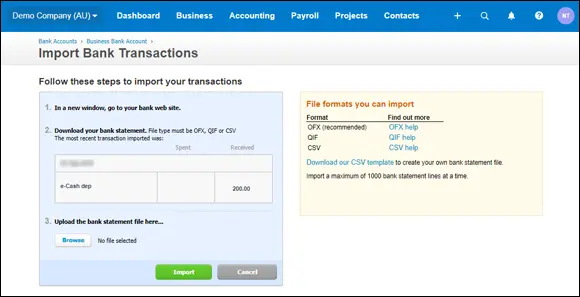
4 Make sure that the date format reflects the transactions that you’re importing.You are prompted to confirm the date format; remember that this format will be used in future. If you need to change it, click on the drop-down menu and select your preferred date format.
5 Check the box labelled Don’t Import the First Line.You check this box because the first line is a column heading.
6 Once you’re satisfied the data suitably matches, click the green Save button.A pop up window confirms statement lines were imported.
7 Click OK.The Bank Reconciliation window opens, because the imported transactions need to be reconciled — see Chapter 8for guidance on reconciling bank transactions.
8 Process the other bank transactions files by repeating Steps 1 to 7.
Source: Xero 2022
FIGURE 3-8:The Statement Import Options window.
Manual journals
Xero does not recommend importing manual journals during the conversion process because, preferably, transactions should be allocated to the correct area rather than via a manual journal. If you do decide entering a manual journal is the best solution, remember that only a user with Standard user status and above can access the manual journal area.
To import manual journals into Xero, follow these steps:
1 From the dashboard, users with Adviser access go to Accounting → Advanced → Manual Journals, and then click the Import button. Users with Standard user access go to Accounting → Reports → Journal Reports and then click the Add New Journal hyperlink.The Import Manual Journal window opens.
2 Click the Browse button to select the required file and then click the blue Import button.For example, you could select the ManualJournalsImport.csv file from the DataReadyForImporting folder in the CONVERSION folder.To create a single draft manual journal, use the same date and narration for each line that you enter. To create multiple draft manual journals, enter a new narration, a different date, or both, for each separate journal you want to create.Clicking the Import button displays a report on the impending import process in the Import Manual Journal window. It stresses the action cannot be undone!
3 Review the report integrity.If further editing of the data is required, click the grey Go Back button and review the imported data file.
4 Once satisfied, click the green Complete Import button to import the manual journal(s).The imported data is classified as a draft manual journal on the Manual Journals dashboard.
5 Post the journal entry by clicking on it, reviewing that the details are complete and correct, and clicking the green Post button.This is a journal entry so debits must equal credits. Also, check the consumer tax has been applied as required. The manual journal is now listed as a posted manual journal.
6 Process the other imported manual journals by repeating Steps 1 to 5.
Fixed assets
Only a user with Adviser status can tackle some of the processes related to fixed assets. To import fixed assets into Xero, follow these steps:
1 From the Xero Dashboard go to Accounting → Advanced → Fixed Assets and click on the Import button.To set up the Start Date, check out Chapter 14(the Start Date is the date that you want Xero to start calculating depreciation on your registered fixed assets).The Import Fixed Assets window opens.
2 Make sure that the asset types in the file exist in Xero.To set up new asset types, see Chapter 14.
3 Select your preferred date format from the drop-down menu.
4 Click the Browse button to select the required file and then click the blue Continue button.For example, you could select the FixedAssetsImport.csv file from the DataReadyForImporting folder in the CONVERSION folder.Clicking the Import button opens the Import Fixed Assets window, which provides a report on the impending import process, and highlights the action can’t be undone.
5 Review the report integrity.If further editing of the fixed asset data is required, click the grey Back button and review the imported data file.
6 Once satisfied, click the Import button.The fixed assets are imported as a draft.
7 Review the imported fixed assets by clicking on the individual asset under the Draft tab and updating the details as required.See Chapter 14for guidance on fixed asset details.
8 Once satisfied, a user with Adviser status can move the fixed asset from the Draft tab to the Registered tab by clicking the check box beside it and clicking the Register button.The asset is now a part of the Fixed Asset Register.
9 Check the details of the other imported fixed assets and register them by repeating Steps 7 to 8.
Unpresented payments or uncleared funds
At conversion date, the bank balance in Xero should match the Trial Balance from the old system. The Trial Balance is a standard document you should find in the Reports section of your accounting system. If it does, hurrah! Break out the chocolate and skip this section!
If the balances don’t match, it may be because a supplier has been paid but the cheque or payment hasn’t been presented on the bank statement or, vice versa, you’ve paid a client by cheque and it’s not cleared yet. This payment or receipt eventually hits the bank statement, and the Xero bank balance. Follow these steps to prepare the accounts in anticipation of this:
1 Identify the balance of unpresented payments or uncleared funds by running a bank reconciliation in the old system as at the conversion date.
2 Create an asset account in Xero called Uncleared Funds and a liability account in Xero called Unpresented Payments.Refer to Chapter 2for information on creating new accounts. Select the option Show on Dashboard. The goal of this exercise is to return the balance to nil and, once at nil, you’d remove this option from the two accounts.
3 Enter the balances identified in Step 1 in the Uncleared Funds and Unpresented Payments conversion balance.
4 Pre-empt the transactions hitting the bank statement by entering the individual transactions identified in Step 1 as Spend Money and Receive Money transactions.Allocate the Spend Money transactions to the Unpresented Payments account.Allocate the Receive Money transactions to the Uncleared Funds account.See Chapter 8for information on Spend Money and Receive Money transactions.Consumer tax has already been reflected in your conversion figures, so allocate a not reportable tax rate to all transactions entered here.
5 When payments are recognised in the bank statements, code them in Xero to the Uncleared Funds and Unpresented Payments accounts.
6 Check off the payments as they’re recognised.The amount entered into the conversion balance should be reduced to nil.
If that doesn’t sort out your balances, check transactions prior to the Trial Balance bank balance haven’t been included in Xero (which would mean they’ve been double counted). Double counted transactions need to be deleted — see Chapter 4.
Turning Off Your Old System
You and your staff may be feeling apprehensive about the big switcheroo — that is, moving your accounting operations entirely across to Xero. To ensure the move goes smoothly, you may need to manage staff expectations. If staff are involved in your accounting operations, incorporate them in the decision-making process, provide adequate training, and be prepared to answer their questions.
Questions staff (or you) have may include the following:
What if I need access to historical data?
How can we move to the new system?
Читать дальшеИнтервал:
Закладка:
Похожие книги на «Xero For Dummies»
Представляем Вашему вниманию похожие книги на «Xero For Dummies» списком для выбора. Мы отобрали схожую по названию и смыслу литературу в надежде предоставить читателям больше вариантов отыскать новые, интересные, ещё непрочитанные произведения.


Обсуждение, отзывы о книге «Xero For Dummies» и просто собственные мнения читателей. Оставьте ваши комментарии, напишите, что Вы думаете о произведении, его смысле или главных героях. Укажите что конкретно понравилось, а что нет, и почему Вы так считаете.