Wei-Meng Lee - C# 2008 Programmer's Reference
Здесь есть возможность читать онлайн «Wei-Meng Lee - C# 2008 Programmer's Reference» весь текст электронной книги совершенно бесплатно (целиком полную версию без сокращений). В некоторых случаях можно слушать аудио, скачать через торрент в формате fb2 и присутствует краткое содержание. Город: Indianapolis, Год выпуска: 2009, ISBN: 2009, Издательство: Wiley Publishing, Inc., Жанр: Программирование, на английском языке. Описание произведения, (предисловие) а так же отзывы посетителей доступны на портале библиотеки ЛибКат.
- Название:C# 2008 Programmer's Reference
- Автор:
- Издательство:Wiley Publishing, Inc.
- Жанр:
- Год:2009
- Город:Indianapolis
- ISBN:978-0-470-28581-7
- Рейтинг книги:4 / 5. Голосов: 1
-
Избранное:Добавить в избранное
- Отзывы:
-
Ваша оценка:
C# 2008 Programmer's Reference: краткое содержание, описание и аннотация
Предлагаем к чтению аннотацию, описание, краткое содержание или предисловие (зависит от того, что написал сам автор книги «C# 2008 Programmer's Reference»). Если вы не нашли необходимую информацию о книге — напишите в комментариях, мы постараемся отыскать её.
C# 2008 Programmer's Reference — читать онлайн бесплатно полную книгу (весь текст) целиком
Ниже представлен текст книги, разбитый по страницам. Система сохранения места последней прочитанной страницы, позволяет с удобством читать онлайн бесплатно книгу «C# 2008 Programmer's Reference», без необходимости каждый раз заново искать на чём Вы остановились. Поставьте закладку, и сможете в любой момент перейти на страницу, на которой закончили чтение.
Интервал:
Закладка:
Display titles by publisher:
ID="DropDownList1"
runat="server"
DataSourceID="LinqDataSource2"
DataTextField="pub_name"
DataValueField="pub_id"
AutoPostBack="True">
...
To place the ScriptManagercontrol on the page, you can either type it manually or drag the ScriptManagercontrol from the Toolbox and drop it onto the code editor.
Using the UpdatePanel Control
To delineate the part of the page you want to update without causing the entire page to refresh, drag and drop an UpdatePanel control from the AJAX Extensions tab of the Toolbox onto the Default.aspxpage, like this:
Display titles by publisher:
ID="DropDownList1"
runat="server"
DataSourceID="LinqDataSource2"
DataTextField="pub_name"
DataValueField="pub_id"
AutoPostBack="True">
...
The control divides a web page into regions — each region can be updated without refreshing the entire page. The element sets the template that defines the contents of the control.
Now, move a GridViewcontrol into the element so that the content of the GridViewcan be updated without causing a postback to the server:
AllowSorting="True"
AutoGenerateColumns="False" BackColor="LightGoldenrodYellow"
BorderColor="Tan"
...
Press F5 to test the application again. This time, edit the record by clicking the Edit link (see Figure 17-26). Notice that, as you click on the links (Edit, Update, Cancel, and Select), the page does not reload. Instead, all the changes happen inside the GridView control.
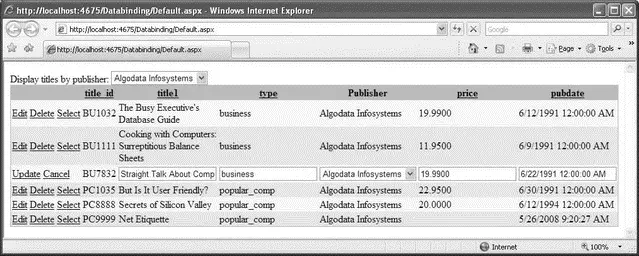
Figure 17-26
Using Triggers to Cause an Update
So far, you have used the control to enclose controls to ensure that changes in this control do not cause a postback to the server. If you select a publisher from the dropdown list, though, you will realize that the entire page is refreshed. By adding a trigger to the page, you can specify a control (and, optionally, its event) that causes an control to refresh. The trigger causes an update when the specified control raises an event. In other words, when a control specified by a trigger causes an update to a control located with an control, only the control is updated and not the entire page.
Here's the markup you need to add a trigger to an control:
...
Here, the control will refresh whenever the value of DropDownList1changes.
Press F5 to test the application. Now selecting a publisher from the dropdown list updates the GridViewcontrol without causing a refresh in the page.
Displaying Progress Using the UpdateProgress Control
The refreshing of the GridViewcontrol may happen very quickly on your computer because your web server is running locally. In the real world, there is network latency, and users may experience a delay but not be aware that a control is in the midst of a refresh. Therefore, it's important to give visual cues to users to let them know when an update is in progress.
You can display a progress report while an is being refreshed by using the control. Add the following to the source view of Default.aspx:
Display titles by publisher:
DataSourceID="LinqDataSource2"
DataTextField="pub_name" DataValueField="pub_id"
AutoPostBack="True">
Displaying titles...Please wait.
AllowPaging="True" AllowSorting="True"
AutoGenerateColumns="False"
BackColor="LightGoldenrodYellow" BorderColor="Tan"
...
To inject a delay, double-click on the dropdown list control and use the Sleep()method to insert a two-second delay:
protected void DropDownList1_SelectedIndexChanged(object sender, EventArgs e) {
System.Threading.Thread.Sleep(2000);
}
Within the element, you can embed a control such as an control or an control containing an animated GIF image to display some information to inform the user. Here, you display the message "Displaying titles… Please wait" (see Figure 17-27) to let the user know that the GridViewcontrol is updating.
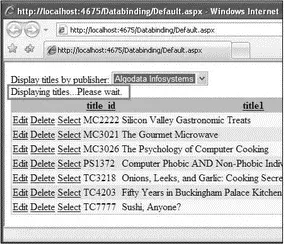
Figure 17-27
Press F5 to test the application.
Displaying a Modal Dialog Using the ModalPopupExtender Control
One problem with the current example is that when the user clicks the Delete link, the record in the GridViewcontrol is deleted straightaway. When you delete a record in the real world, it is always good to confirm the action with the user. In the Windows world, you can easily display a message box to let the user confirm the action. However, in a web application, it is slightly tricky.
The solution to this problem is to use the ModalPopupExtendercontrol available in the AJAX Control Toolkit. The ModalPopupExtendercontrol uses a popup to display content to the user in a modal fashion and prevents users from interacting with the rest of the page.
Let's modify the application to show a modal popup whenever the user tries to delete a record. Figure 17-28 shows the end result.

Figure 17-28
First, define the following CSS styles in the source view of the Default.aspxpage:
.modalBackground {
background-color:Blue;
filter:alpha(opacity=50);
opacity:0.5;
}
.dialog {
border-left:5px solid #fff;
border-right:5px solid #fff;
border-top:5px solid #fff;
border-bottom:5px solid #fff;
background:#ccc;
padding: 10px;
Интервал:
Закладка:
Похожие книги на «C# 2008 Programmer's Reference»
Представляем Вашему вниманию похожие книги на «C# 2008 Programmer's Reference» списком для выбора. Мы отобрали схожую по названию и смыслу литературу в надежде предоставить читателям больше вариантов отыскать новые, интересные, ещё непрочитанные произведения.


Обсуждение, отзывы о книге «C# 2008 Programmer's Reference» и просто собственные мнения читателей. Оставьте ваши комментарии, напишите, что Вы думаете о произведении, его смысле или главных героях. Укажите что конкретно понравилось, а что нет, и почему Вы так считаете.