Wei-Meng Lee - C# 2008 Programmer's Reference
Здесь есть возможность читать онлайн «Wei-Meng Lee - C# 2008 Programmer's Reference» весь текст электронной книги совершенно бесплатно (целиком полную версию без сокращений). В некоторых случаях можно слушать аудио, скачать через торрент в формате fb2 и присутствует краткое содержание. Город: Indianapolis, Год выпуска: 2009, ISBN: 2009, Издательство: Wiley Publishing, Inc., Жанр: Программирование, на английском языке. Описание произведения, (предисловие) а так же отзывы посетителей доступны на портале библиотеки ЛибКат.

- Название:C# 2008 Programmer's Reference
- Автор:
- Издательство:Wiley Publishing, Inc.
- Жанр:
- Год:2009
- Город:Indianapolis
- ISBN:978-0-470-28581-7
- Рейтинг книги:4 / 5. Голосов: 1
-
Избранное:Добавить в избранное
- Отзывы:
-
Ваша оценка:
C# 2008 Programmer's Reference: краткое содержание, описание и аннотация
Предлагаем к чтению аннотацию, описание, краткое содержание или предисловие (зависит от того, что написал сам автор книги «C# 2008 Programmer's Reference»). Если вы не нашли необходимую информацию о книге — напишите в комментариях, мы постараемся отыскать её.
C# 2008 Programmer's Reference — читать онлайн бесплатно полную книгу (весь текст) целиком
Ниже представлен текст книги, разбитый по страницам. Система сохранения места последней прочитанной страницы, позволяет с удобством читать онлайн бесплатно книгу «C# 2008 Programmer's Reference», без необходимости каждый раз заново искать на чём Вы остановились. Поставьте закладку, и сможете в любой момент перейти на страницу, на которой закончили чтение.
Интервал:
Закладка:
What Do You Need to Run ASP.NET?
ASP.NET is supported on the following operating systems:
□ Microsoft Windows 2000 Professional and Server (SP2 recommended)
□ Microsoft Windows XP Professional
□ Microsoft Windows Server 2003/2008
□ Microsoft Windows Vista
To run ASP.NET applications, you need to install IIS on your computer (IIS is not installed by default; you can install IIS on your computer by running the Add or Remove Programs application in the Control Panel and then selecting the Add/Remove Windows Components tab). To obtain the ASP.NET runtime, you must install the .NET Framework on your machine. You can obtain the latest .NET Framework from the following site: http://microsoft.com/downloads.
Data Binding
One of the most common tasks a web application does is display records from a database. For example, you may have an inventory web application with which your staff can check the latest pricing information and stock availability. This chapter explains how to retrieve records from a database and use data binding in ASP.NET to display them on a page. In addition, it shows how to use the new LinqDataSourcecontrol, which enables you to use LINQ to talk to databases without needing to write complex SQL queries.
To start, launch Visual Studio 2008 and create a new ASP.NET Web Site project (see Figure 17-1).
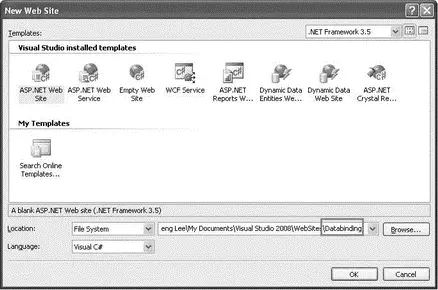
Figure 17-1
The default location is File System (see Figure 17-2), which means that you can save your ASP.NET project in any folder on your local drive so that during debugging a built-in web server is automatically launched to host your ASP.NET application. Alternatively, you can choose the HTTP option, which means that your ASP.NET application will be hosted by a web server (most commonly the local IIS), or the FTP option, which uses an FTP Server. For this example, use File System, the default option.
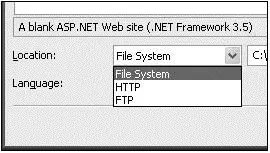
Figure 17-2
Modeling Databases Using LINQ to SQL
The example web application will display records from two tables in the pubs sample database. Because you are going to use LINQ to access the database, you do not connect to the database directly. Instead, you generate classes that represent the database and its tables and then use those classes to interact with the data. To begin, add a new item to the project and select the LINQ to SQL Classes template (see Figure 17-3).
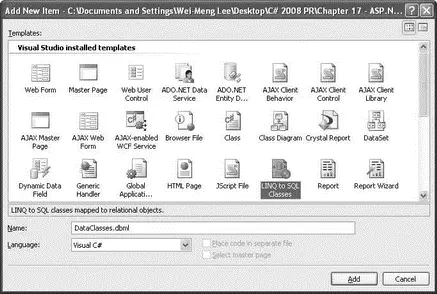
Figure 17-3
Use the default name of DataClasses.dbml. When prompted to save the item in the App_Codefolder, click Yes. The DataClasses.dbmlfile is created in the App_Code folder of your project (see Figure 17-4).
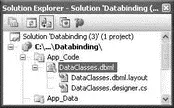
Figure 17-4
The Object Relational Designer (O/R Designer) then launches so that you can visually edit the databases and tables you want to use. Open the Server Explorer window, and connect to the pubssample database. Drag and drop the publisherand titletables onto the design surface of DataClasses.dbml(see Figure 17-5).
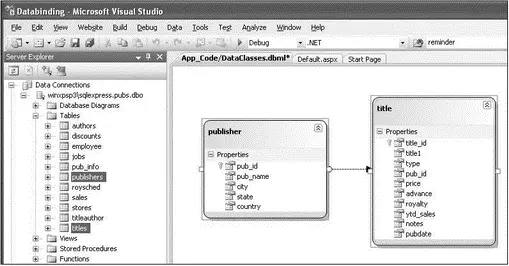
Figure 17-5
Save the DataClasses.dbmlfile by pressing Ctrl+S. When you save the file, Visual Studio 2008 persists out .NET classes that represent the entities and database relationships that you have just added. For each LINQ to SQL designer file you add to your solution, a custom DataContextclass is generated. It is the main object that you use to manipulate the table. In this example, the DataContextclass is named DataClassesDataContext.
Be sure to save DataClasses.dbmlbefore proceeding.
Data Binding Using the GridView Control
To display the records from a table, you can use the GridViewcontrol, which displays the values of a data source in a table where each column represents a field and each row represents a record. Drag the GridViewcontrol from the Toolbox and drop it onto the design surface of Default.aspx. In the SmartTag of the GridViewcontrol, select in the Choose Data Source dropdown list (see Figure 17-6).
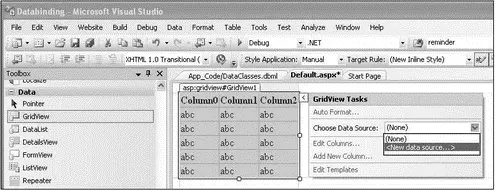
Figure 17-6
In the Data Source Configuration Wizard (see Figure 17-7), select LINQ and click OK. Use the default name of LinqDataSource1. Click OK.
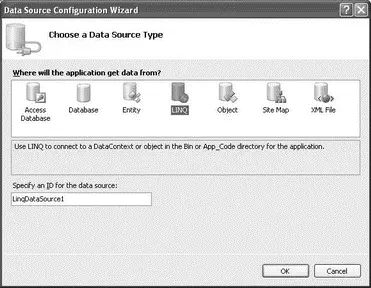
Figure 17-7
For those of you familiar with the various data source controls (such as SqlDataSourceand ObjectDataSource) in ASP.NET 2.0, the LinqDataSourcecontrol works much like them. What is special about the LinqDataSourcecontrol is that instead of binding directly to a database (as with the SqlDataSource), it binds to a LINQ-enabled data model. The beauty of this is that you need not write the various complex SQL queries (such as insert, delete, and modify) to use it. Instead, you just need to specify the data model you are working with, and the type of operations you want to perform on it (such as delete, insert, or update) and then the control takes care of performing those operations by itself.
The DataClassesDataContextobject that you generated earlier is automatically selected for you (see Figure 17-8). Click Next.
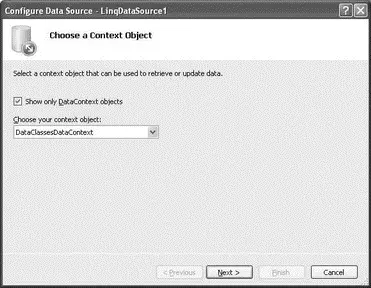
Figure 17-8
Select the titlestable, and click the * checkbox to select all fields (see Figure 17-9).
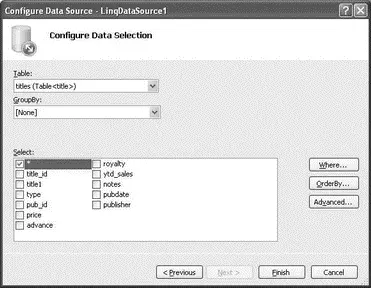
Figure 17-9
Click the Advanced button and check all the checkboxes. Click OK (see Figure 17-10) and then click Finish.
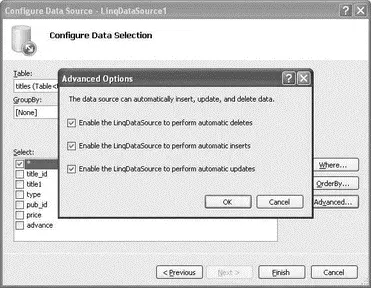
Figure 17-10
Switch to the source view of Default.aspxpage, and observe the element:
ID="LinqDataSource1" runat="server"
ContextTypeName="DataClassesDataContext"
EnableDelete="True"
Интервал:
Закладка:
Похожие книги на «C# 2008 Programmer's Reference»
Представляем Вашему вниманию похожие книги на «C# 2008 Programmer's Reference» списком для выбора. Мы отобрали схожую по названию и смыслу литературу в надежде предоставить читателям больше вариантов отыскать новые, интересные, ещё непрочитанные произведения.


Обсуждение, отзывы о книге «C# 2008 Programmer's Reference» и просто собственные мнения читателей. Оставьте ваши комментарии, напишите, что Вы думаете о произведении, его смысле или главных героях. Укажите что конкретно понравилось, а что нет, и почему Вы так считаете.