";
browser. loadDataWithBaseURL("x-data://base", page,
"text/html", "UTF-8", null);
}
private classCallback extendsWebViewClient {
publicboolean shouldOverrideUrlLoading(WebView view, String url) {
loadTime();
return( true);
}
}
}
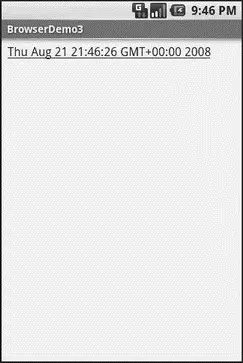
Here, we load a simple Web page into the browser ( loadTime()) that consists of the current time, made into a hyperlink to the /clockURL. We also attach an instance of a WebViewClientsubclass, providing our implementation of shouldOverrideUrlLoading(). In this case, no matter what the URL, we want to just reload the WebViewvia loadTime().
Running this activity gives the result shown in Figure 13-3.

Figure 13-3. The Browser3 sample application
Selecting the link and clicking the D-pad center button will “click” the link, causing us to rebuild the page with the new time.
Settings, Preferences, and Options (Oh, My!)
With your favorite desktop Web browser, you have some sort of “settings” or “preferences” or “options” window. Between that and the toolbar controls, you can tweak and twiddle the behavior of your browser, from preferred fonts to the behavior of Javascript.
Similarly, you can adjust the settings of your WebViewwidget as you see fit, via the WebSettingsinstance returned from calling the widget’s getSettings()method.
There are lots of options on WebSettingsto play with. Most appear fairly esoteric (e.g., setFantasyFontFamily()). However, here are some that you may find more useful:
• Control the font sizing via setDefaultFontSize()(to use a point size) or setTextSize()(to use constants indicating relative sizes like LARGERand SMALLEST)
• Control Javascriptvia setJavaScriptEnabled()(to disable it outright) and setJavaScriptCanOpenWindowsAutomatically()(to merely stop it from opening pop-up windows)
• Control Web site rendering via setUserAgent() — 0 means the WebViewgives the Web site a user-agent string that indicates it is a mobile browser, while 1 results in a user-agent string that suggests it is a desktop browser
The settings you change are not persistent, so you should store them somewhere (such as via the Android preferences engine) if you are allowing your users to determine the settings, versus hard-wiring the settings in your application.
CHAPTER 14
Showing Pop-Up Messages
Sometimes your activity (or other piece of Android code) will need to speak up.
Not every interaction with Android users will be neat, tidy, and containable in activities composed of views. Errors will crop up. Background tasks may take way longer than expected. Something asynchronous may occur, such as an incoming message. In these and other cases, you may need to communicate with the user outside the bounds of the traditional user interface.
Of course, this is nothing new. Error messages in the form of dialog boxes have been around for a very long time. More-subtle indicators also exist, from task-tray icons to bouncing dock icons to a vibrating cell phone.
Android has quite a few systems for letting you alert your users outside the bounds of an Activity-based UI. One, notifications, is tied heavily into intents and services and, as such, is covered in Chapter 32. In this chapter, you will see two means of raising pop-up messages: toasts and alerts.
A Toastis a transient message, meaning that it displays and disappears on its own without user interaction. Moreover, it does not take focus away from the currently active Activity, so if the user is busy writing the next Great American Programming Guide, they will not have keystrokes be “eaten” by the message.
Since a Toastis transient, you have no way of knowing if the user even notices it. You get no acknowledgment from them, nor does the message stick around for a long time to pester the user. Hence, the Toast is mostly for advisory messages, such as indicating a long-running background task is completed, the battery has dropped to a low-but-not-too-low level, etc.
Making a Toastis fairly easy. The Toastclass offers a static makeText()that accepts a String(or string resource ID) and returns a Toastinstance. The makeText()method also needs the Activity(or other Context) plus a duration. The duration is expressed in the form of the LENGTH_SHORTor LENGTH_LONGconstants to indicate, on a relative basis, how long the message should remain visible.
If you would prefer your Toastbe made out of some other View, rather than be a boring old piece of text, simply create a new Toastinstance via the constructor (which takes a Context), then call setView()to supply it with the view to use and setDuration()to set the duration.
Once your Toastis configured, call its show()method, and the message will be displayed.
If you would prefer something in the more classic dialog-box style, what you want is an AlertDialog. As with any other modal dialog box, an AlertDialogpops up, grabs the focus, and stays there until closed by the user. You might use this for a critical error, a validation message that cannot be effectively displayed in the base activity UI, or something else where you are sure that the user needs to see the message and needs to see it now.
The simplest way to construct an AlertDialogis to use the Builderclass. Following in true builder style, Builderoffers a series of methods to configure an AlertDialog, each method returning the Builderfor easy chaining. At the end, you call show()on the builder to display the dialog box.
Commonly used configuration methods on Builder include the following:
• setMessage()if you want the “body” of the dialog to be a simple textual message, from either a supplied Stringor a supplied string resource ID
• setTitle()and setIcon()to configure the text and/or icon to appear in the title bar of the dialog box
• setPositiveButton(), setNeutralButton(), and setNegativeButton()to indicate which button(s) should appear across the bottom of the dialog, where they should be positioned (left, center, or right, respectively), what their captions should be, and what logic should be invoked when the button is clicked (besides dismissing the dialog)
If you need to configure the AlertDialogbeyond what the builder allows, instead of calling show(), call create()to get the partially built AlertDialoginstance, configure it the rest of the way, then call one of the flavors of show()on the AlertDialogitself.
Once show()is called, the dialog box will appear and await user input.
Читать дальше


