Mark Murphy - Beginning Android
Здесь есть возможность читать онлайн «Mark Murphy - Beginning Android» весь текст электронной книги совершенно бесплатно (целиком полную версию без сокращений). В некоторых случаях можно слушать аудио, скачать через торрент в формате fb2 и присутствует краткое содержание. Город: New York, Год выпуска: 2009, ISBN: 2009, Издательство: Apress, Жанр: Программирование, на английском языке. Описание произведения, (предисловие) а так же отзывы посетителей доступны на портале библиотеки ЛибКат.

- Название:Beginning Android
- Автор:
- Издательство:Apress
- Жанр:
- Год:2009
- Город:New York
- ISBN:978-1-4302-2420-4
- Рейтинг книги:3 / 5. Голосов: 1
-
Избранное:Добавить в избранное
- Отзывы:
-
Ваша оценка:
Beginning Android: краткое содержание, описание и аннотация
Предлагаем к чтению аннотацию, описание, краткое содержание или предисловие (зависит от того, что написал сам автор книги «Beginning Android»). Если вы не нашли необходимую информацию о книге — напишите в комментариях, мы постараемся отыскать её.
Dear Reader,
First, welcome to the world of Android! We’re entering a new era of mobile application development, one marked by open platforms and open source, to take ‘walled gardens’ and make them green houses for any and all to participate in. Android is relatively easy for developers, and I believe that this innovation will help generate a large ecosystem of developers and consumers within a very short time. This means that budding developers such as yourself will have many opportunities to design and build your own applications and you’ll have a huge and hungry customer base.
Second, welcome to the book! Its purpose is to start you on your way with building Android applications, and to help you master the learning curve. Android is already a rich framework, comparable in many ways to the richness Android of desktop Java environments. This means that there is a lot of cool stuff for you to pick up along your journey in order to create the slickest, most useful apps Android you can imagine.
The source code for the code samples in this book is all available from the Apress site, so you can stay as hands-on and practical as you like while I introduce you to the core of Android, and invite you to experiment with the various classes and APIs we’ll be looking at. By the time you’ve finished this book, you’ll be creating your own Android applications and asking yourself what your next great application will be…!
Enjoy! Mark Murphy
Beginning Android — читать онлайн бесплатно полную книгу (весь текст) целиком
Ниже представлен текст книги, разбитый по страницам. Система сохранения места последней прочитанной страницы, позволяет с удобством читать онлайн бесплатно книгу «Beginning Android», без необходимости каждый раз заново искать на чём Вы остановились. Поставьте закладку, и сможете в любой момент перейти на страницу, на которой закончили чтение.
Интервал:
Закладка:
Checking Them Out
To see how these work in practice, take a peek at Messages/Message(available from the Source Code section of the Apress Web site), containing the following layout:
android:orientation="vertical"
android:layout_width="fill_parent"
android:layout_height="fill_parent" >
android:id="@+id/alert"
android:text="Raise an alert"
android:layout_width="fill_parent"
android:layout_height="wrap_content"/>
android:id="@+id/toast"
android:text="Make a toast"
android:layout_width="fill_parent"
android:layout_height="wrap_content"/>
and the following Java code:
public classMessageDemo extendsActivity implementsView.OnClickListener {
Button alert;
Button toast;
@Override
publicvoid onCreate(Bundle icicle) {
super. onCreate(icicle);
setContentView(R.layout.main);
alert = (Button) findViewById(R.id.alert);
alert. setOnClickListener( this);
toast = (Button) findViewById(R.id.toast);
toast. setOnClickListener( this);
}
publicvoid onClick(View view) {
if(view==alert) {
newAlertDialog. Builder( this)
. setTitle("MessageDemo")
. setMessage("eek!")
. setNeutralButton("Close", newDialogInterface. OnClickListener() {
publicvoid onClick(DialogInterface dlg, int sumthin) {
// do nothing – it will close on its own
}
})
. show();
} else{
Toast
. makeText( this, "", Toast.LENGTH_SHORT)
. show();
}
}
}
The layout is unremarkable — just a pair of buttons to trigger the alert and the Toast.
When the Raise an Alert button is clicked, we use a builder ( new Builder(this)) to set the title ( setTitle("MessageDemo)"), message ( setMessage("eek!")), and neutral button ( setNeutralButton(Close, new OnClickListener() ...) before showing the dialog. When the button is clicked, the OnClickListenercallback does nothing; the mere fact the button was pressed causes the dialog to be dismissed. However, you could update information in your activity based upon the user action, particularly if you have multiple buttons for the user to choose from. The result is a typical dialog box like the one in Figure 14-1.
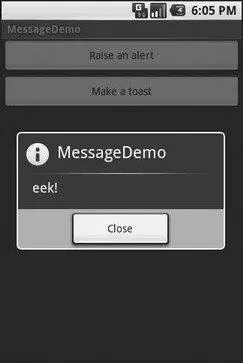
Figure 14-1. The MessageDemo sample application, after clicking the Raise an Alert button
When you click the Make a Toast button, the Toast class makes us a text-based Toast(makeText(this, "", LENGTH_SHORT)), which we then show(). The result is a short-lived, non-interrupting message (see Figure 14-2).
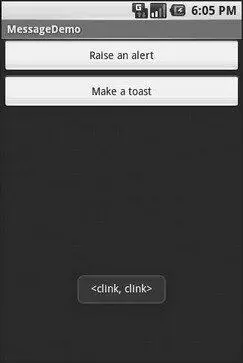
Figure 14-2. The same application, after clicking the Make a Toast button
CHAPTER 15
Dealing with Threads
Ideally, you want your activities to be downright snappy, so your users don’t feel that your application is sluggish. Responding to user input quickly (e.g., 200ms) is a fine goal. At minimum, though, you need to make sure you respond within 5 seconds, or the ActivityManagercould decide to play the role of the Grim Reaper and kill off your activity as being non-responsive.
Of course, your activity might have real work to do, which takes non-negligible amounts of time. There are two ways of dealing with this:
• Do expensive operations in a background service, relying on notifications to prompt users to go back to your activity
• Do expensive work in a background thread
Android provides a veritable cornucopia of means to set up background threads yet allow them to safely interact with the UI on the UI thread. These include Handlerobjects and posting Runnableobjects to the View.
Getting Through the Handlers
The most flexible means of making an Android-friendly background thread is to create an instance of a Handlersubclass. You only need one Handlerobject per activity, and you do not need to manually register it or anything — merely creating the instance is sufficient to register it with the Android threading subsystem.
Your background thread can communicate with the Handler, which will do all of its work on the activity’s UI thread. This is important because UI changes, such as updating widgets, should only occur on the activity’s UI thread.
You have two options for communicating with the Handler: messages and Runnableobjects.
Messages
To send a Messageto a Handler, first invoke obtainMessage()to get the Messageobject out of the pool. There are a few flavors of obtainMessage(), allowing you to just create empty Messageobjects, or ones populated with message identifiers and arguments. The more complicated your Handlerprocessing needs to be, the more likely it is you will need to put data into the Messageto help the Handlerdistinguish different events.
Then, you send the Messageto the Handlervia its message queue, using one of the following sendMessage...()family of methods:
• sendMessage()puts the message on the queue immediately
• sendMessageAtFrontOfQueue()puts the message on the queue immediately, and moreover puts it at the front of the message queue (versus the back, as is the default), so your message takes priority over all others
• sendMessageAtTime()puts the message on the queue at the stated time, expressed in the form of milliseconds based on system uptime ( SystemClock.uptimeMillis())
• sendMessageDelayed()puts the message on the queue after a delay, expressed in milliseconds
To process these messages, your Handlerneeds to implement handleMessage(), which will be called with each message that appears on the message queue. There, the handler can update the UI as needed. However, it should still do that work quickly, as other UI work is suspended until the Handleris done.
For example, let’s create a ProgressBarand update it via a Handler. Here is the layout from the Threads/Handlersample project. This sample code along with all others in this chapter can be found in the Source Code section at http://apress.com.
Интервал:
Закладка:
Похожие книги на «Beginning Android»
Представляем Вашему вниманию похожие книги на «Beginning Android» списком для выбора. Мы отобрали схожую по названию и смыслу литературу в надежде предоставить читателям больше вариантов отыскать новые, интересные, ещё непрочитанные произведения.


Обсуждение, отзывы о книге «Beginning Android» и просто собственные мнения читателей. Оставьте ваши комментарии, напишите, что Вы думаете о произведении, его смысле или главных героях. Укажите что конкретно понравилось, а что нет, и почему Вы так считаете.