Mark Murphy - Beginning Android
Здесь есть возможность читать онлайн «Mark Murphy - Beginning Android» весь текст электронной книги совершенно бесплатно (целиком полную версию без сокращений). В некоторых случаях можно слушать аудио, скачать через торрент в формате fb2 и присутствует краткое содержание. Город: New York, Год выпуска: 2009, ISBN: 2009, Издательство: Apress, Жанр: Программирование, на английском языке. Описание произведения, (предисловие) а так же отзывы посетителей доступны на портале библиотеки ЛибКат.

- Название:Beginning Android
- Автор:
- Издательство:Apress
- Жанр:
- Год:2009
- Город:New York
- ISBN:978-1-4302-2420-4
- Рейтинг книги:3 / 5. Голосов: 1
-
Избранное:Добавить в избранное
- Отзывы:
-
Ваша оценка:
Beginning Android: краткое содержание, описание и аннотация
Предлагаем к чтению аннотацию, описание, краткое содержание или предисловие (зависит от того, что написал сам автор книги «Beginning Android»). Если вы не нашли необходимую информацию о книге — напишите в комментариях, мы постараемся отыскать её.
Dear Reader,
First, welcome to the world of Android! We’re entering a new era of mobile application development, one marked by open platforms and open source, to take ‘walled gardens’ and make them green houses for any and all to participate in. Android is relatively easy for developers, and I believe that this innovation will help generate a large ecosystem of developers and consumers within a very short time. This means that budding developers such as yourself will have many opportunities to design and build your own applications and you’ll have a huge and hungry customer base.
Second, welcome to the book! Its purpose is to start you on your way with building Android applications, and to help you master the learning curve. Android is already a rich framework, comparable in many ways to the richness Android of desktop Java environments. This means that there is a lot of cool stuff for you to pick up along your journey in order to create the slickest, most useful apps Android you can imagine.
The source code for the code samples in this book is all available from the Apress site, so you can stay as hands-on and practical as you like while I introduce you to the core of Android, and invite you to experiment with the various classes and APIs we’ll be looking at. By the time you’ve finished this book, you’ll be creating your own Android applications and asking yourself what your next great application will be…!
Enjoy! Mark Murphy
Beginning Android — читать онлайн бесплатно полную книгу (весь текст) целиком
Ниже представлен текст книги, разбитый по страницам. Система сохранения места последней прочитанной страницы, позволяет с удобством читать онлайн бесплатно книгу «Beginning Android», без необходимости каждый раз заново искать на чём Вы остановились. Поставьте закладку, и сможете в любой момент перейти на страницу, на которой закончили чтение.
Интервал:
Закладка:
But if you press the Menu button, you will get our options menu (Figure 11-2).
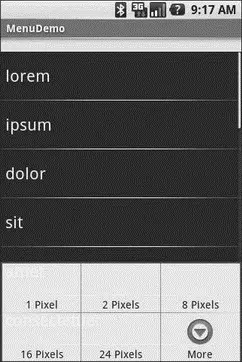
Figure 11-2. The same application, showing the options menu
Clicking the More button shows the remaining two menu choices (Figure 11-3).
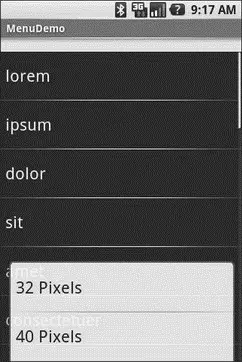
Figure 11-3. The same application, the remaining menu choices
Choosing a height (say, 16 pixels) then changes the divider height of the list to something garish (Figure 11-4).
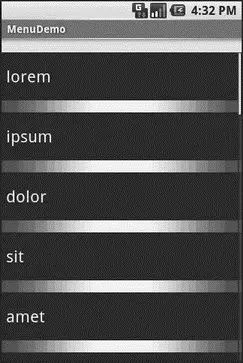
Figure 11-4. The same application, made ugly
You can trigger the context menu by doing a tap-and-hold on any item in the list (Figure 11-5).
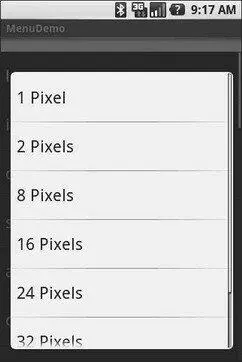
Figure 11-5. The same application, showing a context menu
Once again, choosing an option sets the divider height.
Yet More Inflation
You saw in Chapter 9 that you can describe Viewsvia XML files and inflate them into actual Viewobjects at runtime. Android also allows you to describe menus via XML files and inflate them when a menu is called for. This helps you keep your menu structure separate from the implementation of menu-handling logic, and it provides easier ways to develop menu-authoring tools.
Menu XML Structure
Menu XML goes in res/menu/in your project tree, alongside the other types of resources that your project might employ. As with layouts, you can have several menu XML files in your project, each with their own filename and the .xmlextension.
For example, from the Menus/Inflationsample project at http://apress.com/, here is a menu called sample.xml:
android:title="Close"
android:orderInCategory="3"
android:icon="@drawable/eject" />
android:orderInCategory="2"
android:title="Sans Icon" />
android:orderInCategory="4"
android:enabled="false"
android:title="Disabled" />
android:menuCategory="secondary"
android:visible="false">
android:orderInCategory="0"
android:title="2nd-To-Last" />
android:orderInCategory="1"
android:title="Last" />
android:orderInCategory="3"
android:title="A Submenu">
android:title="Non-Ghost"
android:visible="true"
android:alphabeticShortcut="n" />
android:title="A Ghost"
android:visible="false"
android:alphabeticShortcut="g" />
Note the following about menu XML definitions:
• You must start with a menuroot element.
• Inside a menuare itemelements and groupelements, the latter representing a collection of menu items that can be operated upon as a group.
• Sub-menus are specified by adding a menuelement as a child of an itemelement, using this new menuelement to describe the contents of the sub-menu.
• If you want to detect when an item is chosen or to reference an item or group from your Java code, be sure to apply an android:id, just as you do with View layout XML.
Menu Options and XML
Inside the item and group elements you can specify various options, matching up with corresponding methods on Menuor MenuItem.
The title of a menu item is provided via the android:titleattribute on an item element. This can be either a literal string or a reference to a string resource (e.g., @string/foo).
Menu items can have icons. To provide an icon — in the form of a reference to a drawable resource (e.g., @drawable/eject), use the android:iconattribute on the item element.
By default, the order of the items in the menu is determined by the order they appear in the menu XML. If you want, you can change that default by specifying the android:orderInCategoryattribute on the itemelement. This is a 0-based index of the order for the items associated with the current category. There is an implicit default category; groups can provide an android:menuCategoryattribute to specify a different category to use for items in that group.
Generally, though, it is simplest just to put the items in the XML in the order you want them to appear.
Items and groups can be enabled or disabled, controlled in the XML via the android:enabledattribute on the item or group element. By default, items and groups are enabled. Disabled items and groups appear in the menu but cannot be selected. You can change an item’s status at runtime via the setEnabled()method on MenuItem, or change a group’s status via setGroupEnabled()on Menu.
Similarly, items and groups can be visible or invisible, controlled in the XML via the android:visibleattribute on the item or group element. By default, items and groups are visible. Invisible items and groups do not appear in the menu at all. You can change an item’s status at runtime via the setVisible()method on MenuItem, or change a group’s status via setGroupVisible()on Menu.
In the layout XML shown earlier, the other_stuffgroup is initially invisible. If we make it visible in our Java code, the two menu items in the group will “magically” appear.
Items can have shortcuts — single letters ( android:alphabeticShortcut) or numbers ( android:numericShortcut) that can be pressed to choose the item without having to use the touch screen, D-pad, or trackball to navigate the full menu.
Inflating a Menu
Actually using a menu, once it’s defined in XML, is easy. Just create a MenuInflaterand tell it to inflate your menu:
@Override
publicboolean onCreateOptionsMenu(Menu menu) {
theMenu = menu;
new MenuInflater( getApplication()).
inflate(R.menu.sample, menu);
return( super. onCreateOptionsMenu(menu));
}
CHAPTER 12
Fonts
Inevitably, you’ll get the question “Hey, can we change this font?” when doing application development. The answer depends on what fonts come with the platform, whether you can add other fonts, and how to apply them to the widget or whatever needs the font change.
Android is no different. It comes with some fonts plus a means for adding new fonts. Though, as with any new environment, there are a few idiosyncrasies to deal with.
Читать дальшеИнтервал:
Закладка:
Похожие книги на «Beginning Android»
Представляем Вашему вниманию похожие книги на «Beginning Android» списком для выбора. Мы отобрали схожую по названию и смыслу литературу в надежде предоставить читателям больше вариантов отыскать новые, интересные, ещё непрочитанные произведения.


Обсуждение, отзывы о книге «Beginning Android» и просто собственные мнения читателей. Оставьте ваши комментарии, напишите, что Вы думаете о произведении, его смысле или главных героях. Укажите что конкретно понравилось, а что нет, и почему Вы так считаете.