Mark Murphy - Beginning Android
Здесь есть возможность читать онлайн «Mark Murphy - Beginning Android» весь текст электронной книги совершенно бесплатно (целиком полную версию без сокращений). В некоторых случаях можно слушать аудио, скачать через торрент в формате fb2 и присутствует краткое содержание. Город: New York, Год выпуска: 2009, ISBN: 2009, Издательство: Apress, Жанр: Программирование, на английском языке. Описание произведения, (предисловие) а так же отзывы посетителей доступны на портале библиотеки ЛибКат.

- Название:Beginning Android
- Автор:
- Издательство:Apress
- Жанр:
- Год:2009
- Город:New York
- ISBN:978-1-4302-2420-4
- Рейтинг книги:3 / 5. Голосов: 1
-
Избранное:Добавить в избранное
- Отзывы:
-
Ваша оценка:
Beginning Android: краткое содержание, описание и аннотация
Предлагаем к чтению аннотацию, описание, краткое содержание или предисловие (зависит от того, что написал сам автор книги «Beginning Android»). Если вы не нашли необходимую информацию о книге — напишите в комментариях, мы постараемся отыскать её.
Dear Reader,
First, welcome to the world of Android! We’re entering a new era of mobile application development, one marked by open platforms and open source, to take ‘walled gardens’ and make them green houses for any and all to participate in. Android is relatively easy for developers, and I believe that this innovation will help generate a large ecosystem of developers and consumers within a very short time. This means that budding developers such as yourself will have many opportunities to design and build your own applications and you’ll have a huge and hungry customer base.
Second, welcome to the book! Its purpose is to start you on your way with building Android applications, and to help you master the learning curve. Android is already a rich framework, comparable in many ways to the richness Android of desktop Java environments. This means that there is a lot of cool stuff for you to pick up along your journey in order to create the slickest, most useful apps Android you can imagine.
The source code for the code samples in this book is all available from the Apress site, so you can stay as hands-on and practical as you like while I introduce you to the core of Android, and invite you to experiment with the various classes and APIs we’ll be looking at. By the time you’ve finished this book, you’ll be creating your own Android applications and asking yourself what your next great application will be…!
Enjoy! Mark Murphy
Beginning Android — читать онлайн бесплатно полную книгу (весь текст) целиком
Ниже представлен текст книги, разбитый по страницам. Система сохранения места последней прочитанной страницы, позволяет с удобством читать онлайн бесплатно книгу «Beginning Android», без необходимости каждый раз заново искать на чём Вы остановились. Поставьте закладку, и сможете в любой момент перейти на страницу, на которой закончили чтение.
Интервал:
Закладка:
The resulting application is shown in Figures 8-2 and 8-3.
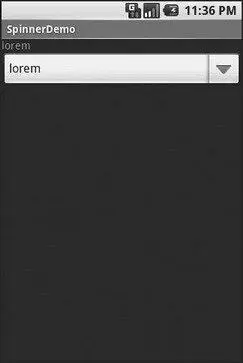
Figure 8-2. The SpinnerDemo sample application, as initially launched
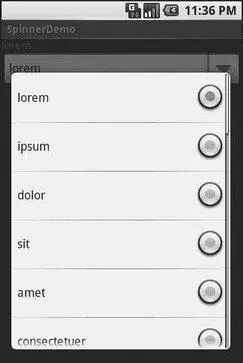
Figure 8-3. The same application, with the spinner drop-down list displayed
Grid Your Lions (or Something Like That…)
As the name suggests, GridViewgives you a two-dimensional grid of items to choose from. You have moderate control over the number and size of the columns; the number of rows is dynamically determined based on the number of items the supplied adapter says are available for viewing.
There are a few properties which, when combined, determine the number of columns and their sizes:
• android:numColumnsspells out how many columns there are, or, if you supply a value of auto_fit, Android will compute the number of columns based on available space and the following properties.
• android:verticalSpacingand its counterpart android:horizontalSpacingindicate how much whitespace there should be between items in the grid.
• android:columnWidthindicates how many pixels wide each column should be.
• android:stretchModeindicates, for grids with auto_fit for android:numColumns, what should happen for any available space not taken up by columns or spacing — this should be columnWidthto have the columns take up available space or spacingWidthto have the whitespace between columns absorb extra space. For example, suppose the screen is 320 pixels wide, and we have android:columnWidthset to 100pxand android:horizontalSpacingset to 5px. Three columns would use 310 pixels (three columns of 100 pixels and two whitespaces of 5 pixels). With android:stretchModeset to columnWidth, the three columns will each expand by 3–4 pixels to use up the remaining 10 pixels. With android:stretchModeset to spacingWidth, the two whitespaceswill each grow by 5 pixels to consume the remaining 10 pixels.
Otherwise, the GridViewworks much like any other selection widget — use setAdapter()to provide the data and child views, invoke setOnItemSelectedListener()to register a selection listener, etc.
For example, here is a XML layout from the Selection/Gridsample project, showing a GridViewconfiguration:
xmlns:android="http://schemas.android.com/apk/res/android"
android:orientation="vertical"
android:layout_width="fill_parent"
android:layout_height="fill_parent">
android:id="@+id/selection"
android:layout_width="fill_parent"
android:layout_height="wrap_content"
/>
android:id="@+id/grid"
android:layout_width="fill_parent"
android:layout_height="fill_parent"
android:verticalSpacing="35px"
android:horizontalSpacing="5px"
android:numColumns="auto_fit"
android:columnWidth="100px"
android:stretchMode="columnWidth"
android:gravity="center"
/>
For this grid, we take up the entire screen except for what our selection label requires. The number of columns is computed by Android ( android:numColumns="auto_fit") based on 5-pixel horizontal spacing ( android:horizontalSpacing="5px"), 100-pixel columns ( android:columnWidth="100px"), with the columns absorbing any “slop” width left over ( android:stretchMode="columnWidth").
The Java code to configure the GridViewis:
public classGridDemo extendsActivity
implementsAdapterView.OnItemSelectedListener {
TextView selection;
String[] items={"lorem", "ipsum", "dolor", "sit", "amet",
"consectetuer", "adipiscing", "elit", "morbi", "vel",
"ligula", "vitae", "arcu", "aliquet", "mollis",
"etiam", "vel", "erat", "placerat", "ante",
"porttitor", "sodales", "pellentesque", "augue", "purus"};
@Override
publicvoid onCreate(Bundle icicle) {
super. onCreate(icicle);
setContentView(R.layout.main);
selection = (TextView) findViewById(R.id.selection);
GridView g=(GridView) findViewById(R.id.grid);
g. setAdapter( new FunnyLookingAdapter( this,
android.R.layout.simple_list_item_1, items));
g. setOnItemSelectedListener( this);
}
publicvoid onItemSelected(AdapterView parent, View v,
int position, long id) {
selection. setText(items[position]);
}
publicvoid onNothingSelected(AdapterView parent) {
selection. setText("");
}
private classFunnyLookingAdapter extendsArrayAdapter {
Context ctxt;
FunnyLookingAdapter(Context ctxt, int resource,
String[] items) {
super(ctxt, resource, items);
this.ctxt = ctxt;
}
publicView getView(int position, View convertView,
ViewGroup parent) {
TextView label = (TextView)convertView;
if(convertView== null) {
convertView = new TextView(ctxt);
label = (TextView)convertView;
}
label. setText(items[position]);
return(convertView);
}
}
}
For the grid cells, rather than using auto-generated TextViewwidgets as in the previous sections, we create our own views, by subclassing ArrayAdapterand overriding getView(). In this case, we wrap the funny-looking strings in our own TextViewwidgets, just to be different. If getView()receives a TextView, we just reset its text; otherwise, we create a new TextViewinstance and populate it.
With the 35-pixel vertical spacing from the XML layout ( android:verticalSpacing="35"), the grid overflows the boundaries of the emulator’s screen as shown in Figures 8-4 and 8-5.
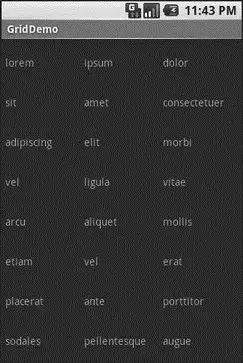
Figure 8-4. The GridDemo sample application, as initially launched
Читать дальшеИнтервал:
Закладка:
Похожие книги на «Beginning Android»
Представляем Вашему вниманию похожие книги на «Beginning Android» списком для выбора. Мы отобрали схожую по названию и смыслу литературу в надежде предоставить читателям больше вариантов отыскать новые, интересные, ещё непрочитанные произведения.


Обсуждение, отзывы о книге «Beginning Android» и просто собственные мнения читателей. Оставьте ваши комментарии, напишите, что Вы думаете о произведении, его смысле или главных героях. Укажите что конкретно понравилось, а что нет, и почему Вы так считаете.