Mark Murphy - Beginning Android
Здесь есть возможность читать онлайн «Mark Murphy - Beginning Android» весь текст электронной книги совершенно бесплатно (целиком полную версию без сокращений). В некоторых случаях можно слушать аудио, скачать через торрент в формате fb2 и присутствует краткое содержание. Город: New York, Год выпуска: 2009, ISBN: 2009, Издательство: Apress, Жанр: Программирование, на английском языке. Описание произведения, (предисловие) а так же отзывы посетителей доступны на портале библиотеки ЛибКат.

- Название:Beginning Android
- Автор:
- Издательство:Apress
- Жанр:
- Год:2009
- Город:New York
- ISBN:978-1-4302-2420-4
- Рейтинг книги:3 / 5. Голосов: 1
-
Избранное:Добавить в избранное
- Отзывы:
-
Ваша оценка:
Beginning Android: краткое содержание, описание и аннотация
Предлагаем к чтению аннотацию, описание, краткое содержание или предисловие (зависит от того, что написал сам автор книги «Beginning Android»). Если вы не нашли необходимую информацию о книге — напишите в комментариях, мы постараемся отыскать её.
Dear Reader,
First, welcome to the world of Android! We’re entering a new era of mobile application development, one marked by open platforms and open source, to take ‘walled gardens’ and make them green houses for any and all to participate in. Android is relatively easy for developers, and I believe that this innovation will help generate a large ecosystem of developers and consumers within a very short time. This means that budding developers such as yourself will have many opportunities to design and build your own applications and you’ll have a huge and hungry customer base.
Second, welcome to the book! Its purpose is to start you on your way with building Android applications, and to help you master the learning curve. Android is already a rich framework, comparable in many ways to the richness Android of desktop Java environments. This means that there is a lot of cool stuff for you to pick up along your journey in order to create the slickest, most useful apps Android you can imagine.
The source code for the code samples in this book is all available from the Apress site, so you can stay as hands-on and practical as you like while I introduce you to the core of Android, and invite you to experiment with the various classes and APIs we’ll be looking at. By the time you’ve finished this book, you’ll be creating your own Android applications and asking yourself what your next great application will be…!
Enjoy! Mark Murphy
Beginning Android — читать онлайн бесплатно полную книгу (весь текст) целиком
Ниже представлен текст книги, разбитый по страницам. Система сохранения места последней прочитанной страницы, позволяет с удобством читать онлайн бесплатно книгу «Beginning Android», без необходимости каждый раз заново искать на чём Вы остановились. Поставьте закладку, и сможете в любой момент перейти на страницу, на которой закончили чтение.
Интервал:
Закладка:
}
}
}
The theory is that we override getView()and return rows based on which object is being displayed, where the object is indicated by a position index into the Adapter. However, if you look at the implementation shown in the code here, you will see a reference to a LayoutInflaterclass — and that concept takes a little bit of an explanation.
A Bit About Inflation
In this case, “inflation” means the act of converting an XML layout specification into the actual tree of Viewobjects the XML represents. This is undoubtedly a tedious bit of code: take an element, create an instance of the specified Viewclass, walk the attributes, convert those into property setter calls, iterate over all child elements, lather, rinse, repeat.
The good news is that the fine folk on the Android team wrapped all that up into a class called LayoutInflaterthat we can use ourselves. When it comes to fancy lists, for example, we will want to inflate Viewsfor each row shown in the list, so we can use the convenient shorthand of the XML layout to describe what the rows are supposed to look like.
In the preceding example, we inflate the R.layout.rowlayout we created in the previous section. This gives us a Viewobject that, in reality, is our LinearLayoutwith an ImageViewand a TextView, just as R.layout.rowspecifies. However, rather than having to create all those objects ourselves and wire them together, the XML and LayoutInflaterhandle the “heavy lifting” for us.
And Now, Back to Our Story
So we have used LayoutInflaterto get a Viewrepresenting the row. This row is “empty” since the static layout file has no idea what actual data goes into the row. It is our job to customize and populate the row as we see fit before returning it. So, we do the following:
• Put the text label into our label widget, using the word at the supplied position.
• See if the word is longer than four characters and, if so, find our ImageViewicon widget and replace the stock resource with a different one.
Now we have a ListViewwith different icons based upon context of that specific entry in the list (see Figure 9-2).
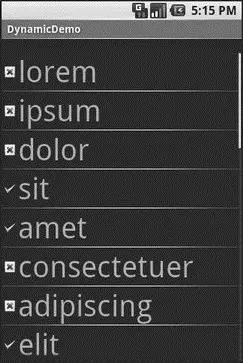
Figure 9-2. The DynamicDemo application
This was a fairly contrived example, but you can see where this technique could be used to customize rows based on any sort of criteria, such as other columns in a returned Cursor.
Better. Stronger. Faster.
The getView()implementation shown previously works, but it is inefficient. Every time the user scrolls, we have to create a bunch of new View objects to accommodate the newly shown rows. And since the Android framework does not cache existing View objects itself, we wind up making new row Viewobjects even for rows we just created a second or two ago. This is bad.
It might be bad for the immediate user experience, if the list appears to be sluggish. More likely, though, it will be bad due to battery usage — every bit of CPU that is used eats up the battery. This is compounded by the extra work the garbage collector needs to do to get rid of all those extra objects you create. So the less efficient your code, the more quickly the phone’s battery will be drained, and the less happy the user will be. And you want happy users, right?
So, let us take a look at a few tricks to make your fancy ListViewwidgets more efficient.
Using convertView
The getView()method receives, as one of its parameters, a Viewnamed, by convention, convertView. Sometimes convertViewwill be null. In those cases, you have to create a new row Viewfrom scratch (e.g., via inflation), just as we did before.
However, if convertViewis not null, then it is actually one of your previously created Views. This will be the case primarily when the user scrolls the ListView— as new rows appear, Android will attempt to recycle the views of the rows that scrolled off the other end of the list, to save you having to rebuild them from scratch.
Assuming that each of your rows has the same basic structure, you can use findViewById()to get at the individual widgets that make up your row and change their contents, then return convertViewfrom getView()rather than create a whole new row.
For example, here is the getView()implementation from last time, now optimized via convertView(from the FancyLists/Recyclingproject at http://apress.com/):
public classRecyclingDemo extendsListActivity {
TextView selection;
String[] items={"lorem", "ipsum", "dolor", "sit", "amet",
"consectetuer", "adipiscing", "elit", "morbi", "vel",
"ligula", "vitae", "arcu", "aliquet", "mollis",
"etiam", "vel", "erat", "placerat", "ante",
"porttitor", "sodales", "pellentesque", "augue",
"purus"};
@Override
publicvoid onCreate(Bundle icicle) {
super. onCreate(icicle);
setContentView(R.layout.main);
setListAdapter( new IconicAdapter( this));
selection = (TextView) findViewById(R.id.selection);
}
publicvoid onListItemClick(ListView parent, View v,
int position, long id) {
selection. setText(items[position]);
}
classIconicAdapter extendsArrayAdapter {
Activity context;
IconicAdapter(Activity context) {
super(context, R.layout.row, items);
this.context = context;
}
publicView getView(int position, View convertView,
ViewGroup parent) {
View row = convertView;
if(row== null) {
LayoutInflater inflater = context. getLayoutInflater();
row = inflater. inflate(R.layout.row, null);
}
TextView label = (TextView)row. findViewById(R.id.label);
label. setText(items[position]);
ImageView icon = (ImageView)row. findViewById(R.id.icon);
if(items[position]. length() > 4) {
icon. setImageResource(R.drawable.delete);
} else{
icon. setImageResource(R.drawable.ok);
}
return(row);
}
}
}
Here we check to see if the convertViewis null and, if so we then inflate our row — but if it is not null, we just reuse it. The work to fill in the contents (icon image, text) is the same in either case. The advantage is that if the convertViewis not null, we avoid the potentially expensive inflation step.
Интервал:
Закладка:
Похожие книги на «Beginning Android»
Представляем Вашему вниманию похожие книги на «Beginning Android» списком для выбора. Мы отобрали схожую по названию и смыслу литературу в надежде предоставить читателям больше вариантов отыскать новые, интересные, ещё непрочитанные произведения.


Обсуждение, отзывы о книге «Beginning Android» и просто собственные мнения читателей. Оставьте ваши комментарии, напишите, что Вы думаете о произведении, его смысле или главных героях. Укажите что конкретно понравилось, а что нет, и почему Вы так считаете.