The good news is that they can be as fancy as you want, within the limitations of a mobile device’s screen, of course. However, making them fancy takes some work and some features of Android that I will cover in this chapter.
The classic Android ListViewis a plain list of text — solid but uninspiring. This is because all we hand to the ListViewis a bunch of words in an array, and we tell Android to use a simple built-in layout for pouring those words into a list.
However, you can have a list whose rows are made up of icons, or icons and text, or checkboxes and text, or whatever you want. It is merely a matter of supplying enough data to the adapter and helping the adapter to create a richer set of View objects for each row.
For example, suppose you want a ListViewwhose entries are made up of an icon, followed by some text. You could construct a layout for the row that looks like this, found in the FancyLists/Staticsample project available in the Source Code section of the Apress Web site:
android:layout_width="fill_parent"
android:layout_height="wrap_content"
android:orientation="horizontal">
android:id="@+id/icon"
android:layout_width="22px"
android:paddingLeft="2px"
android:paddingRight="2px"
android:paddingTop="2px"
android:layout_height="wrap_content"
android:src="@drawable/ok"
/>
android:id="@+id/label"
android:layout_width="wrap_content"
android:layout_height="wrap_content"
android:textSize="44sp"
/>
This layout uses a LinearLayoutto set up a row, with the icon on the left and the text (in a nice big font) on the right.
By default, though, Android has no idea that you want to use this layout with your ListView. To make the connection, you need to supply your Adapter with the resource ID of the custom layout shown in the preceding code:
public classStaticDemo extendsListActivity {
TextView selection;
String[] items={"lorem", "ipsum", "dolor", "sit", "amet",
"consectetuer", "adipiscing", "elit", "morbi", "vel",
"ligula", "vitae", "arcu", "aliquet", "mollis",
"etiam", "vel", "erat", "placerat", "ante",
"porttitor", "sodales", "pellentesque", "augue",
"purus"};
@Override
publicvoid onCreate(Bundle icicle) {
super. onCreate(icicle);
setContentView(R.layout.main);
setListAdapter( newArrayAdapterString( this,
R.layout.row, R.id.label, items));
selection = (TextView) findViewById(R.id.selection);
}
publicvoid onListItemClick(ListView parent, View v,
int position, long id) {
selection. setText(items[position]);
}
}
This follows the general structure for the previous ListViewsample.
The key in this example is that you have told ArrayAdapterthat you want to use your custom layout ( R.layout.row) and that the TextViewwhere the word should go is known as R.id.labelwithin that custom layout. Remember: to reference a layout ( row.xml), use R.layoutas a prefix on the base name of the layout XML file ( R.layout.row).
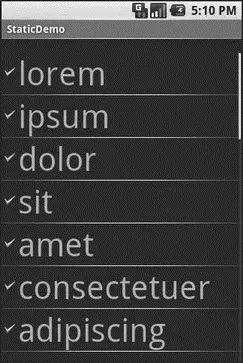
The result is a ListViewwith icons down the left side. In particular, all the icons are the same, as Figure 9-1 shows.

Figure 9-1. The StaticDemo application
This technique — supplying an alternate layout to use for rows — handles simple cases very nicely. However, it isn’t sufficient when you have more-complicated scenarios for your rows, such as the following:
• Not every row uses the same layout (e.g., some have one line of text, others have two).
• You need to configure the widgets in the rows (e.g., different icons for different cases).
In those cases, the better option is to create your own subclass of your desired Adapter, override getView(), and construct your rows yourself. The getView()method is responsible for returning a View, representing the row for the supplied position in the adapter data.
For example, let’s rework the preceding code to use getView()so we can have different icons for different rows — in this case, one icon for short words and one for long words (from the FancyLists/Dynamicsample project at http://apress.com/):
public classDynamicDemo extendsListActivity {
TextView selection;
String[] items={"lorem", "ipsum", "dolor", "sit", "amet",
"consectetuer", "adipiscing", "elit", "morbi", "vel",
"ligula", "vitae", "arcu", "aliquet", "mollis",
"etiam", "vel", "erat", "placerat", "ante",
"porttitor", "sodales", "pellentesque", "augue",
"purus"};
@Override
publicvoid onCreate(Bundle icicle) {
super. onCreate(icicle);
setContentView(R.layout.main);
setListAdapter( new IconicAdapter( this));
selection = (TextView) findViewById(R.id.selection);
}
publicvoid onListItemClick(ListView parent, View v,
int position, long id) {
selection. setText(items[position]);
}
classIconicAdapter extendsArrayAdapter {
Activity context;
IconicAdapter(Activity context) {
super(context, R.layout.row, items);
this.context = context;
}
publicView getView(int position, View convertView,
ViewGroup parent) {
LayoutInflater inflater = context. getLayoutInflater();
View row = inflater. inflate(R.layout.row, null);
TextView label = (TextView)row. findViewById(R.id.label);
label. setText(items[position]);
if(items[position]. length() > 4) {
ImageView icon = (ImageView)row. findViewById(R.id.icon);
icon. setImageResource(R.drawable.delete);
}
return(row);
Читать дальше


