Most keyboards will be detected as soon as they are plugged in, but other keyboards will be detected only when the system starts. For example, I have a secondary French Canadian USB keyboard and a USB calculator/numeric keypad; the French Canadian keyboard is detected as soon as it is plugged in, but the numeric keypad must be plugged in during boot in order to be detected properly. Special features of advanced pointers (such as touchpads) will not be configured automatically unless those devices are plugged in when system-config-display is run.
2.4.3.4. ...a nonstandard monitor, such as a widescreen laptop display?
In most cases, these displays can be probed automatically using VESA standard protocols. If not, edit /etc/X11/ xorg.conf , find the Monitor section, and enter the HorizSync (horizontal scan frequency) and VertRefresh (vertical scan/refresh frequency) values specified in your monitor documentation:
Section "Monitor"
Identifier "Monitor0"
VendorName "Monitor Vendor"
ModelName "Unknown Monitor"
HorizSync 32.00 - 72.0 # Horiz. sync in kHz
VertRefresh 58.0 - 62.0 # Vert. refresh in Hz
EndSection
Next, edit the default resolution to match your hardware:
Section "Screen"
Identifier "Screen0"
Device "Videocard0
Monitor "Monitor0"
DefaultDepth 24
SubSection "Display"
Depth 24
Modes "1280x800"
EndSubSection
EndSection
2.4.4. Where Can I Learn More?
The manpages for X (general information about the X Window System), Xserver (general information about the X window server), Xorg (specific information about the X.org version of the Xserver used in Fedora Core), and xorg.conf (information about the X server configuration file).
2.5. Configuring Printing
In order to print from your Fedora system, you have to configure at least one print queue to manage documents waiting to be printed. For printers directly connected to your computer, this process is fully automatic, and for other printers (such as those on your network), it is very simple.
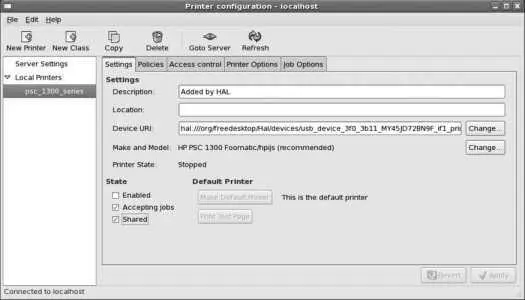
Select the menu option System→Administration→Printing (in KDE, it is Administration→Printing). You will be prompted to enter the root password, and then the printer configuration window will appear, as shown in Figure 2-16. If any print queues have been previously defined, they will be listed on the left side of the window, grouped according to connection type; if you click on one of these printers, the configuration details for that printer will appear on the right.
Figure 2-16. Printer configuration window
2.5.1.1. Add a new print queue
USB and parallel printers, as well as network printers that use the Internet Print Protocol (IPP), will be detected and configured automatically; you can adjust the printer configuration by editing the values in the main printer-configuration window (Figure 2-16) and then clicking Apply.
Other printers must be configured manually. Click on the New Printer icon to access the window shown in Figure 2-17.
Figure 2-17. New Printer window
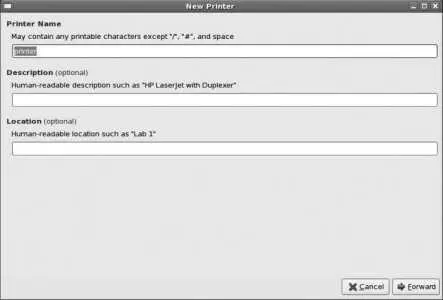
Enter the name of the printer, which should be short and contain no spaces. I recommend using the generic printer type followed by a number (e.g., laser3 or inkjet0 ); even if you only have one printer now, you may add more in the future. If desired, you can add verbose description and location information. Click Forward to proceed to the connection configuration step, shown in Figure 2-18 .
Figure 2-18. Printer connection configuration
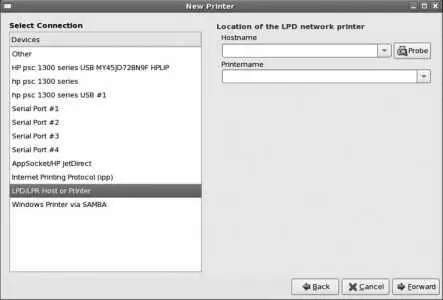
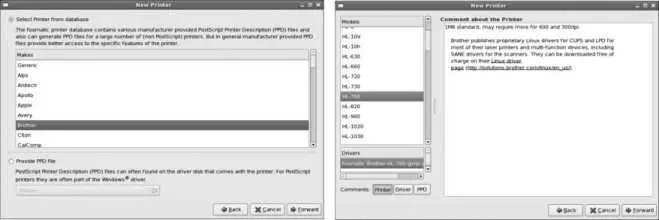
The Devices list shows all detected local printers, plus serial ports and common network printing protocols. Select the appropriate option; for network printers, you will need to enter the IP address or hostname as well as the printer or queue name. Press Forward to proceed to the driver configuration step, shown in the left side of Figure 2-19. Select the printer manufacturer, then click Forward; on the next display (shown on the right side of Figure 2-19), select the printer model. Use the Comments buttons to display information about the printer, driver, or PPD file.
The Drivers list may present more than one driver option. In almost all cases, it is best to use the default driver.
Click Forward, then click Apply on the confirmation dialog that appears.
Figure 2-19. Printer driver selection
2.5.1.2. Edit an existing print queue
To change an existing queue configuration, select the printer in the main window (Figure 2-16) and edit the option values on the tabs:
Settings
Configures the printer description, location, connection details, printer driver, and printer status (enabled/accepting/shared). Enabled means the the queue contents will be sent to the printer; accepting means that new print requests may be enqueued.
Policies
Configures starting and ending banner pages (which identify each print job) and the action to be taken when a printer error occurs.
Access control
Used to restrict printer access to specific users, or to prevent specific users from accessing the printer.
Printer options
Configures the default settings for printer features such as stapling, duplexing, media, ink cartridge type, and resolution.
2.5.1.3. Set the default print queue
The default print queue is used for all print requests that do not specify a queue. To set the default, select a printer and then click Make Default Printer. Click Apply to activate your change.
The command lpr (line printer requester) is used to place a print request into a queue. When used from the command line, lpr can accept input from standard input or from a specified file. For example, to print the file output.ps :
$ lpr output.ps
Or to print the calendar for the year, generated by the cal -y command:
$ cal -y | lpr
To specify a specific print queue (such as laser3 ), add the -P argument along with the name of the queue:
$ lpr -P laser3 output.ps
$ cal -y | lpr -P laser3
You can view the status of a print queue, including the documents in the queue, by clicking on the printer icon that appears in the notification area of the GNOME panel bar. The window shown in Figure 2-20 will appear; this window shows all print requests made by you on all print queues. To delete a document from the queue, right-click on it and select the Cancel document option.
Читать дальше
