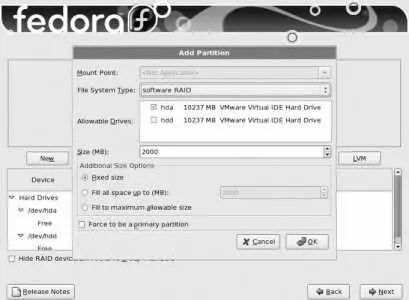
To create a partition to serve as a RAID array element, click the New button in Disk Druid's main window. The Add Partition dialog will appear, as in Figure 10-12 .
Figure 10-12. Adding a RAID partition
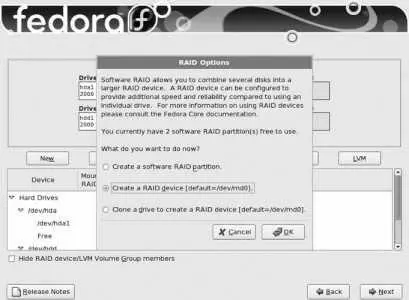
Another way to create a RAID partition is by clicking on the RAID button; the dialog in Figure 10-13 will appear, asking what you want to do next. Select the option "Create a software RAID partition" and click OK.
For the File System Type, select "software RAID." Deselect all of the Allowable Drives checkboxes except one to indicate the drive on which you wish to create the partition. Enter the Size in megabytes, and select "Fixed size." Click OK to proceed.
Repeat this process to create partitions for the other elements of the RAID array on other drives. For example, when creating a 2 GB RAID 1 array that spans two drives, create a 2 GB software RAID partition on each of the two drives.
Once you have created all of the partitions for the array, click the RAID button to view the RAID Options window, as shown in Figure 10-13 .
Figure 10-13. RAID Options window
Select the option to "Create a RAID device" and click OK. The Make RAID Device window will appear, as shown in Figure 10-14 .
Figure 10-14. Make RAID Device window
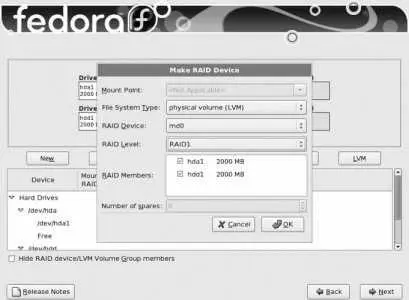
To use this RAID array as a boot filesystem, enter the mount point /boot , set the File System Type to ext3, set the RAID Level to RAID 1, and then select the checkboxes of the RAID partitions that will serve as elements of the array. Click OK to create the filesystem.
When creating a RAID array, use partitions that are exactly or almost exactly the same size because the size of the smallest element defines the amount of space that will be used in each of the elements; any differences between the size of the smallest element and the sizes of each of the other elements is wasted space.
To create a RAID array that will serve as a Physical Volume in an LVM Volume Group, set the File System Type to "Physical volume (LVM)," select the RAID Level, and select the checkboxes of the RAID partitions that will serve as elements of this array. Click OK to create the array.
10.2.1.3. Creating an LVM layout
Whether you're using RAID or not, LVM is the best way to set up partitioning: the overhead is minuscule, and the flexibility that it buys is valuable.
In order to configure LVM during installation, you need to create one or more partitions that will serve as physical volumes. There are two ways to do this:
Use RAID arrays as physical volumes, following the instructions in the previous section.
Use disk partitions as physical volumes. Click New in the Disk Druid main screen to access the Add Partition window ( Figure 10-11 ). Select "Physical volume (LVM)" for the File System Type, enter the partition size, and then click OK to create the partition.
It usually doesn't make sense to combine RAID and disk partition PVs in the same volume group because you will lose the data protection provided by the RAID array.
Once you have created the physical volumes, click the LVM button. The window shown in Figure 10-15 will be displayed.
Figure 10-15. Make LVM Volume Group window
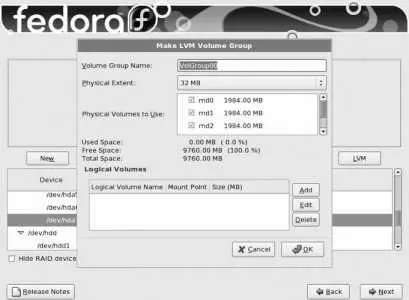
Enter a descriptive volume group name, such as main for your primary volume group. The default physical extent size is 32 MB, which is a reasonable choice for most applications. If you have a good reason to use a different extent size, set it now because it cannot be easily changed after installation.
Reducing the physical extent size increases the size of the LVM data structures but gives a finer granularity for assigning storage to logical volumes. Increasing the physical extent size slightly reduces the LVM overhead, increasing performance.
Select the checkbox of all of the physical volumes you wish to use in this volume group.
The next step is to create a logical volume to hold each filesystem you wish to create. Table 10-2 contains a list of recommended filesystems.
Table 10-2. Recommended filesystems for Fedora Core
| Mount point |
Recommended size |
Notes |
| / |
10 GB |
Required |
| /home |
10 GB or more, depending on how much data your users will be personally storing |
Strongly recommended for any system where users will be logging in on the console or via remote SSH access (e.g., desktop systems, servers with personal user accounts), and systems that are acting as file servers for personal files such as a Samba server (see Lab 7.1, "Configuring Samba to Share Files with Windows Systems"). By separating the users' home directories onto a separate filesystem, you can reinstall the operating system in the future without affecting users' files. |
| /var |
2 GB to 1 TB depending on the applications in use |
The /var filesystem holds data that is variable but that is not stored in the users' home directories for example, databases, email, web pages, and queued print requests. Creating a separate filesystem segregates it for backup and makes it easier to reinstall the operating system without affecting this data. |
To create each logical volume and filesystem, click the Add button at the bottom of the screen to access the Make Logical Volume window shown in Figure 10-16 .
Figure 10-16. Make Logical Volume window
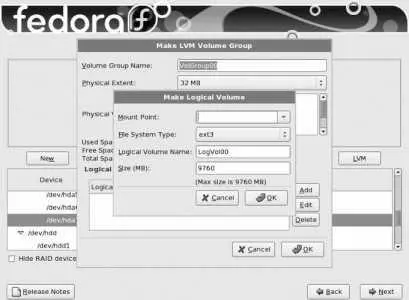
Enter the chosen Mount Point and a descriptive logical volume name; then enter the desired size (leaving the File System Type set to the default, "ext3"). Click OK to return to the Make LVM Volume Group window; note that the LV size you entered is rounded to a multiple of the physical extent size in the Logical Volumes display.
Repeat this process for the other logical volumes.
It is best to leave some space within the VG unassigned so that you can use LVM snapshots and so that you can add space to a crowded filesystem without having to unmount another filesystem to reduce its size.
Finally, create a swap LV by clicking on the Add button in the Make LVM Volume Group window; when the Make Logical Volume window appears ( Figure 10-16 ), set the File System Type to "swap," and enter the desired swap size. Although traditional wisdom dictates a swap size twice as large as the system memory, it's reasonable to give a system with more memory less swapspace, and a system with less memory more swapspace. If in doubt, use the traditional figure as a starting point, since it can be changed later. The swapspace should be at least as large as the installed RAM (Disk Druid will warn you if it is not).
Once you have configured all of the logical volumes, click OK in the Make LVM Volume Group window, and then click Next in the main Disk Druid window. Proceed with the installation as outlined in Chapter 1 .
10.2.2. How Does It Work?
Читать дальше
