Chris Tyler - Fedora Linux
Здесь есть возможность читать онлайн «Chris Tyler - Fedora Linux» весь текст электронной книги совершенно бесплатно (целиком полную версию без сокращений). В некоторых случаях можно слушать аудио, скачать через торрент в формате fb2 и присутствует краткое содержание. Год выпуска: 2006, ISBN: 2006, Издательство: O'Reilly, Жанр: ОС и Сети, на английском языке. Описание произведения, (предисловие) а так же отзывы посетителей доступны на портале библиотеки ЛибКат.

- Название:Fedora Linux
- Автор:
- Издательство:O'Reilly
- Жанр:
- Год:2006
- ISBN:978-0-596-52682-5
- Рейтинг книги:5 / 5. Голосов: 1
-
Избранное:Добавить в избранное
- Отзывы:
-
Ваша оценка:
Fedora Linux: краткое содержание, описание и аннотация
Предлагаем к чтению аннотацию, описание, краткое содержание или предисловие (зависит от того, что написал сам автор книги «Fedora Linux»). Если вы не нашли необходимую информацию о книге — напишите в комментариях, мы постараемся отыскать её.
Fedora Linux: A Complete Guide to Red Hat's Community Distribution In this book, you'll learn how to:
Install Fedora and perform basic administrative tasks
Configure the KDE and GNOME desktops
Get power management working on your notebook computer and hop on a wired or wireless network
Find, install, and update any of the thousands of packages available for Fedora
Perform backups, increase reliability with RAID, and manage your disks with logical volumes
Set up a server with file sharing, DNS, DHCP, email, a Web server, and more
Work with Fedora's security features including SELinux, PAM, and Access Control Lists (ACLs)
Whether you are running the stable version of Fedora Core or bleeding-edge Rawhide releases, this book has something for every level of user. The modular, lab-based approach not only shows you how things work - but also explains why--and provides you with the answers you need to get up and running with Fedora Linux.
Fedora Linux — читать онлайн бесплатно полную книгу (весь текст) целиком
Ниже представлен текст книги, разбитый по страницам. Система сохранения места последней прочитанной страницы, позволяет с удобством читать онлайн бесплатно книгу «Fedora Linux», без необходимости каждый раз заново искать на чём Вы остановились. Поставьте закладку, и сможете в любой момент перейти на страницу, на которой закончили чтение.
Интервал:
Закладка:
# mkdir /var/www/fedora
Then fetch all of the files into that directory:
# cd /var/www/fedora
# wget -nH --cut-dirs= 4 -r http://less.cogeco.net/pub/fedora/linux/core/6/
Note that the URL here is taken from the mirror list, but has the Fedora Core release number ( 6 ) added to the end (replace this URL with that of a mirror close to you). The --cut-dirs= 4 option removes four leading directory names ( pub/fedora/linux/core ) from the retrieved files before saving them.
The downloaded tree will include the ISO files. If you'd rather not download them, use the -X option when you run wget :
# cd /var/www/fedora
# wget -nH -X '/*/*/*/*/*/*/iso' --cut-dirs= 4 -r \ http://less.cogeco.net/pub/fedora/linux/core/6/
(The \ indicates that the command continues on the next line; you can leave it out and type everything on one line.)
The downloaded directory indexes will be saved as files starting with index.html ; these can be deleted using the find command:
# find /var/www/fedora -name 'index.html*' -print -exec rm {} \;
The wget command can also be used with FTP sites:
# cd /var/www/fedora
# wget -X '/*/*/*/*/*/*/iso' -nH -X index.html --cut-dirs= 4 -r \ ftp://ftp.muug.mb.ca/pub/fedora/linux/core/5/
To fetch files from an rsync mirror, use the rsync command:
# cd /var/www/fedora
# rsync -v --recursive rsync://fedora.cat.pdx.edu/fedora-linux-core/4 .
Don't miss the . at the end of the line!
Ensure that the httpd service is started (see Lab 7.5, "Using the Apache Web Server "), and then start the installation on the target system using your choice of boot media (disc, PXE boot, or USB drive).
10.3.1.3. Preparing a PXE Boot Server
To configure a PXE boot server, you will need the tftp-server , xinetd , system-config-netboot , and dhcp packages. You will also need a working network installation server, as described in the previous section.
Before configuring a PXE Boot Server, confirm that the installation target machines use the PXE protocol for network booting.
To configure the PXE server, select the menu option System→Administration→Server Settings→Network Booting Service. The window shown in Figure 10-17 will be displayed.
Figure 10-17. Network boot-type selection
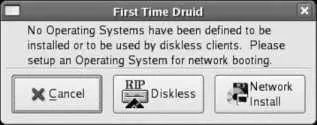
Click on the Network Install button, and the Network Installation Dialog in Figure 10-18 will appear.
Figure 10-18. Network Installation Dialog
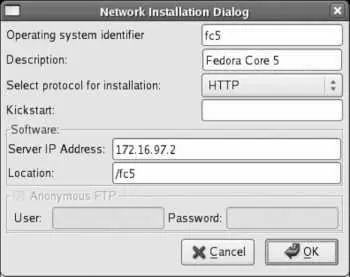
Enter fc6 as the operating system identifier, type an easily readable description of the OS to be installed, select the protocol for installation, and then enter the IP address and the server directory in which the software is installed. Leave the Kickstart field blank (even if you're using a Kickstart file). Click OK to proceed.
You will now see the main window of the netboot configuration tool, shown in Figure 10-19 . This window is used to associate the operating system identifier of the configuration you just created ( fc6 ) with a particular range of IP addresses.
Figure 10-19. Main netboot configuration window
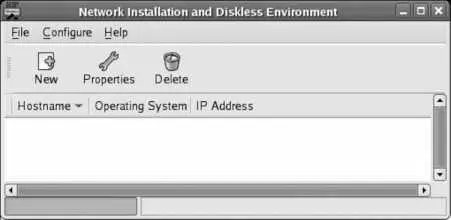
Click New to add a new IP entry in the dialog shown in Figure 10-20 . To configure one specific computer, enter that computer's hostname or IP address; to configure an entire subnet, enter the subnet.
Figure 10-20. Entering the netboot configuration for a new IP address or subnet
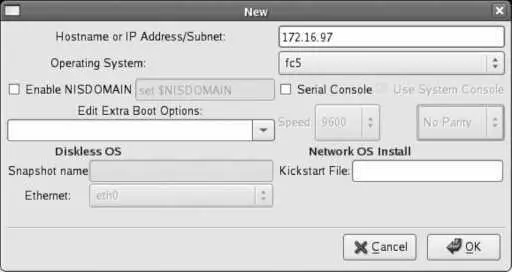
The format for entering the subnet is a bit unusual; you must enter just the network part of the address. For example, the IP address 172.16.97.32 with a netmask of 255.255.255.0 yields a network number of 172.16.97 and a host number of 32, so you would enter 172.16.97 into the IP Address Subnet field.
If you have created more than one network installation profile, select the correct value for the Operating System field. Enter the Kickstart URL, if any, into the Kickstart File field, and then click OK.
The main system-config-netboot window will show the new entry; you can now close the window.
The next step is to configure a DHCP server using the file /etc/dhcpd.conf . In addition to the regular configuration options, you will need to add one additional statement. If you don't otherwise need DHCP, use this minimal configuration file:
# /etc/dhcpd.conf file for PXE booting
ddns-update-style none;
subnet 192.168.1.0 netmask 255.255.255.0 {
range 192.168.1.16 192.168.1.250 ;
filename "linux-install/pxelinux.0";
}
The additional statement (highlighted in bold) identifies the name of the file to be loaded via TFTP. linux-install/pxelinux.0 is the Linux bootloader; the path is relative to /tftpboot on the server.
You can run the DHCP and TFTP servers on different machines if you add a next-server line to the DHCP configuration:
next-server 192.168.1.3 ;
This configures the next phase of the boot process to use the TFTP server at the IP address 192.168.1.3.
Do not run more than one DHCP server on your LAN. If you have a DHCP server on a router or gateway device, disable it while using the PXE boot server.
Finally, configure the tftp Xinetd service and start the xinetd and dhcpd services (see Lab 7.2, "Configuring a DHCP Server ").
To use the PXE boot server, start the target system and select Network Boot using the BIOS options. A boot display similar to that shown in Figure 10-21 should appear.
Figure 10-21. PXE boot process
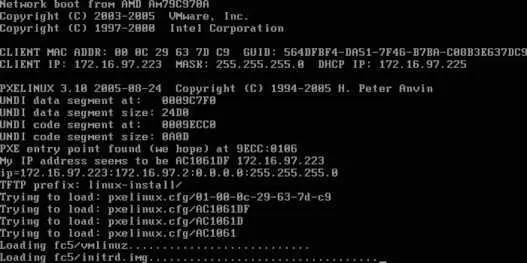
The system will then proceed with the normal Fedora Core installation process.
10.3.2. How Does It Work?
All Fedora Core boot media use one of the bootloaders from the isolinux / syslinux / pxelinux family. These programs have been specifically tailored for booting from optical disk, removable disk drives, and PXE boot servers. Each of them uses text files to configure the available boot options.
The USB boot image diskboot.img is a complete image of a bootable 8 MB VFAT (MS-DOS FAT with long filenames) filesystem. This filesystem contains the isolinux bootloader, the kernel, the initrd ramdisk image, and configuration files.
Читать дальшеИнтервал:
Закладка:
Похожие книги на «Fedora Linux»
Представляем Вашему вниманию похожие книги на «Fedora Linux» списком для выбора. Мы отобрали схожую по названию и смыслу литературу в надежде предоставить читателям больше вариантов отыскать новые, интересные, ещё непрочитанные произведения.


Обсуждение, отзывы о книге «Fedora Linux» и просто собственные мнения читателей. Оставьте ваши комментарии, напишите, что Вы думаете о произведении, его смысле или главных героях. Укажите что конкретно понравилось, а что нет, и почему Вы так считаете.