Chris Tyler - Fedora Linux
Здесь есть возможность читать онлайн «Chris Tyler - Fedora Linux» весь текст электронной книги совершенно бесплатно (целиком полную версию без сокращений). В некоторых случаях можно слушать аудио, скачать через торрент в формате fb2 и присутствует краткое содержание. Год выпуска: 2006, ISBN: 2006, Издательство: O'Reilly, Жанр: ОС и Сети, на английском языке. Описание произведения, (предисловие) а так же отзывы посетителей доступны на портале библиотеки ЛибКат.

- Название:Fedora Linux
- Автор:
- Издательство:O'Reilly
- Жанр:
- Год:2006
- ISBN:978-0-596-52682-5
- Рейтинг книги:5 / 5. Голосов: 1
-
Избранное:Добавить в избранное
- Отзывы:
-
Ваша оценка:
Fedora Linux: краткое содержание, описание и аннотация
Предлагаем к чтению аннотацию, описание, краткое содержание или предисловие (зависит от того, что написал сам автор книги «Fedora Linux»). Если вы не нашли необходимую информацию о книге — напишите в комментариях, мы постараемся отыскать её.
Fedora Linux: A Complete Guide to Red Hat's Community Distribution In this book, you'll learn how to:
Install Fedora and perform basic administrative tasks
Configure the KDE and GNOME desktops
Get power management working on your notebook computer and hop on a wired or wireless network
Find, install, and update any of the thousands of packages available for Fedora
Perform backups, increase reliability with RAID, and manage your disks with logical volumes
Set up a server with file sharing, DNS, DHCP, email, a Web server, and more
Work with Fedora's security features including SELinux, PAM, and Access Control Lists (ACLs)
Whether you are running the stable version of Fedora Core or bleeding-edge Rawhide releases, this book has something for every level of user. The modular, lab-based approach not only shows you how things work - but also explains why--and provides you with the answers you need to get up and running with Fedora Linux.
Fedora Linux — читать онлайн бесплатно полную книгу (весь текст) целиком
Ниже представлен текст книги, разбитый по страницам. Система сохранения места последней прочитанной страницы, позволяет с удобством читать онлайн бесплатно книгу «Fedora Linux», без необходимости каждый раз заново искать на чём Вы остановились. Поставьте закладку, и сможете в любой момент перейти на страницу, на которой закончили чтение.
Интервал:
Закладка:
Query OK, 0 rows affected (0.00 sec)
mysql> quit
Bye
Make sure that the mysqld service is running!
You can then enter the database, access account, and password information into the configuration of whatever software will use MySQL.
MySQL recommends that you add a password to root's access of the MySQL server. You can do that with these commands (\ indicates that text continues on the following line):
# /usr/bin/mysqladmin -u root password ' Secret '
# /usr/bin/mysqladmin -u root -h $( hostname ) \
password ' Secret '
Secret is the root password that you wish to use. After you enable the root password, you'll need to use the -p option to mysql so that you are prompted for the password each time:
# mysql -p
For example, to install Serendipity:
1. Download the Serendipity software from http://www.s9y.com and place it in the /tmp directory.
2. Unpack the Serendipity software in the /var/www/html directory:
3. # cd /var/www/html
4. # tar xvzf /tmp/serendipity*.tar.gz
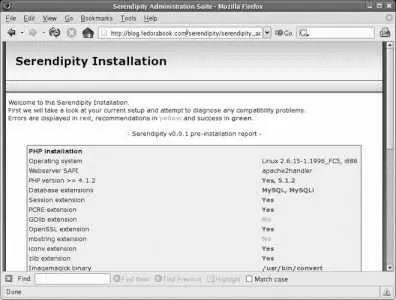
5. Access that directory through a web browser at http:///serendipity . You will see the initial verification page shown in Figure 7-23 .
Figure 7-23. Serendipity Installation verification page
1. If there are any permission errors, correct them using the instructions on the page and then click the Recheck Installation link at the bottom of the page. Once the check is successful, click on the Simple Installation link.
2. As shown in Figure 7-24 , enter the database, hostname, access account (database user), and password that you created in the MySQL database. Fill in the other fields, such as the blog title and the username and password you wish to use to administer the blog, using values of your choosing. Click on the Complete Installation link at the bottom of the page.
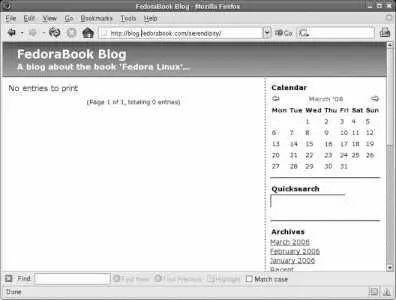
3. Figure 7-25 shows the confirmation page that appears. Click on the link labeled "Visit your new blog here" to see your initial blog page, shown in Figure 7-26 .
Figure 7-24. Serendipity Installation page
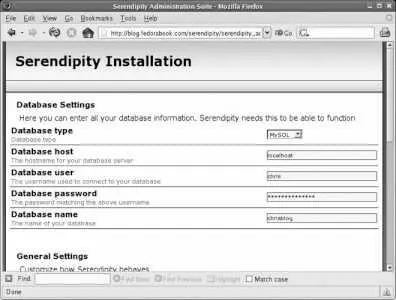
Figure 7-25. Serendipity Installation confirmation page
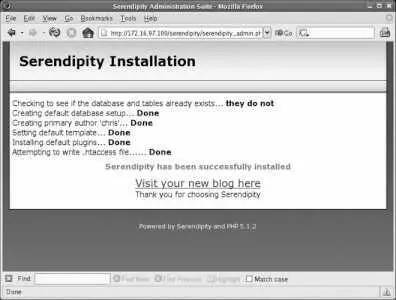
Figure 7-26. Serendipity blog front page
7.9.2. How Does It Work?
MySQL is a Structured Query Language (SQL) database server. It provides rapid access to large sets of structured data, such as customer lists, sports scores, student marks, product catalogs, blog comments, or event schedules. The MySQL database runs as a server daemon named mysqld , and many different types of software can connect to the server to access data.
Connections to the database server are made through the network socket /var/lib/mysql/mysql.sock (local connections) or on the TCP port 3306 (remote connections). If the MySQL server is running on the same machine as your application, you should leave port 3306 closed in your firewall configuration, but you must open it if you separate the MySQL server and the application onto different machines (which you might do for performance reasons if you're using the database heavily).
The mysql monitor command is a very simple command-line interface to the MySQL server. It permits you to enter commands to the server and to see the results of those commands on your screen.
MySQL data is stored in /var/lib/mysql ; each database is stored in a separate subdirectory.
7.9.3. What About...
7.9.3.1. ...creating my own scripts and programs that access MySQL data?
Most scripting and programming languages have modules to access MySQL data. For example, you can use the database driver (DBD) module DBD::mysql to access the basic database interface (DBI) abstraction layer to work with databases in Perl. For details on writing software that accesses a MySQL database, see Chapter 22 in the MySQL documentation ( http://dev.mysql.com/doc/refman/5.0/en/apis.html ).
7.9.4. Where Can I Learn More?
The manpages for mysqld , mysql , mysqladmin , mysqldump , and mysqlshow
The MySQL manual: http://www.mysql.com/doc
Documentation on the Perl DBI module: perldoc DBI
Documentation on the PHP MySQL functions: http://ca.php.net/mysql
7.10. Installing and Configuring a Wiki
A Wiki is a series of web pages that can be easily edited using only a web browsera simple and convenient way of producing a collaborative web site. Perhaps the most impressive examples of Wikis are those operated by the Wikimedia Foundation ( http://wikimedia.org ), including Wikipedia, the Wiktionary, and WikiBooks.
Fedora Extras includes the Wiki software used by the Wikimedia Foundation, named MediaWiki. Once installed, it can be configured and ready for use in a few minutes.
7.10.1. How Do I Do That?
MediaWiki requires a MySQL server. yum won't automatically install a MySQL server when you install MediaWiki because MySQL isn't truly a dependency: the database server doesn't have to be on the same computerbut for a small installation, that makes the most sense.
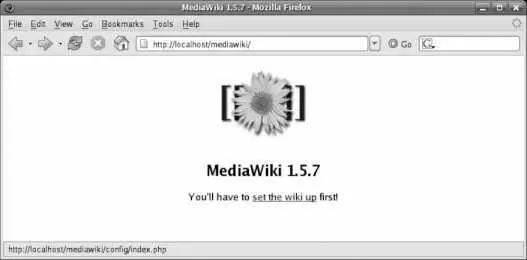
To configure MediaWiki, start your web server (if it's not already running) and then, using a browser on the same computer as the MediaWiki software, go to http://localhost/mediawiki/ . You will see an introduction page like that in Figure 7-27 , informing you that the software must be configured before use.
Figure 7-27. MediaWiki before initial configuration
To configure the software, click on the link provided. The page shown in Figure 7-28 will appear.
Figure 7-28. MediaWiki configuration page
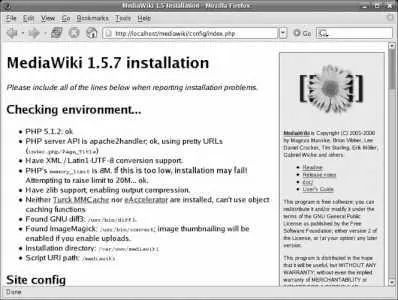
This page presents the results of some initial configuration tests, followed by a form that you must fill in with configuration information. The fields on this form are:
Site name
Input an opaque string (no spaces and no punctuation marks) of letters and numbers for the name of your Wiki.
Contact email
Enter an email address that can be used to contact the Wiki administrator. It is probably best to use an email alias here.
Language
The language for the Wiki prompts and messages (the content can be in any language, regardless of the value you choose here).
Copyright/license metadata
Читать дальшеИнтервал:
Закладка:
Похожие книги на «Fedora Linux»
Представляем Вашему вниманию похожие книги на «Fedora Linux» списком для выбора. Мы отобрали схожую по названию и смыслу литературу в надежде предоставить читателям больше вариантов отыскать новые, интересные, ещё непрочитанные произведения.


Обсуждение, отзывы о книге «Fedora Linux» и просто собственные мнения читателей. Оставьте ваши комментарии, напишите, что Вы думаете о произведении, его смысле или главных героях. Укажите что конкретно понравилось, а что нет, и почему Вы так считаете.