14.By default, the printer share is not listed in Active Directory. Listing the printer share in Active Directory makes it possible for users to search for and find the printer more easily. If you want the printer share to be listed in Active Directory, select the Printers node in the left pane, press and hold or right-click the printer in the main window, and then select List In Directory.
15.By default, print jobs are sent to the print server where they are rendered and then sent to the printer. You can change this behavior by using Branch Office Direct Printing. With Branch Office Direct Printing, print jobs are rendered on client computers and then sent directly to the printer. If you want to enable direct printing, select the Printers node in the left pane, press and hold or right-click the printer in the main window, and then select Enable Branch Office Direct Printing.
When the Network Printer Installation Wizard finishes installing the new printer, the Printers folder will have an additional icon with the name set the way you specified. You can change the printer properties and check printer status at any time. For more information, see “Configuring printer properties” later in this chapter.
TIP If you repeat this process, you can create additional printers for the same print device. All you need to do is change the printer name and share name. having additional printers for a single print device makes it possible for you to set different properties to serve different needs. For example, you could have a high-priority printer for print jobs that need to be printed immediately and a low-priority printer for print jobs that aren’t as urgent.
Connecting to printers created on the network
After you create a network printer, remote users can connect to it and use it much as they do any other printer. You need to set up a connection on a user-by-user basis or have users do this themselves. To create a connection to the printer on a Windows 7 system, follow these steps:
1.With the user logged on, tap or click Start, and then tap or click Devices And Printers. In Devices And Printers, tap or click Add A Printer to start the Add Printer Wizard.
2.Select Add A Network, Wireless Or Bluetooth Printer. The wizard searches for available devices.
3.If the printer you want is listed in the Select A Printer list, tap or click it, and then tap or click Next.
4.If the printer you want is not listed in the Select A Printer list, tap or click The Printer That I Want Isn’t Listed. On the Find A Printer By Name Or TCP/IP Address page, do one of the following:
■To browse the network for shared printers, choose Find A Printer In The Directory, Based On Location Or Feature, and then tap or click Next. Tap or click the printer to use, and then tap or click Select.
■To specify the printer to use by its share path, choose Select A Shared Printer By Name. Enter the UNC path to the shared printer, such as \\PrintServer12\Twelfth Floor NE, or the Web path to an Internet Printer, such as http://PrintServer12/Printers/IPrinter52/.printer.
■To specify a printer to use by TCP/IP address or host name, select Add A Printer Using A TCP/IP Address Or Hostname, and then tap or click Next. Choose a device type, and then enter the host name or IP address for the printer, such as 192.168.1.90. If you select the Autodetect or TCP/IP Device options, the wizard will set the port name to the same value, but you can also choose a different value. Tap or click Next.
5.On the Type A Printer Name page, the printer name is set for you. You can accept the default name or enter a new name. Tap or click Next to install the printer, and then tap or click Finish. The user can now print to the network printer by selecting the printer in an application. The Device And Printers folder on the user’s computer shows the new network printer as well.
To create a connection to the printer on a Windows 8.1 system, follow these steps:
1.In Devices And Printers, tap or click Add A Printer. The Add Printer Wizard attempts to detect the printer automatically.
If the wizard finds the printer with which you want to work, tap or click it in the list provided, follow the prompts, and skip the rest of the steps in this procedure.
If the wizard doesn’t find the printer, tap or click The Printer That I Want Isn’t Listed, and then complete the rest of this procedure.
2.In the Add Printer Wizard, tap or click Add Bluetooth, Wireless Or Network Discoverable Printer.
3.In the list of available printers, select the printer you want to use, and then tap or click Next.
4.If prompted, install the printer driver on your computer. Complete the additional steps in the wizard, and then tap or click Finish. You can confirm the printer is working by printing a test page.
If you have trouble connecting to the printer, try the following as part of troubleshooting:
■Be sure that a firewall isn’t blocking connectivity to the printer. You might need to open a firewall port to enable access between the computer and the printer.
■Be sure the printer is turned on and connected to the same network as the computer. If your network consists of multiple subnets connected together, try to connect the printer to the same network subnet. You can determine the subnet by looking at the computer’s IP address.
■Be sure the printer is configured to broadcast its presence on the network. Most network printers automatically do this.
■Be sure the printer has an IP address and proper network settings. If DHCP is configured on the network, DHCP assigns IP addresses automatically as printers connect to the network.
Deploying printer connections
Connecting to printers is fairly easy, but you can make the process even easier by deploying printer connections through Group Policy. You can deploy printer connections to computers or users via the Group Policy objects (GPOs) that Windows applies. Deploy the connections to groups of users when you want users to be able to access the printers from any computer they log on to. Deploy the connections to groups of computers when you want all users of the computers to access the printers. For per-computer connections, Windows adds or removes printer connections when the computer starts. For per-user connections, Windows adds or removes printer connections when the user logs on.
To deploy printer connections to computers, you must follow these steps:
1.In Print Management, expand the Print Servers node and the node for the server with which you want to work.
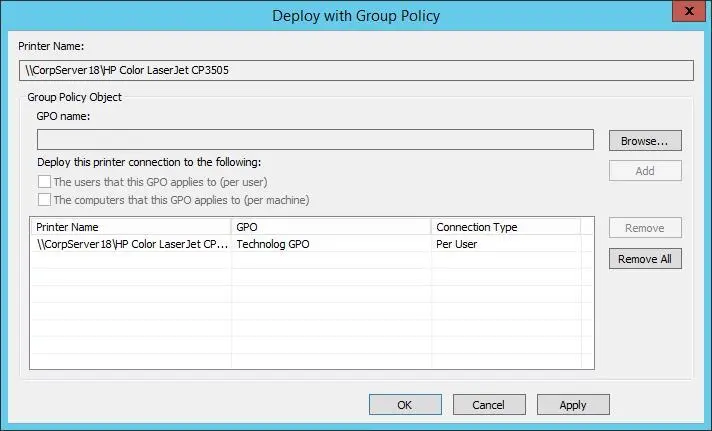
2.Select the server’s Printers node. In the main pane, press and hold or right-click the printer you want to deploy, and then tap or click Deploy With Group Policy. This displays the Deploy With Group Policy dialog box, shown in Figure 10-8.

FIGURE 10-8Select the GPO to use for deploying the printer connection.
3.Tap or click Browse. In the Browse For Group Policy Object dialog box, select the GPO to use, and then tap or click OK.
4.Do one or both of the following:
■To deploy to the printer connection on a per-user basis, under Deploy This Printer Connection To The Following, select The Users That This GPO Applies To.
Читать дальше


