William Stanek - Windows Server 2012 R2 Storage, Security, & Networking Pocket Consultant
Здесь есть возможность читать онлайн «William Stanek - Windows Server 2012 R2 Storage, Security, & Networking Pocket Consultant» весь текст электронной книги совершенно бесплатно (целиком полную версию без сокращений). В некоторых случаях можно слушать аудио, скачать через торрент в формате fb2 и присутствует краткое содержание. Жанр: ОС и Сети, на английском языке. Описание произведения, (предисловие) а так же отзывы посетителей доступны на портале библиотеки ЛибКат.
- Название:Windows Server 2012 R2 Storage, Security, & Networking Pocket Consultant
- Автор:
- Жанр:
- Год:неизвестен
- ISBN:нет данных
- Рейтинг книги:3 / 5. Голосов: 1
-
Избранное:Добавить в избранное
- Отзывы:
-
Ваша оценка:
Windows Server 2012 R2 Storage, Security, & Networking Pocket Consultant: краткое содержание, описание и аннотация
Предлагаем к чтению аннотацию, описание, краткое содержание или предисловие (зависит от того, что написал сам автор книги «Windows Server 2012 R2 Storage, Security, & Networking Pocket Consultant»). Если вы не нашли необходимую информацию о книге — напишите в комментариях, мы постараемся отыскать её.
Windows Server 2012 R2 Storage, Security, & Networking Pocket Consultant — читать онлайн бесплатно полную книгу (весь текст) целиком
Ниже представлен текст книги, разбитый по страницам. Система сохранения места последней прочитанной страницы, позволяет с удобством читать онлайн бесплатно книгу «Windows Server 2012 R2 Storage, Security, & Networking Pocket Consultant», без необходимости каждый раз заново искать на чём Вы остановились. Поставьте закладку, и сможете в любой момент перейти на страницу, на которой закончили чтение.
Интервал:
Закладка:
11.By default, print jobs are sent to the print server where they are rendered and then sent to the printer. You can change this behavior by using Branch Office Direct Printing. With Branch Office Direct Printing, print jobs are rendered on client computers and then sent directly to the printer. If you want to enable direct printing, select the Printers node in the left pane, press and hold or right-click the printer in the main window, and then select Enable Branch Office Direct Printing.
Installing and configuring physically attached print devices
Most physically attached print devices are connected to a computer directly through a USB cable. You can configure physically attached printers as local print devices or as network print devices. The key difference is that a local device is accessible only to users logged on to the computer and a network device is accessible to network users as a shared print device. Remember that the workstation or server you’re logged on to becomes the print server for the device you’re configuring. If the computer is sleeping or turned off, the printer will not be available.
You can install physically attached print devices locally by logging on to the print server you want to configure; you can install the print devices remotely through Remote Desktop. If you’re configuring a local Plug and Play printer and are logged on to the print server, installing a print device is a snap. After the printer is installed, you need to configure it for use.
You can install and configure a print device by following these steps:
1.Power on the printer, and then connect the print device to the server by using the appropriate cable.
2.If Windows Server automatically detects the print device, Windows begins installing the device and the necessary drivers. If the necessary drivers aren’t found, you might need to insert the printer’s driver disc into the CD/DVD drive.
3.If Windows Server doesn’t detect the print device automatically, you need to install the print device manually as described in the next set of instructions.
4.After you install the printer, you can configure the printer. In Print Management, expand the Print Servers node and the node for the server with which you want to work. When you select the Printers node for the server you are configuring, you’ll find a list of available printers in the main pane. Press and hold or right-click the printer you want to configure, and then tap or click Manage Sharing. This displays the printer’s Properties dialog box with the Sharing tab selected, as shown in Figure 10-5.
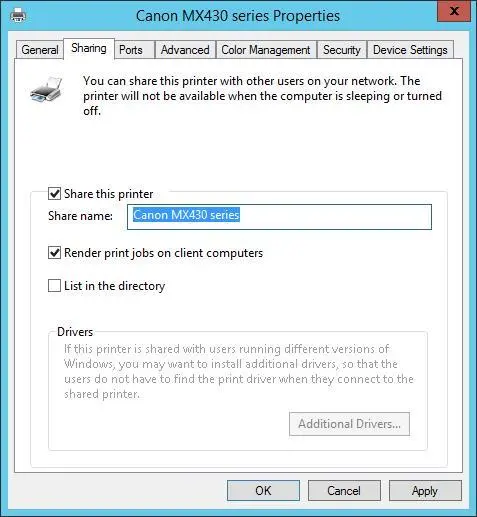
FIGURE 10-5Configure the printer by using the Properties dialog box.
5.When you select the Share This Printer check box, Windows Server sets the default share name to the name of the printer. You can enter a different name for the printer share in the Share Name text box.
6.By default, the Render Print Jobs On Client Computers check box is selected, which configures the printer for Branch Office Direct Printing. With Branch Office Direct Printing, print jobs are rendered on client computers and then sent directly to the printer. If you want print jobs to be sent to the print server for rendering and then sent to the printer, clear the Render Print Jobs On Client Computers check box.
7.Listing the printer share in Active Directory enables users to search for and find the printer more easily. If you want the printer share to be listed in Active Directory, select the List In The Directory check box.
8.Tap or click OK.
Sometimes Windows Server won’t detect your printer. In this case, follow these steps to install the print device:
1.In Print Management, expand the Print Servers node and the node for the server with which you want to work.
2.Press and hold or right-click the server’s Printers node, and then tap or click Add Printer to start the Network Printer Installation Wizard.
3.On the Printer Installation page, shown in Figure 10-6, select Add A New Printer Using An Existing Port, and then choose the appropriate LPT, COM, or USB port. You can also print to a file. If you do, Windows Server 2012 R2 prompts users for a file name each time they print. Tap or click Next.
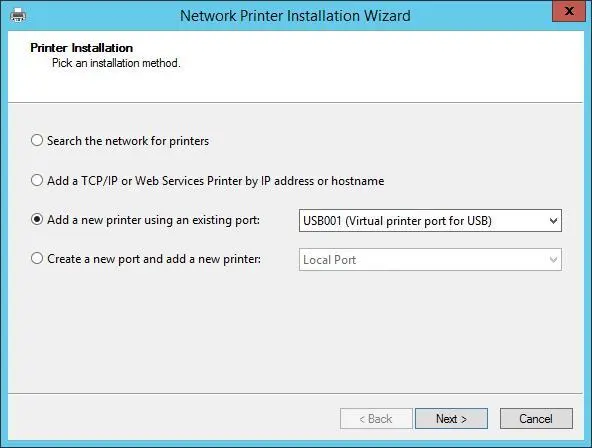
FIGURE 10-6Choose the existing port to use.
4.On the Printer Driver page, shown in Figure 10-7, choose one of the following options:
■If Windows detected the printer type on the selected port and a compatible driver was found automatically, a printer driver is listed that reflects the printer manufacturer and model and the Use The Printer Driver That The Wizard Selected option is selected by default. To accept this setting, tap or click Next.
■If a compatible driver is not available and you want to choose an existing driver installed on the computer, select the Use An Existing Driver On The Computer option. After you choose the appropriate driver from the selection list, tap or click Next.
■If multiple drivers are available for a printer, such as both PCL and PostScript drivers, and you want to use a driver other than the selected default, select the Use An Existing Driver On The Computer option. After you choose the appropriate driver from the selection list, tap or click Next.
■If a compatible driver is not available and you want to install a new driver, select Install A New Driver, and then tap or click Next. You must now specify the print device manufacturer and model. This enables Windows Server 2012 R2 to assign a printer driver to the print device. After you choose a print device manufacturer, choose a printer model.
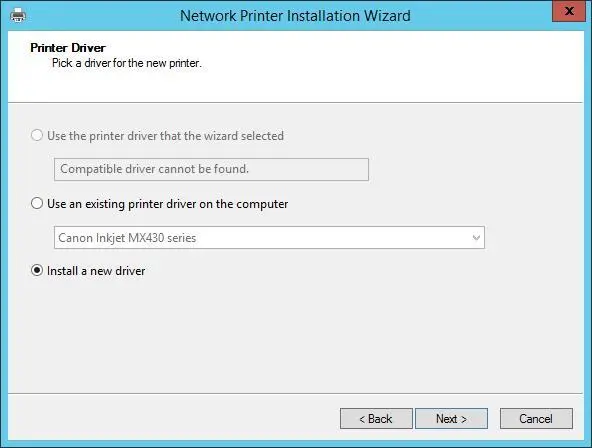
FIGURE 10-7Select the driver to use for the printer or install a new driver.
REAL WORLD If the device manufacturer and model you’re using aren’t displayed in the list, tap or click Windows Update. Windows will then connect to the Windows Update website to update the list of printers to show additional models. This automatic driver provisioning process can take several minutes. When the update process is complete, you should then be able to select your printer manufacturer and model. If you can’t, download the driver from the manufacturer’s website, and then extract the driver files. Tap or click Have Disk. In the Install From Disk dialog box, tap or click Browse. In the Locate File dialog box, locate the.inf driver file for the device, and then tap or click Open.
NOTE If a driver for the specific printer model you’re using isn’t available, you often can select a generic driver or a driver for a similar print device. Consult the print device documentation for pointers.
5.Assign a name to the printer. This is the name that will be listed in Print Management.
6.Specify whether the printer is available to remote users. To create a printer accessible to remote users, select the Share This Printer option, and then enter a name for the shared resource. In a large organization you’ll want the share name to be logical and helpful in locating the printer. For example, you could give the name Twelfth Floor NE to the printer that points to the print device in the northeast corner of the twelfth floor.
Читать дальшеИнтервал:
Закладка:
Похожие книги на «Windows Server 2012 R2 Storage, Security, & Networking Pocket Consultant»
Представляем Вашему вниманию похожие книги на «Windows Server 2012 R2 Storage, Security, & Networking Pocket Consultant» списком для выбора. Мы отобрали схожую по названию и смыслу литературу в надежде предоставить читателям больше вариантов отыскать новые, интересные, ещё непрочитанные произведения.


Обсуждение, отзывы о книге «Windows Server 2012 R2 Storage, Security, & Networking Pocket Consultant» и просто собственные мнения читателей. Оставьте ваши комментарии, напишите, что Вы думаете о произведении, его смысле или главных героях. Укажите что конкретно понравилось, а что нет, и почему Вы так считаете.