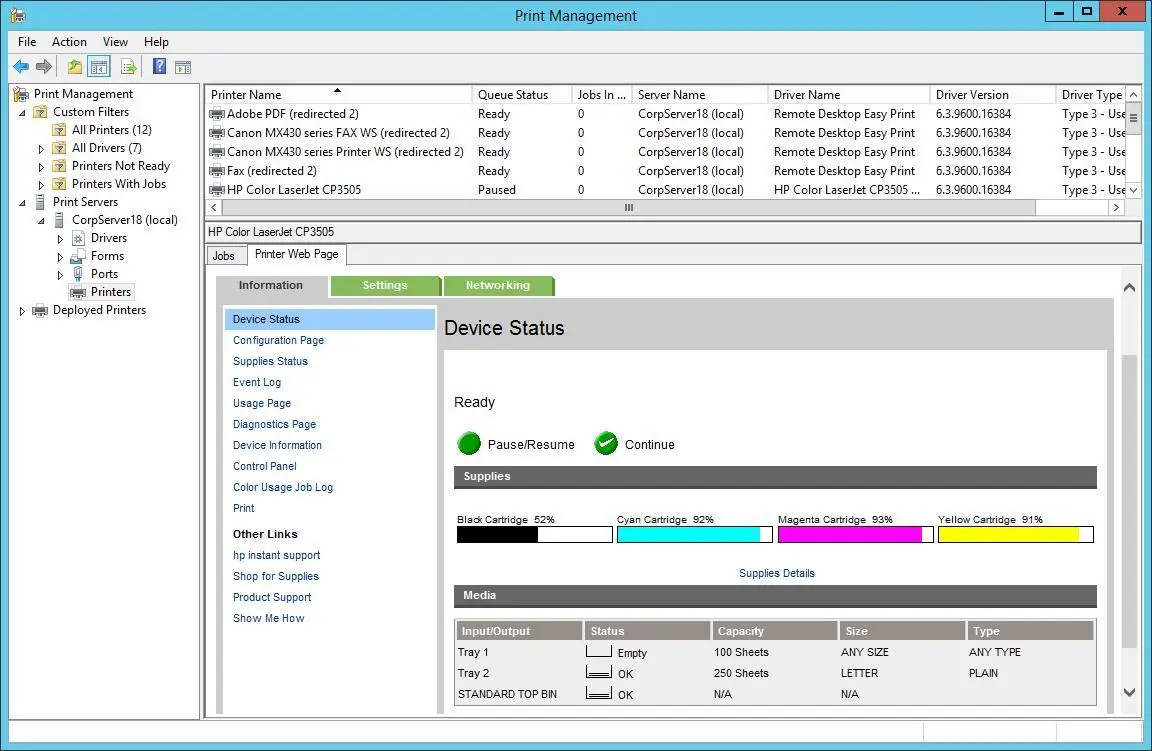
FIGURE 10-1Use Print Management to work with print servers and printers throughout your organization.
By default, Print Management enables you to manage local print servers. You can manage and monitor other print servers in the organization by adding them to the console. Additionally, to manage a remote print server, you must be a member of the local Administrators group on the print server or a member of the Domain Admins group in the domain of which the print server is a member.
When you select a print server’s Printers node, the main pane lists the associated printer queues by printer name, queue status, number of jobs in a queue, and server name. If you press and hold or right-click Printers, and then tap or click Show Extended View, you can turn on Extended view. Extended view makes it easy to track the status of both printers and print jobs by displaying information about the status of a print job, its owner, the number of pages, the size of the job, when it was submitted, its port, and its priority.
In addition, when a printer has a webpage, Extended view displays a Printer Web Page tab that lets you directly access the printer’s webpage. This webpage provides details about the printer’s status, its physical properties, and its configuration, and it sometimes allows remote administration.
You can add print servers to Print Management by following these steps:
1.In Print Management, press and hold or right-click the Print Servers node in the left pane, and then tap or click Add/Remove Servers.
2.In the Add/Remove Servers dialog box, shown in Figure 10-2, you’ll find a list of the print servers you previously added.
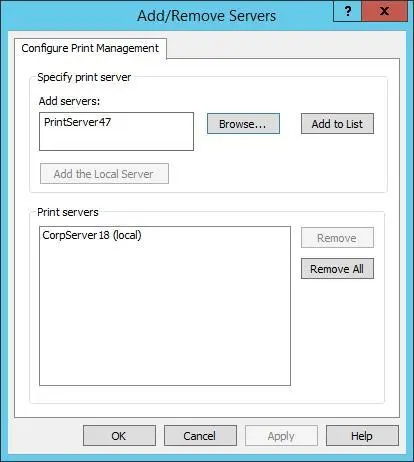
FIGURE 10-2Add print servers to Print Management so that you can manage and monitor them.
Do one of the following, and then tap or click Add To List:
■In the Add Servers list, enter or paste the names of the print servers you want to add. Use commas to separate computer names.
■Tap or click Browse to display the Select Print Server dialog box. Tap or click the print server you want to use, and then tap or click Select Server.
3.Repeat the previous step as necessary, and then tap or click OK.
You can remove print servers from Print Management by following these steps:
1.In Print Management, press and hold or right-click the Print Servers node in the left pane, and then tap or click Add/Remove Servers.
2.In the Add/Remove Servers dialog box, you’ll find a list of the print servers that are being monitored. Under Print Servers, select one or more servers, and then tap or click Remove.

The following sections examine techniques you can use to install printers. Windows Server 2012 R2 makes it possible for you to install and manage printers anywhere on the network. To install or configure a new printer on Windows Server 2012 R2, you must be a member of the Administrators, Print Operators, or Server Operators group. To connect to and print documents to the printer, you must have the appropriate access permissions. See “Setting printer access permissions” later in this chapter for details.
Using the autoinstall feature of Print Management
Print Management can automatically detect all network printers located on the same subnet as the computer on which the console is running. After detection, Print Management can automatically install the appropriate printer drivers, set up print queues, and share the printers. To automatically install network printers and configure a print server, follow these steps:
1.Start Print Management by tapping or clicking Tools in Server Manager, and then tapping or clicking Print Management.
2.In Print Management, expand the Print Servers node by double-tapping or double-clicking it.
3.Press and hold or right-click the entry for the local or remote server with which you want to work, and then tap or click Add Printer to start the Network Printer Installation Wizard.
4.On the Print Installation page, select Search The Network For Printers, and then tap or click Next.
5.The wizard searches the local subnet for network printers. If printers are found, you’ll get a list of printers by name and IP address (see Figure 10-3). Tap or click a printer to install, tap or click Next, and then continue this procedure to install the automatically detected printer.
If a printer you want to use is not listed, you should ensure that the printer is powered on and is online and then repeat this procedure. If a printer you want to use is powered on and online but is not listed, see “Installing networkattached print devices” to complete the installation.
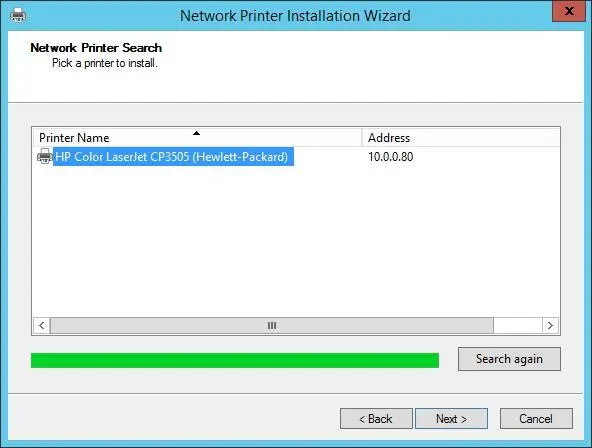
FIGURE 10-3Printers located by the wizard are listed by name and IP address.
6.The wizard automatically detects the TCP/IP port configuration of the selected printer and then communicates with the printer to obtain the information required to configure the printer. Afterward, the wizard sets the default name and share name of the printer as shown in Figure 10-4. The printer is configured as a shared resource as well.
The printer name is the name you use when you work with the printer in Print Management. The share name is the name users use when they work with the printer.
Optionally, enter information in the Location and Comment text boxes that will help users locate and identify the printer. For example, you might want to specify the printer location as: Room 314 in Building 7.
NOTE The printer name and share name can be up to 256 characters and can include spaces. In a large organization, you’ll want the share name to be logical and helpful in locating the printer. For example, you might want to give the name Twelfth Floor Ne to the printer that points to a print device in the northeast corner of the twelfth floor.
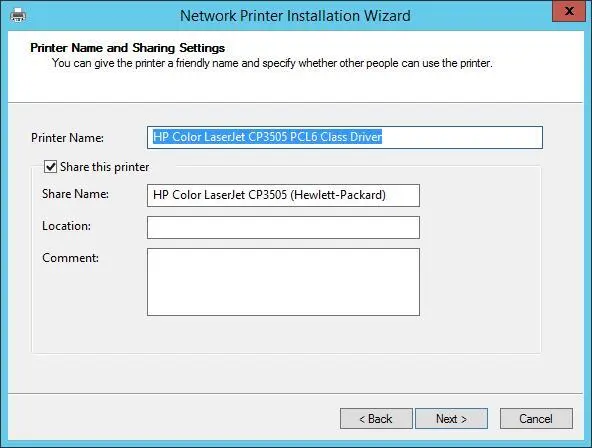
FIGURE 10-4Set the printer name and share name.
7.The next page lets you review the settings. When you’re ready to complete the installation, tap or click Next.
8.When you share a printer, Windows Server automatically makes drivers available so that users can download them when they first connect to the printer. The status page should confirm that printer driver and printer installation were successful. If there was a problem with the installation, note the errors provided. For example, someone might have powered off the printer while you were trying to configure it. If so, you’ll need to power the printer back on and repeat this procedure.
9.If you’d like to print a test page on the printer, select the Print Test Page check box, and then tap or click Finish. Otherwise, just tap or click Finish.
10.By default, the printer share is not listed in Active Directory. Listing the printer share in Active Directory enables users to search for and find the printer more easily. If you want the printer share to be listed in Active Directory, select the Printers node in the left pane, press and hold or right-click the printer in the main window, and then select List In Directory.
Читать дальше


