Isabella Beeton - Beeton's Book of Needlework
Здесь есть возможность читать онлайн «Isabella Beeton - Beeton's Book of Needlework» — ознакомительный отрывок электронной книги совершенно бесплатно, а после прочтения отрывка купить полную версию. В некоторых случаях можно слушать аудио, скачать через торрент в формате fb2 и присутствует краткое содержание. Издательство: Иностранный паблик, Жанр: foreign_antique, foreign_home, Хобби и ремесла, на английском языке. Описание произведения, (предисловие) а так же отзывы посетителей доступны на портале библиотеки ЛибКат.
- Название:Beeton's Book of Needlework
- Автор:
- Издательство:Иностранный паблик
- Жанр:
- Год:неизвестен
- ISBN:нет данных
- Рейтинг книги:5 / 5. Голосов: 1
-
Избранное:Добавить в избранное
- Отзывы:
-
Ваша оценка:
Beeton's Book of Needlework: краткое содержание, описание и аннотация
Предлагаем к чтению аннотацию, описание, краткое содержание или предисловие (зависит от того, что написал сам автор книги «Beeton's Book of Needlework»). Если вы не нашли необходимую информацию о книге — напишите в комментариях, мы постараемся отыскать её.
Beeton's Book of Needlework — читать онлайн ознакомительный отрывок
Ниже представлен текст книги, разбитый по страницам. Система сохранения места последней прочитанной страницы, позволяет с удобством читать онлайн бесплатно книгу «Beeton's Book of Needlework», без необходимости каждый раз заново искать на чём Вы остановились. Поставьте закладку, и сможете в любой момент перейти на страницу, на которой закончили чтение.
Интервал:
Закладка:
65.– Tatted Antimacassar. (See pages 574-5 Конец ознакомительного фрагмента. Текст предоставлен ООО «ЛитРес». Прочитайте эту книгу целиком, купив полную легальную версию на ЛитРес. Безопасно оплатить книгу можно банковской картой Visa, MasterCard, Maestro, со счета мобильного телефона, с платежного терминала, в салоне МТС или Связной, через PayPal, WebMoney, Яндекс.Деньги, QIWI Кошелек, бонусными картами или другим удобным Вам способом.
).
Materials: Messrs. Walter Evans and Co.'s Boar's Head cotton No. 30, or tatting cotton No. 24, or for a larger size tatting cotton No. 20; tatting-pin No. 1; large shuttle.
The illustration shows the fourth of the antimacassar and the whole of the rosette which forms the centre. Begin with the latter, with the five-branched pattern in the centre, at the same time with the following round of circles:–*Work first one circle of this round, consisting of 3 double, 1 purl, 4 times alternately 2 double, 1 purl, 3 double; then at a short distance a circle like the one just made, in which, however, instead of working the first purl, the cotton must be joined on to the last purl of the preceding circle. Then work at a short distance the first leaf of the five-branched pattern, which consists of 4 double, 1 purl, 4 double. When this branch is completed, repeat at a short distance 4 times more from *; but in working the branches of the five-branched pattern, instead of working the purl, join it on to the purl of the first branch of the five-branched pattern (this purl forms the centre of the pattern). All the circles must also be joined one to each other, as can be seen from illustration. Then work the scallops round the border of the rosette, * fasten the cotton on to the purl which joins the two next circles of the preceding round, and work one scallop consisting of 11 times alternately 2 double, 1 purl, then 2 double. Repeat 9 times more from *. When the rosette is completed, work eight rosettes in the same manner and join them into a circle from illustration by means of small three-branched patterns, and then join them on to the middle rosette.
The strip of insertion which comes next is worked in two halves as follows:–Work first, for the half turned towards the centre, two rows of circles lying opposite each other; begin with one of the largest circles, consisting of 4 double, 1 purl, 3 times alternately 2 double, 1 purl, then 4 double; * at a short distance work a smaller circle of 4 double, 1 purl, 4 double; after another short distance, a circle like the first joined on to it; then again a smaller circle, which at the place of the first purl is joined on to the purl of the preceding small circle. A short distance from this work again one of the larger circles just described, which is fastened on to the preceding similar circle; then repeat from * till the double row has nine larger and eight smaller circles. The first half of the strip of insertion is completed; the second outer half is worked like the first, only the small circles must here be worked without any purl, and two of them together must always be fastened on to the two joined small circles of the first half, as was done for the five-branched pattern of the rosette; besides this, each of the large circles has 4 double, 1 purl, 4 times alternately 2 double, 1 purl, then 4 double. When eight similar patterns have been worked, join them into a circle from illustration by means of small rosettes; this circle is then joined to the already-finished part of the cover. The small rosettes and remaining patterns of the antimacassar are easily worked from illustration. The completed patterns are joined together in the course of the work.
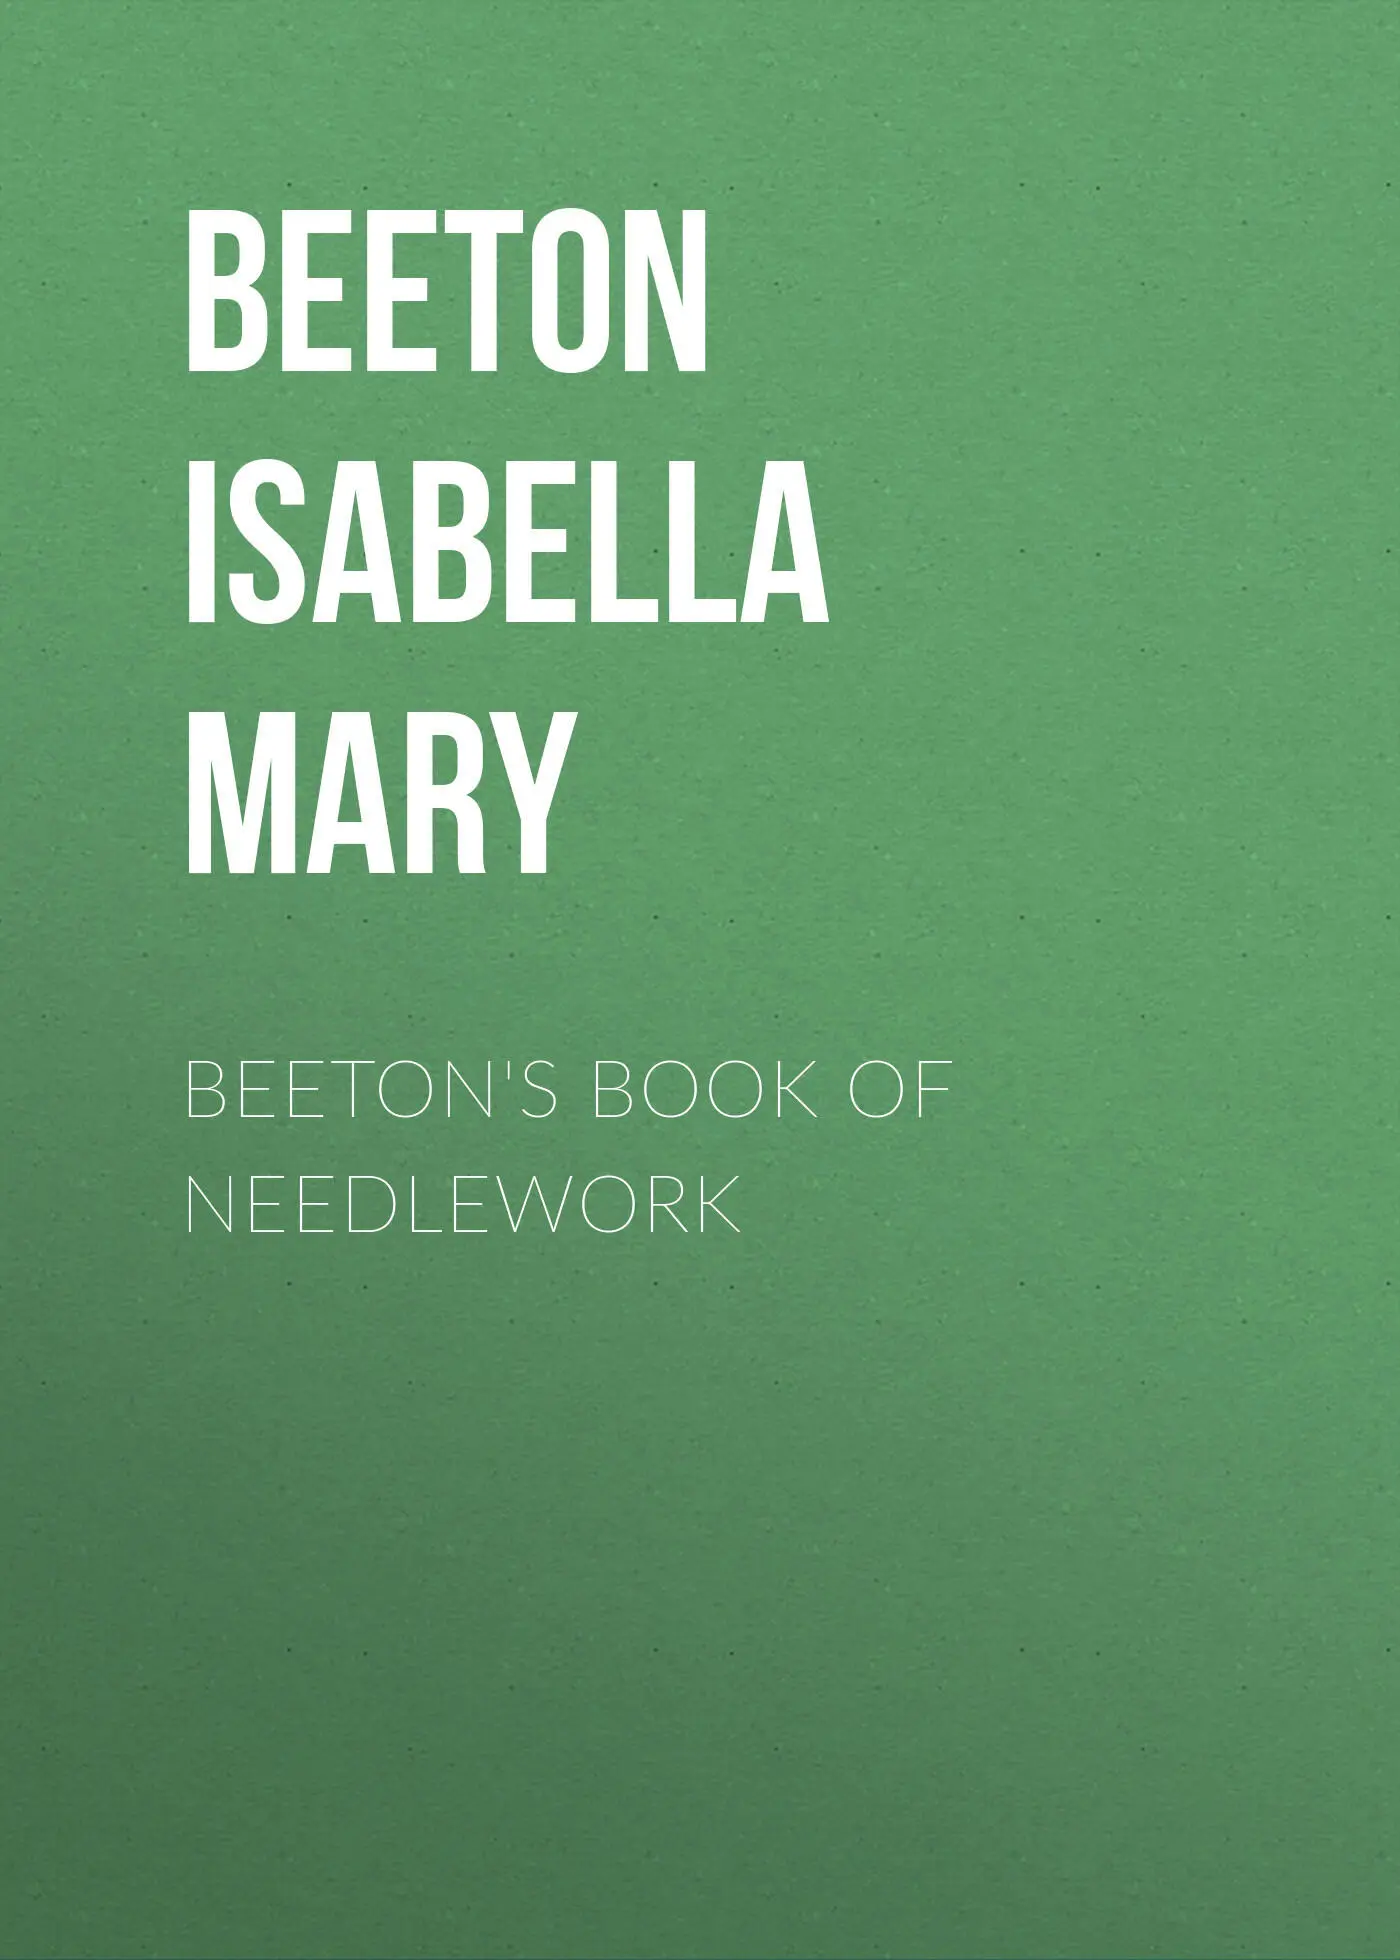
TATTING COTTON
Is supplied by Messrs. Walter Evans and Co., of Derby, in all sizes from 20 to 120. Crochet Cotton, which is preferred by some Tatters, is sold in all sizes from to 120.
The following table will assist ladies in selecting the size of either tatting or crochet cotton. All these cottons are on reels containing 100 yards:–
Ladies at a distance from town or on the Continent will be glad to have some guide as to the quantity of cotton required to complete their work. The quantity of tatting or crochet cotton used by an average worker is found to be two yards to the square inch with a single shuttle; three yards to the square inch with two shuttles.
EMBROIDERY
EMBROIDERY INSTRUCTIONS
The art of embroidering with cotton on linen, muslin, cambric, piqué, &c.c., is very easy to learn by strictly attending to the following instructions.
The size of the thread and needle must correspond to that of the material on which you embroider; the needle must not be too long, and the cotton must be soft. Messrs. Walter Evans and Co.'s embroidery cotton is the best. Skilful embroiderers never work over anything, because when you tack the material on paper or cloth each stitch shows, and if the material is very fine, leaves small holes; but for those that are learning we should advise them to tack the material to be embroidered upon a piece of toile cirée . If you work without this, place the material straight over the forefinger of the left hand; the material must never be held slantways. The three other fingers of the left hand hold the work; the thumb remains free to give the right position to each stitch. The work must always, if possible, lie so that the outline of the pattern is turned towards the person who works. For the sake of greater clearness one part of the following illustrations is given in larger size than nature. Preparing the patterns is one of the most important things in embroidery, for the shape of the patterns is often spoiled merely because they have not been prepared with sufficient care.
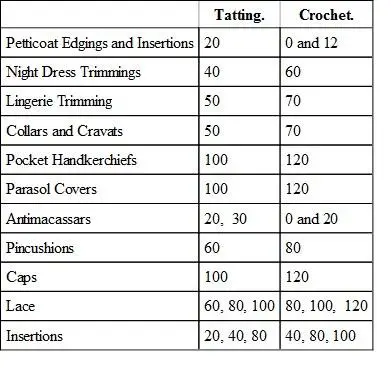
ILLUSTRATION 66 shows how to prepare a scallop. Take thicker cotton than that with which you work; never commence with a knot, and do not take a thread longer than sixteen or eighteen inches. The outlines of the scallops are first traced with short straight stitches. In the corners particularly the stitches must be short. The space between the outlines is filled with chain stitches, as can be seen from illustration; they must not be too long, otherwise the embroidery will look coarse. It is in this way that every pattern to be worked in button-hole or satin stitch is to be prepared.
ILLUSTRATION 67 shows the double overcast stitch or button-hole stitch in a straight line. After having traced the outline begin to work from left to right; fasten the cotton with a few stitches, hold it with the thumb of the left hand under the outline, insert the needle downwards above the outline, draw it out under the same above the cotton which you hold in the left hand, and draw it up. Repeat for all the stitches in the same manner; they must be regular and lie close to one another. Great care should be taken that the material on which you embroider is not puckered.
ILLUSTRATION 68 ( Overcast Stitch ).–The double overcast and the button-hole stitches are worked from left to right, whilst back stitches, knotted and satin stitches are worked from right to left. The stitch is worked in the same way as the double overcast, only the needle must never be drawn out above , but below , the cotton with which you work, and which you keep down with the thumb of the left hand.
Читать дальшеИнтервал:
Закладка:
Похожие книги на «Beeton's Book of Needlework»
Представляем Вашему вниманию похожие книги на «Beeton's Book of Needlework» списком для выбора. Мы отобрали схожую по названию и смыслу литературу в надежде предоставить читателям больше вариантов отыскать новые, интересные, ещё непрочитанные произведения.


Обсуждение, отзывы о книге «Beeton's Book of Needlework» и просто собственные мнения читателей. Оставьте ваши комментарии, напишите, что Вы думаете о произведении, его смысле или главных героях. Укажите что конкретно понравилось, а что нет, и почему Вы так считаете.