Bruce Barnbaum - The Art of Photography - An Approach to Personal Expression
Здесь есть возможность читать онлайн «Bruce Barnbaum - The Art of Photography - An Approach to Personal Expression» весь текст электронной книги совершенно бесплатно (целиком полную версию без сокращений). В некоторых случаях можно слушать аудио, скачать через торрент в формате fb2 и присутствует краткое содержание. Жанр: Старинная литература, на английском языке. Описание произведения, (предисловие) а так же отзывы посетителей доступны на портале библиотеки ЛибКат.

- Название:The Art of Photography: An Approach to Personal Expression
- Автор:
- Жанр:
- Год:неизвестен
- ISBN:нет данных
- Рейтинг книги:5 / 5. Голосов: 1
-
Избранное:Добавить в избранное
- Отзывы:
-
Ваша оценка:
The Art of Photography: An Approach to Personal Expression: краткое содержание, описание и аннотация
Предлагаем к чтению аннотацию, описание, краткое содержание или предисловие (зависит от того, что написал сам автор книги «The Art of Photography: An Approach to Personal Expression»). Если вы не нашли необходимую информацию о книге — напишите в комментариях, мы постараемся отыскать её.
The Art of Photography: An Approach to Personal Expression — читать онлайн бесплатно полную книгу (весь текст) целиком
Ниже представлен текст книги, разбитый по страницам. Система сохранения места последней прочитанной страницы, позволяет с удобством читать онлайн бесплатно книгу «The Art of Photography: An Approach to Personal Expression», без необходимости каждый раз заново искать на чём Вы остановились. Поставьте закладку, и сможете в любой момент перейти на страницу, на которой закончили чтение.
Интервал:
Закладка:
(Note: This procedure does not improve sharpness in an out-of-focus negative. It yields an appearance of increased sharpness in a negative that is already sharp.)
It’s worth noting that this is the essence of the “sharpening tool” used (and often overused) in digital printing. Digitally, if you can see a black line along the edges of any sharp tonal break (i.e., a dark building against a bright sky or a sunlit aspen against a dark background, etc.), you’ve overused the sharpening tool. This would be like making thick light and dark lines around all tonal breaks via unsharp masking. The remedy: simply pull back on the use of the sharpening tool until it’s invisible to the naked eye. Too many digital photographers fail to notice and correct this rather obvious quirk.
#2 – Highlight Masking
Arista-II Ortho Litho film is the best choice for a highlight mask. Place this high contrast film directly (emulsion-to-emulsion) in contact with your original negative in a contact printing frame or under heavy glass. After exposing through the negative, develop it in high contrast Arista Powder A/B Developer or Arista Premium Liquidlith A/B Developer. (Note: the entire procedure can be done under safelights because Ortho film is blue light sensitive only, so neither yellow nor red safelights affect it.) These products—and many other traditional photographic materials—are available through Freestyle Photo in Los Angeles. For more information, go to www.freestylephoto.biz/c-Black-and-White-Film-Ortho-Litho-Film.
If your exposure is too low, only the thinnest shadow areas of the original negative will achieve density in the mask, and those areas will develop to extremely high densities. Giving more exposure on a second try will yield a mask with high densities in the shadow and mid-tone areas of the original negative. The highlight areas of the negative will remain clear in the mask. Be sure to follow the directions for proper development; if you quit development too soon, it won’t work.
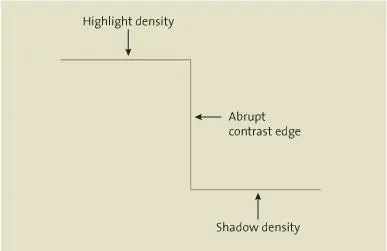
Figure 10-11. Negative density at contrast edge
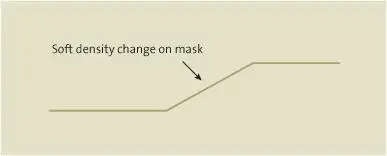
Figure 10-12. Mask density at contrast edge
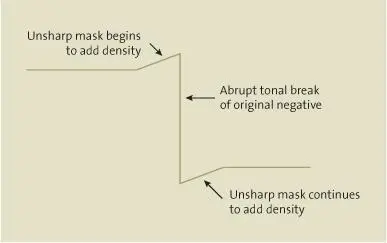
Figure 10-13. Addition of original negative and mask
The density developed in the mask greatly exceeds all densities of the original negative (in essence, the mask is opaque). So when the two are perfectly re-registered in your negative carrier, all mid-tone and shadow areas of the original negative are blacked out. You can now burn the highlight areas without fear of darkening the mid-tone or dark areas adjacent to them.
Let’s go back to the example of the old, abandoned house with a window to the outside landscape (see the section on Burning with Variable Contrast Papers). When printing the negative, you can first make an exposure with no mask to get the tones you want in the interior. Then black out the interior with the mask in perfect registration, and print only the exterior through the window. With this procedure you can really get those high negative densities to work for you.
You may also want to print the exterior at lower contrast to give it a more atmospheric, distant feel. A word of caution: be careful, because this can be overdone. You can burn the sunlit exterior too much, rendering it too dark and thereby losing the look and feel of it being much brighter than the interior. In fact, if you go hog wild, you can burn the exterior so much that its tonalities nearly match the interior. It would be absurd to do that, as you would lose any sense of realism. So, while you have immense flexibility and many options, it’s best to remain subtle and sensible with an eye toward tonal logic.
(In Chapter 11, on the digital zone system, you’ll see how you can do this with two photographic captures—one for the interior, a second for the exterior—layered together in Photoshop. It’s a simple process, but here, too, the results can be utterly illogical unless some semblance of subtlety and common sense are invoked.)
Beware of another serious potential problem: the highlight mask must be perfectly registered emulsion-to-emulsion with the negative when printing. Therefore, you must use a glass negative carrier to ensure perfect contact between the negative and mask. (This is also strongly advised for unsharp masking.) Unless you’re reversing the image by placing the original negative in the enlarger upside down (i.e., with its emulsion up), the highlight mask must be placed below the negative. Be sure to place a clear negative of equal thickness below the negative for the basic exposure, the one giving you the interior tonalities. If you fail to do this, you’ll alter the plane of the negative for the second exposure, and you’ll get a slight ghost image at the edge.
It should be apparent that masking—either contrast reduction masking or highlight masking, or both—are extraordinary tools. But like other good tools, they can be overused and abused. It was Mark Twain who said, “If the only tool you have is a hammer, it’s amazing how many things look like nails.” If you find yourself resorting to masking too frequently, it may indicate another underlying problem. It may be that your negatives are chronically overdeveloped, forcing you to print at low contrast levels in an effort to retain detail in extradense highlights. Cutting back on your negative development may solve the problem more easily and more effectively. (Of course, if the problem is underexposure, give more exposure to all your negatives in the field. That’s the only real solution to that problem.)
I strongly recommend obtaining a pin registration system. Pin registration equipment for mask making includes a punch to put holes along the edge of the negative, a glass with embedded pins corresponding to the negative holes for alignment, spacers, and a negative carrier with registration pins custom made to your enlarger. At the time of publication of this book, these items can be purchased from two sources: Lynn Radeka, 1249 Brian Street, Placentia CA 92870 (phone: 1–714-993–1685, or email: lynn@radekaphotography.com) or Alistair Inglis, 4987 Dunbar Street, Vancouver, B.C. V6N 1V4, Canada (phone: 1–604-266–0260). Their systems allow your negative carrier to be removed and reinstalled in exactly the same place for perfect alignment with any number of masks. After each exposure, the carrier can be removed (under safelights, of course, because the paper is still in the enlarger!), the current mask removed, another mask inserted, and the carrier reinserted into the enlarger for another exposure. The cost for the equipment is moderate, but the benefits are enormous, and it’s only a one-time cost.
Inspection, Evaluation, and the Myth of “Dry-Down”
All of the techniques of controlling the print during exposure and into development have now been discussed: dodging, burning, flashing, masking, variable contrast printing, and two-solution development. The final advanced technique of print control, reducing (also known as bleaching), takes place after the print has been fully developed and placed into the fixing bath. Before discussing reducing, let’s first work our way through chemical processing and on to the all-important inspection and evaluation of the image.
After I develop the print, I quickly transfer it to a stop bath for several seconds to terminate development. (I use glacial acetic acid for this purpose.) Next, I place it in the fixer (I use Kodak’s general purpose fixer with hardener) for several seconds with continuous agitation. I then turn on an initial inspection light to view the image while still in the tray.
Читать дальшеИнтервал:
Закладка:
Похожие книги на «The Art of Photography: An Approach to Personal Expression»
Представляем Вашему вниманию похожие книги на «The Art of Photography: An Approach to Personal Expression» списком для выбора. Мы отобрали схожую по названию и смыслу литературу в надежде предоставить читателям больше вариантов отыскать новые, интересные, ещё непрочитанные произведения.


Обсуждение, отзывы о книге «The Art of Photography: An Approach to Personal Expression» и просто собственные мнения читателей. Оставьте ваши комментарии, напишите, что Вы думаете о произведении, его смысле или главных героях. Укажите что конкретно понравилось, а что нет, и почему Вы так считаете.