Bruce Barnbaum - The Art of Photography - An Approach to Personal Expression
Здесь есть возможность читать онлайн «Bruce Barnbaum - The Art of Photography - An Approach to Personal Expression» весь текст электронной книги совершенно бесплатно (целиком полную версию без сокращений). В некоторых случаях можно слушать аудио, скачать через торрент в формате fb2 и присутствует краткое содержание. Жанр: Старинная литература, на английском языке. Описание произведения, (предисловие) а так же отзывы посетителей доступны на портале библиотеки ЛибКат.

- Название:The Art of Photography: An Approach to Personal Expression
- Автор:
- Жанр:
- Год:неизвестен
- ISBN:нет данных
- Рейтинг книги:5 / 5. Голосов: 1
-
Избранное:Добавить в избранное
- Отзывы:
-
Ваша оценка:
The Art of Photography: An Approach to Personal Expression: краткое содержание, описание и аннотация
Предлагаем к чтению аннотацию, описание, краткое содержание или предисловие (зависит от того, что написал сам автор книги «The Art of Photography: An Approach to Personal Expression»). Если вы не нашли необходимую информацию о книге — напишите в комментариях, мы постараемся отыскать её.
The Art of Photography: An Approach to Personal Expression — читать онлайн бесплатно полную книгу (весь текст) целиком
Ниже представлен текст книги, разбитый по страницам. Система сохранения места последней прочитанной страницы, позволяет с удобством читать онлайн бесплатно книгу «The Art of Photography: An Approach to Personal Expression», без необходимости каждый раз заново искать на чём Вы остановились. Поставьте закладку, и сможете в любой момент перейти на страницу, на которой закончили чтение.
Интервал:
Закладка:
Not only can filters be used to separate tones, but they can also be used to bring diverse tones closer together—as the green filter brought the grass and poppies together in the hypothetical example above. Jay Dusard often uses filters in this manner, separating the tonalities later in a very different manner during negative development. There may be times when a darker or lighter color can be intrusive or disruptive to a composition, and it can be better blended with its surroundings through filtration.
An example drawn from my experiences in the Utah/Arizona canyon country helps explain this idea. The dominant features of the landscape in that area are the enormous sandstone cliff faces. Some cliffs that are nearly white in color have visible horizontal lines of various red/purple hues caused by the stratification of ancient dunes or clay deposits. They also have dark, vertical eroded crevices caused by water pouring down the cliffs. Photographing these cliffs with a green filter further darkens the horizontal streaks, making them the dominant feature. A red filter, however, lightens the horizontal streaks almost to the point of tonal merger with the rest of the cliff. When the horizontal streaks nearly disappear, the vertical eroded crevices become the dominant feature. Thus, the choice of filter can potentially change the dominant line structure of the image from vertical to horizontal!
Just as with any other aspect of photography, no two photographers will have the same approach. This is the meaning of personal expression, and it is as it should be! The important thing is to use your tools with understanding and with a purpose in mind. Filters can be exceptionally useful tools.
Digital Filtration for Black-and-White
The approach that digital photography takes to filtration is quite different. Using a digital camera, all photographs can be—and most logically are—initially made in color. The color is rendered through three separate channels: red, green, and blue (RGB). Later, at the computer, the image can be broken down into each of those channels, allowing you to choose one channel or percentages of all three channels for the final photograph. Furthermore, the image can be broken down into sections so that different percentages of the channels can be used in different portions of the print. This process can be the rough equivalent of filtering one portion of the image with the most appropriate filter for that section alone (perhaps a red filter for a sky with billowing clouds) and another portion of the image with a different filter (perhaps a green filter for the grasses and trees). It can be tedious, of course, but it allows for extreme control.
With traditional photography, it would be possible (though highly impractical) to make two exposures in the field with different filters, then print one portion of the final image using the negative that benefits from the first filter and the remainder of the image from the negative that benefits from the other filter. Pin registration of the two negatives (Chapter 10) would be required.
If the initial image is made on film and then scanned later for digital purposes, the scanned image is also broken into three channels—allowing the same considerations as outlined above. However, if the initial image is a color transparency, keep in mind that the range of contrast encompassed by transparency film falls far short of a black-and-white negative. Two transparencies may be made (one for highlights and one for shadows), or even three (highlights, mid-tones, and shadows) may be exposed to cover a wider contrast range. The most advantageous selection of percentages of each channel can then be made for each part of the image. Of course, with this technique the complexity can become enormous, but it can be done. Please keep in mind that tedium is one thing and fine art is another. How many people think that Michelangelo, Shakespeare, or Beethoven avoided doing their utmost because it was too tedious?
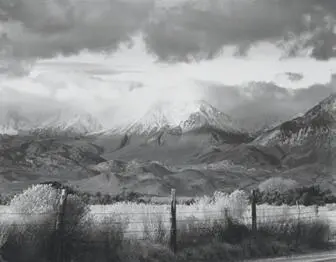
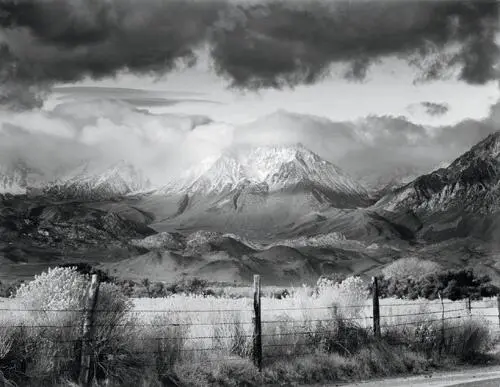
Figure 7-2 is a straight print, showing how much brighter the sky is than the foreground and middle ground of the scene. We tend not to see this tonal disparity because when we look around a scene, the eye automatically opens and closes its own aperture (the iris) to compensate for brighter and darker portions, and the brain further smoothes out the differences. The camera sees the entire scene at one aperture, often with surprising results.
With a good deal of manipulation in the darkroom, Figure 7-2 shows how the tonal imbalance is corrected by darkening the upper portion of the image, then by subtly darkening the edges to direct the eye toward the center, Basin Mountain. The manipulated image is far closer to the way I saw the scene than the straight print.
Figure 7-2. Basin Mountain, Approaching Storm
Note
If people respond favorably to one of my prints, I want them to think that they could have produced the same photograph if only they had been in the right place at the right time. I don’t want any of my manipulations to be obvious.
If the initial color image is made on negative film, which has a far greater contrast range than color transparencies (a range that virtually equals black-and-white negatives), the three-channel breakdown can be applied to the scanned negative. Different scanners, however, have different responses to the orange cast of the color negative, so a great deal of manipulation may be required to get the effect you want. Through careful calibration of your scanner, computer, and printer (or a commercial printer, if you’re using one), you can overcome most, or all, of the potential problems caused by the negative’s orange cast.
For more specific information about filtration via digital means, I recommend consulting other books devoted to that topic.
Infrared Film and Filters
Infrared black-and-white film sees more than the visible spectrum that the eye sees. It goes on into the infrared portion of the EM spectrum, immediately beyond red. Using infrared film can allow the creative photographer some interesting departures from reality. A variety of filters can be used with infrared film to accentuate or subdue the effect that this film imparts.
An infrared filter completely blocks out all visible light, allowing the film to record only the infrared component that is transmitted to the film. Use of such filters with infrared film creates some eye-popping images, both with portraits and landscapes. In portraits, skin tones are rendered in especially milky and unusual tonalities; in landscapes, sunlit foliage often appears blazingly white, as do clouds, while blue skies are rendered intensely black. An infrared filter accentuates this effect to the greatest extent. Of course, since the filter blocks out all visible light, you’ll see nothing if you look through it; it’s as opaque to your eye as a dark slide is for 4 × 5 film holders! But it allows infrared rays to penetrate through.
A #29 dark red filter allows some of the visible light onto the film, creating a nearly complete infrared effect; a #25 red filter allows still more of the visible spectrum through, yet the infrared effect is still quite strong. Going to weaker filters—such as #21 orange, #12 deep yellow, or #8 (K2) light yellow—allows progressively more visible light through to the film, and progressively more subtle infrared effects. As the infrared effect becomes more subtle, the viewer may be unaware that infrared film was used. The leaves on deciduous trees may appear to be bright, perhaps brighter than normal, but almost subliminally so.
Читать дальшеИнтервал:
Закладка:
Похожие книги на «The Art of Photography: An Approach to Personal Expression»
Представляем Вашему вниманию похожие книги на «The Art of Photography: An Approach to Personal Expression» списком для выбора. Мы отобрали схожую по названию и смыслу литературу в надежде предоставить читателям больше вариантов отыскать новые, интересные, ещё непрочитанные произведения.


Обсуждение, отзывы о книге «The Art of Photography: An Approach to Personal Expression» и просто собственные мнения читателей. Оставьте ваши комментарии, напишите, что Вы думаете о произведении, его смысле или главных героях. Укажите что конкретно понравилось, а что нет, и почему Вы так считаете.