Bruce Barnbaum - The Art of Photography - An Approach to Personal Expression
Здесь есть возможность читать онлайн «Bruce Barnbaum - The Art of Photography - An Approach to Personal Expression» весь текст электронной книги совершенно бесплатно (целиком полную версию без сокращений). В некоторых случаях можно слушать аудио, скачать через торрент в формате fb2 и присутствует краткое содержание. Жанр: Старинная литература, на английском языке. Описание произведения, (предисловие) а так же отзывы посетителей доступны на портале библиотеки ЛибКат.

- Название:The Art of Photography: An Approach to Personal Expression
- Автор:
- Жанр:
- Год:неизвестен
- ISBN:нет данных
- Рейтинг книги:5 / 5. Голосов: 1
-
Избранное:Добавить в избранное
- Отзывы:
-
Ваша оценка:
The Art of Photography: An Approach to Personal Expression: краткое содержание, описание и аннотация
Предлагаем к чтению аннотацию, описание, краткое содержание или предисловие (зависит от того, что написал сам автор книги «The Art of Photography: An Approach to Personal Expression»). Если вы не нашли необходимую информацию о книге — напишите в комментариях, мы постараемся отыскать её.
The Art of Photography: An Approach to Personal Expression — читать онлайн бесплатно полную книгу (весь текст) целиком
Ниже представлен текст книги, разбитый по страницам. Система сохранения места последней прочитанной страницы, позволяет с удобством читать онлайн бесплатно книгу «The Art of Photography: An Approach to Personal Expression», без необходимости каждый раз заново искать на чём Вы остановились. Поставьте закладку, и сможете в любой момент перейти на страницу, на которой закончили чтение.
Интервал:
Закладка:
However, used sensibly and subtly, the digital approach to color can offer tremendous rewards and exhibit remarkable visual power. The problem is not with the digital means, which afford all the control anyone could ask for. It’s in controlling you! Sometimes you may want the viewer to sit down and think rather than jump up and shout. In fact, subtle, subdued colors have their place (look at the subtlety in Japanese or Chinese paintings to see the strength of well-chosen pastels).
Another Photoshop tool that is often overused is the sharpening tool. The sharpening tool is a variation on a traditional tool known as the soft mask or the contrast reduction mask (see the masking discussion in Chapter 10). It’s nice to have sharp images, but the problem is that all too often the sharpening tool is used too heavily and a thin black line becomes visible at the edge of objects throughout the image. Sometimes, when grossly overused, it becomes a thick black line that is grotesquely obvious and bothersome, yet the photographer remains oblivious to this distraction. Once again, my advice is to use the tool subtly.
Light and Color Control
Another method of control in outdoor, natural light involves recognizing changes in the quality of light during the day. Scenes under midday light can have a cold, austere appearance, while similar scenes at sunrise or sunset can glow with warmth (Figure 6-10 and Figure 6-11). The color of sunlight changes rapidly during the first and last half hour of the day, while almost no color shift takes place during the rest of the day—only the sun’s direction changes. Enhancing early or late warm tones with a film that inherently enhances warm tones, or subduing it with films that enhance cooler tones, or altering the hue subtly on the computer, can help put your vision into your photographs. By the same token, you can intensify midday colors digitally or with films that tend toward cooler tones, or warm them up a bit with warmer-toned films.
Consider the following example. Sand dunes in the middle of the day usually possess soft lines, low contrast, and rather bland beige colors (except for a few renowned ones with quite wonderful colors). As such, they have little emotional impact from their color. But the same dunes at sunrise or sunset can be alive with reds and oranges, and their shadows give them greater tonal contrast as well. If you are seeking higher emotional impact, shoot near sunrise or sunset. If you want to heighten the mood still more, use a warm, contrasty film. If you like warm colors but want a softer rendition, use a lower contrast film and/or one that is stronger in cool colors. If you want a quieter mood, shoot during the midday hours, remembering that changes in color balance or contrast among films can edge the image one way or another emotionally. Digitally, of course, you can increase or decrease saturation, hue, color balance, and contrast quite easily on the computer, giving you remarkable options beyond those of film.
It’s important to be aware of the fact that all daylight films are balanced for sunlight and they display a heavy blue tone on overcast days or in shadow areas. This blue shift may be perfect for a few subjects, but harmful for most. This blue cast can be neutralized by filters (see Chapter 7). Only if you are aware of the color shift can you work with it to your advantage (Figure 6-12, Figure 6-13, and Figure 6-14).
In the same way, indoor color film is balanced for tungsten light of a specific color temperature. If a different type of tungsten bulb is used, the color balance will be altered—usually in a detrimental fashion, but sometimes beneficially, if you know which way the colors will shift. In any studio situation, you can alter the lighting as well as the film, and you can filter either one for maximum control. There is no need to wait for conditions to change, as you often must in outdoor situations. Beware of the effect of fluorescent light; everything takes on a strong green cast which can be corrected only with heavy filtration.
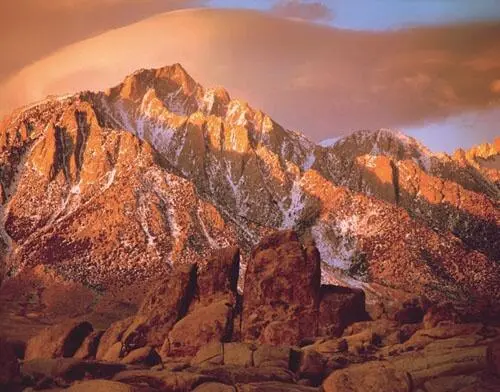
Taken at sunrise as a dramatic cloud swept over the rugged Sierra summit, this photograph displays the warm coloration characteristic of early morning and late evening light. The same scene photographed during the midday hours would have had a cold, blue-gray color throughout. Color is dramatically different during the first few minutes and final few minutes of the day.
Figure 6-10. Mt. Lone Pine and Sierra Wave Cloud
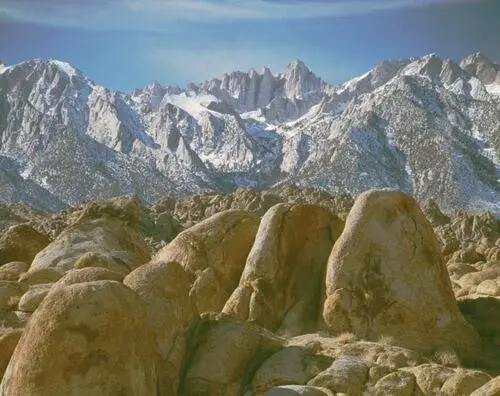
Taken from a location close to that of Figure 6-10, but at midday, this image displays a color balance that has changed to cooler, bluer hues. It’s surely a truer rendition of the actual colors of the scene, but the colors of sunrise and sunset can’t be overlooked.
Figure 6-11. Sierra Nevada Mountains and Alabama Hills

These two photographs were made minutes apart in the same location, Figure 6-12 under sunlit conditions and Figure 6-12 as a cloud passed over the scene. These images show subtle but important differences in the film’s color balance. Figure 6-12 (in shade) exhibits a colder blue tone in both the melting snow and granite rocks on the high slopes. That color balance strikes me as more appropriate to convey the feeling of cold, as opposed to the yellower, warmer rendition in sunlight.
Figure 6-12. Snow Cups, Sierra Nevada Mountains
The foregoing discussion has involved issues during the day, but what about nighttime color photography? In urban areas, contrast created by the inverse square law where streetlights and other point sources produce extremely spotty, contrasty situations is difficult to overcome. One clever way to overcome this is to shoot well after sunset (or before sunrise) but with enough dusk or dawn light to even out the spotty lighting. Away from point sources, moonlight photography can be quite successful. Generally, light levels will be too low for your meter to respond, but you can experiment with exposure times under full moon, half moon, or quarter moon lighting. Once you lock in the necessary times for such lighting—always requiring extended exposures—you can open up a whole new area of photography that you had previously never considered (Figure 6-15).
In-camera digital sensors can detect the color balance of light and correct white balance extremely effectively, obviating serious problems that film encounters regularly. This is a great advantage for color digital work. But then again, there can be exceptions such as the following.
Not long after World War II, portraitist Arnold Newman was commissioned to photograph Alfred Krupp of Germany, the industrial baron and Nazi arms supplier. Newman was Jewish. He managed to get Krupp to pose for him on a small platform raised above the spreading floor of his factory, with the assembly lines below as a background. Fluorescent lights flooded the factory, and Newman augmented them with auxiliary lighting placed below Krupp’s face and almost behind him. He did not filter to correct the fluorescent color shift. Because the two of them were high above the factory floor, nobody else saw what was happening, and Krupp himself had no knowledge of photographic processes. The resulting portrait shows a ghastly, green-faced monster with ominous shadows crossing his face diagonally from below—the devil incarnate. Newman knew what he wanted and he understood his material. The powerful effect might have been far more difficult to achieve digitally due to effective white balance sensors. But I must also admit that the black-and-white version of this portrait is, to my mind, even more effective simply because the sick green color is missing. To me, that color goes overboard and pushes the envelope too far.
Читать дальшеИнтервал:
Закладка:
Похожие книги на «The Art of Photography: An Approach to Personal Expression»
Представляем Вашему вниманию похожие книги на «The Art of Photography: An Approach to Personal Expression» списком для выбора. Мы отобрали схожую по названию и смыслу литературу в надежде предоставить читателям больше вариантов отыскать новые, интересные, ещё непрочитанные произведения.


Обсуждение, отзывы о книге «The Art of Photography: An Approach to Personal Expression» и просто собственные мнения читателей. Оставьте ваши комментарии, напишите, что Вы думаете о произведении, его смысле или главных героях. Укажите что конкретно понравилось, а что нет, и почему Вы так считаете.