Bruce Barnbaum - The Art of Photography - An Approach to Personal Expression
Здесь есть возможность читать онлайн «Bruce Barnbaum - The Art of Photography - An Approach to Personal Expression» весь текст электронной книги совершенно бесплатно (целиком полную версию без сокращений). В некоторых случаях можно слушать аудио, скачать через торрент в формате fb2 и присутствует краткое содержание. Жанр: Старинная литература, на английском языке. Описание произведения, (предисловие) а так же отзывы посетителей доступны на портале библиотеки ЛибКат.

- Название:The Art of Photography: An Approach to Personal Expression
- Автор:
- Жанр:
- Год:неизвестен
- ISBN:нет данных
- Рейтинг книги:5 / 5. Голосов: 1
-
Избранное:Добавить в избранное
- Отзывы:
-
Ваша оценка:
The Art of Photography: An Approach to Personal Expression: краткое содержание, описание и аннотация
Предлагаем к чтению аннотацию, описание, краткое содержание или предисловие (зависит от того, что написал сам автор книги «The Art of Photography: An Approach to Personal Expression»). Если вы не нашли необходимую информацию о книге — напишите в комментариях, мы постараемся отыскать её.
The Art of Photography: An Approach to Personal Expression — читать онлайн бесплатно полную книгу (весь текст) целиком
Ниже представлен текст книги, разбитый по страницам. Система сохранения места последней прочитанной страницы, позволяет с удобством читать онлайн бесплатно книгу «The Art of Photography: An Approach to Personal Expression», без необходимости каждый раз заново искать на чём Вы остановились. Поставьте закладку, и сможете в любой момент перейти на страницу, на которой закончили чтение.
Интервал:
Закладка:
That, of course, would be the perfect test for threshold. But instead of developing the test paper after the twenty exposures as you would for a threshold test, this time cover half of the test paper with a cardboard, covering half of each of the exposures. Now turn on all safelights in the darkroom. Leave them all on for a minimum of eight minutes, then develop the paper. Half of the test paper was now exposed to each of the enlarger exposures only; the other half received the enlarger exposures plus the safelight exposure.
If the safelights put on as little as one unit of light during that eight-minute exposure, each visible band of gray would become one band darker. By comparing densities of gray bands across the portion that was covered by the cardboard during the safelight exposure, you can determine exactly how safe—or unsafe—your safelights are.
Enlarger Light Uniformity Test
If the light distribution across your negative is uneven, your prints will suffer greatly. This is a universal problem, but may be correctable. The way to test enlarger uniformity is this. Focus a negative at 8″ × 10″, then remove the negative. At any of your common working apertures (say, f/8, f/11, or f/16) expose a sheet of enlarging paper for a short enough time that it will develop to about Zone 5, the 18 % gray card. (If the paper is too dark gray or too light gray, the test will not be as effective.)
Now, see if it is uniformly dense from edge-to-edge and from corner-to-corner. Then, tear the paper right down the middle, and place each corner successively against the torn center. Is the density even? Generally, there is a significant light fall-off toward the edges and corners, and this can be corrected by extra burning of each negative outward from the center. If your enlarger exhibits this common problem, you can correct it as long as you are aware of it.
The real problem comes if the fall-off is erratic or if you have somewhat of a checkerboard pattern of light and dark areas across the gray print. If you have this problem, you should buy a new light source, because there is no way to correct it!
Enlarger Lens Sharpness Test
Tape hairs across your negative carrier from opposite corners (if you are bald, borrow someone else’s hair!). Be sure the hairs are pulled tightly. Focus on the crossing point. Are the hairs sharp at the edges? Stop down. Do they become sharp? If so, at what aperture? Always stop down to at least that aperture. (You should check this by actually exposing the cross hairs and developing the prints.) Do the cross hairs lose sharpness if you stop down beyond a certain aperture? If so, do not stop down that far.
A further test is to again use hairs; this time taping them across each of the four corners of your negative carrier (i.e., diagonally from one edge to the next, close to the corner) and perform the same test. The reason for this is that the lens may blur outward from the center in a uniform manner, and the two cross hairs radiating out from the center may not show the blurring that can be seen on hairs that cross them near the four corners. If both tests show the hairlines to be sharp, you have an excellent lens. If not, consider buying a new one.
Add to this list of tests as you see fit, but make sure your tests are good ones or they waste time and accomplish nothing. It is a good feeling to know your equipment and materials. Even if you find some minor defects or limitations, at least you will be aware of them and you may be able to work around them.
Appendix B. Enlarger Light Sources
THERE ARE THREE BASIC TYPES OF ENLARGER LIGHT SOURCES: diffusion, condenser, and point source. Each has its proponents, and each has characteristics that differ from the others. Diffusion gives the softest contrast of the three, point source the harshest, and condenser somewhat closer to point source than to diffusion—perhaps two-thirds of the way to point source.
With diffused illumination, such as a cold light source (so named because the fluorescent-type light source puts out little heat in relation to its light output) or a bulb diffusion source (such as the color/light heads of the Saunders LPL, Omega, and Beseler enlargers, or the variable contrast heads made by Saunders or Oriental, among others), the gradations of contrast are softer and smoother, especially in the highlights. A negative that will print with barely perceptible highlight detail from a diffused light source will lose that detail if printed with a condenser or point source enlarger. A point source enlarger is one that has a small, intensely bright lamp, such as a projector-style quartz-halogen bulb placed far from two glass condensers, which collimate the light and send parallel rays down through the negative. This light creates the sharpest contrast of all. A negative that will print with barely perceptible highlight detail with a point source light will lose a slight degree of “snap” in those highlights with a condenser source, and the same highlights will be somewhat grayed with a diffusion source.
The condenser enlarger is effectively a “poor man’s point source enlarger”. It has the same familiar glass condensers as the point source, but it uses a conventional bulb as its light source, and the bulb is placed relatively close to the condensers. The width of the bulb itself, and its proximity to the condensers, prevents the condensers from perfectly collimating the light, but a fairly good approximation of true collimated light is achieved.
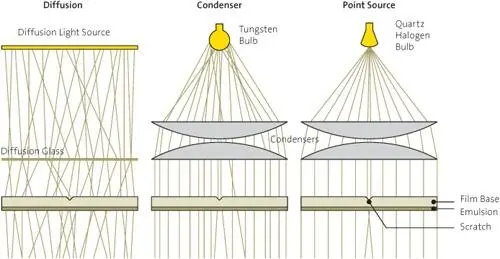
The light from the diffusion enlarger (left) reaches the emulsion beneath the scratch in the base (base thickness is exaggerated in diagram) because light is refracted through the film base from all directions. With the condenser and point source, parallel beams of light refract away from the emulsion beneath the base. The scratch will be harder to see under diffusion enlargement .
Figure B-1. Enlarger light sources Diffusion (left); Condenser (center); Point Source (right)
Photographers argue the merits of these light sources, but the fact is that each works well as long as the negative made for it is appropriate. Use of a point source enlarger necessitates a lower contrast negative than one required for diffusion. As long as the entire system is compatible with itself, it will do the job.
Some people claim that the diffusion enlarger has less sharpness than the point source or even the condenser. It may be true, but I don’t feel disappointment with lack of sharpness in my prints, nor was I unhappy with Ansel’s sharpness. If a sharpness difference does exist, it may be measurable by instruments, but is not readily apparent to the eye.
The diffusion enlarger can claim superiority in one respect: slight scratches in the film base will be rendered invisible, but will be visible with the condenser or point source. The reason is that light from the diffuser hits the negative from all angles, is then refracted crazily through the thickness of the negative’s base before hitting the emulsion, and continuing on to the focusing lens. Slight scratches in the film’s base will cause different refraction patterns through the thickness of the negative, but light will still go through all portions of the negative. With the condenser, and even more with the point source, the collimated light hits the scratch and is diverted to the side, while light hitting elsewhere on the negative’s surface goes essentially straight through. So, less light hits the emulsion below the scratch, and it is recorded as a lighter line on the print.
All negatives can be scratched, but if film holders are kept clean and pressure plates on roll film holders are cleaned regularly, and the negative is handled with care, scratches will be held to a minimum. These precautions should be followed by all photographers, under any circumstances, so do not use this as an excuse to shy away from condenser or point source enlarger light sources.
Читать дальшеИнтервал:
Закладка:
Похожие книги на «The Art of Photography: An Approach to Personal Expression»
Представляем Вашему вниманию похожие книги на «The Art of Photography: An Approach to Personal Expression» списком для выбора. Мы отобрали схожую по названию и смыслу литературу в надежде предоставить читателям больше вариантов отыскать новые, интересные, ещё непрочитанные произведения.


Обсуждение, отзывы о книге «The Art of Photography: An Approach to Personal Expression» и просто собственные мнения читателей. Оставьте ваши комментарии, напишите, что Вы думаете о произведении, его смысле или главных героях. Укажите что конкретно понравилось, а что нет, и почему Вы так считаете.