James Flinn - Building the Balalaika
Здесь есть возможность читать онлайн «James Flinn - Building the Balalaika» весь текст электронной книги совершенно бесплатно (целиком полную версию без сокращений). В некоторых случаях можно слушать аудио, скачать через торрент в формате fb2 и присутствует краткое содержание. Год выпуска: 1984, ISBN: 1984, Жанр: Руководства, music, на английском языке. Описание произведения, (предисловие) а так же отзывы посетителей доступны на портале библиотеки ЛибКат.

- Название:Building the Balalaika
- Автор:
- Жанр:
- Год:1984
- ISBN:0-9613258-0-1
- Рейтинг книги:4 / 5. Голосов: 1
-
Избранное:Добавить в избранное
- Отзывы:
-
Ваша оценка:
Building the Balalaika: краткое содержание, описание и аннотация
Предлагаем к чтению аннотацию, описание, краткое содержание или предисловие (зависит от того, что написал сам автор книги «Building the Balalaika»). Если вы не нашли необходимую информацию о книге — напишите в комментариях, мы постараемся отыскать её.
Building the Balalaika — читать онлайн бесплатно полную книгу (весь текст) целиком
Ниже представлен текст книги, разбитый по страницам. Система сохранения места последней прочитанной страницы, позволяет с удобством читать онлайн бесплатно книгу «Building the Balalaika», без необходимости каждый раз заново искать на чём Вы остановились. Поставьте закладку, и сможете в любой момент перейти на страницу, на которой закончили чтение.
Интервал:
Закладка:
Sand and scrape the top surface to a high gloss. Do not taper the outer edges of the fretboard at this time. Keep it square. It is best to make a fret scale from aluminum with a tapered edge. Mark the fret locations on the tapered edge of the aluminum with a sharp knife-like tool. It is a good idea to use a scale which is graduated in l/50ths of an inch such as the Dietzgen 1590. The aluminum scale is then used to mark the fretboard by scratching a fine line then scribing it across the width of the fretboard with a try-square. Before we mark the fretboard we need to discuss the "zero" fret. Prokopenko calls this a "registering" fret. Normally, the length of a string is measured from the nut to the bridge. Some luthiers place a "zero" fret... which is a fret of a larger size than the rest of the frets... in the location where the nut is normally placed. The nut is then placed 1/ 4" or ao behind the zero fret and lower than this fret so that the string rests on the fret as well as the nut. This assures a very low string action. In this case the string length is measured from the zero fret to the bridge. This is no gimmick and I have seen such frets on some exceptionaly fine instruments. An illustration of this, as well as the conventional nut placement, is shown in Fig. 27.
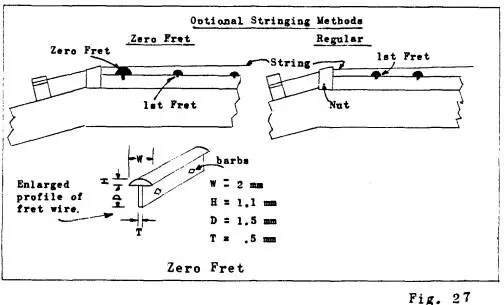
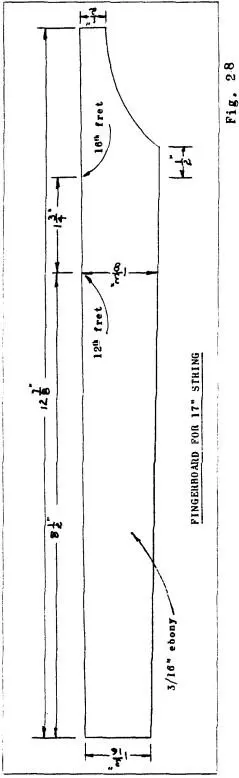
Fret wire comes in a variety of sizes. An enlarged cross-section of fretwire suitable for the prima balalaika is shown in Fig. 27. The wire comes in soft and hard types with the hard type being preferred. A fretsaw that has a blade width the exact size of the tang of the fretwire is used to cut the slots for the frets. The slots should be slightly deeper than the tang but not so deep as to cut beyond half the thickness of the fretboard. An improvised miter box, as well as a small wooden try-square, can be fabricated to guide the saw. After the slots have been cut, the fretboard can now be cut to its final shape. This is shown in Fig.28.
Mother-of-pearl dots, 6mm, are inlaid in the center of the spaces above the 2nd, 5th, 7th, 10th, 12th, and 14th frets and 5mm dots above the 17th, and 19th frets. A special mark can be placed above the 12th fret to identify it as an octave fret. Drill holes for these dots deep enough to permit them to remain slightly above the surface of the fretboard. Attach them with epoxy cement. When dry, sand them flush with the surface. Sand and scrape the board to its final smoothness as this will be the last chance before the frets get in the way. Install only the 17th to the 24th frets at this time. I like to cut the wire 1/ 4" longer than needed and then cut the ends off after the fret is in place. Start the fret in the slot with a hammer and drive it home with a wooden block insulating the hammer from the fret. File the ends of the frets flush with the edge of the fretboard and inspect for burrs. The ends of the frets should be rounded so that they take the same contour as the fret in its longitudinal direction. Do not round off any edges of the fretboard at this time. This precaution primarily concerns the fretboard from the 16th to the 24th fret. The reason is that we want the fingerguard to fit tightly around the fingerboard at this location. Now place the fretboard on the neck and hold the balalaika up to a light. Looking into the light, sight down the prospective fingerboard/neck joint to determine if it is well mated. Take special note of the fingerboard as it extends over the soundboard.
Make a pencil mark on the soundboard in the position of the 20th fret. Glue a 1/ 4x 1/ 8" strip of spruce or other softwood on the soundboard from the 16th to the 20th fret so that the strip is centered under the extended length of the fretboard. When the glue is dry, taper this strip from 0" at the 16th fret to approximately 1/ 16" at the 20th fret. Place the fingerboard on the neck and keep shaving the strip until it rests flat under the fingerboard. The strip is placed in this position to strengthen the extended portion of the fretboard which is in "free air" over the soundboard. The strip is not placed under the whole length because it will then rest on a vibrating portion of the soundboard. The 20th fret is the position that marks the end of the shoulder block. Glue the fretboard to the neck, being careful to place the 16th fret at the neck/body joint. Caution; if you are using an oily wood such as ebony or rosewood, wash the surface to be glued with Bestine before gluing. This will remove any oily film that may be on the surface. Bestine is a solvent used to reduce rubber cement and is sold in office supply stores. Be sure to observe the fume and flammability precautions on the label.
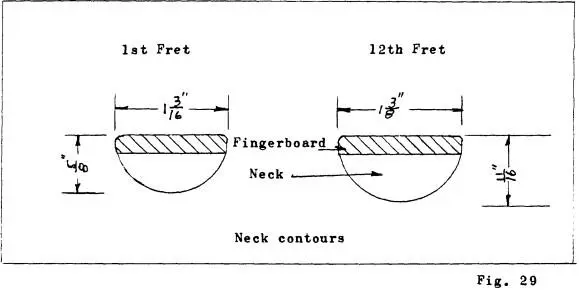
The head and neck are now ready for the final shaping, sanding and melding in with the body. Install the ebony nut at the edge of the fingerboard as shown in Fig. 20. Use cyanoacrylate adhesive for this. Trim the block at the neck/body joint to gracefully conform to the contour of the balalaika shown in Fig. 3. Complete the fretting of the fingerboard. Place a cradle-like block under the fingerboard so that the fret hammer shock is properly absorbed. Shape the underside of the neck to the profile shown in Fig.29. Round off the edges of the fingerboard and the frets so that your fingers make a smooth transition over the frets.
The Fingerguard
Fabrication and installation of the fingerguard, or pancer, is one of the last items to work on. There are many designs for the shape of this part. Its prime function is to prevent the soft soundboard wood from being scratched and worn by the fingers while strumming the instrument. Specifications for this part are as follows; (1) it should be made from a hard, tight-grained wood; (2) the top edge should be flush with the top edge of the fingerboard; (3) it should not touch the soundboard except along the edges; and (4) it should cover a wider segment of the left side of the instrument because of the downward sweep of the strumming hand. A suggested shape for the fingerguard is supplied in Fig. 30 along with the details for attaching it to the top. The fingerguard is first cut to rough size and carefully fitted to the contour of the fingerboard. The wedges, made of the same species of wood as the fingerguard, are cut and glued to the underside of the fingerguard. Notice that the fingerguard comes to a rather sharp point where it terminates with the neck. Make sure that the wedges fit well at this point as it will reinforce the edge. The portion of the fingerguard that outlines the shape of the fingerboard should be reinforced by gluing a piece of veneer to the underside running at right angles to the grain of the fingerguard. Drill holes for the screws in the fingerguard in positions noted in Fig. 30 and attach to the body. It is not necessary to glue this part in place. This makes it easier to replace a worn fingerguard as well as facilitating removal of the soundboard if repairs are required. Sand and scrape the edges of the guard until they fit the contour of the body. (Some balalaika makers glue thin strips of felt beneath the fingerguard to dampen oscillations that may be transmitted from the soundboard by contact or induction. It is possible, that at certain frequencies, the fingerguard can be induced to vibrate and cause tonal problems. If the fingerguard acts "noisy" it is best to insulate it from the fingerboard. This is done by applying a thin strip of adhesive-backed felt along the edge of the fingerboard as it touches the fingerguard. The slot in the fingerboard will have to be trimmed to accomodate this and then reinstalled tightly against the felt.) Remove the fingerguard from the instrument as this will not be finished.
Читать дальшеИнтервал:
Закладка:
Похожие книги на «Building the Balalaika»
Представляем Вашему вниманию похожие книги на «Building the Balalaika» списком для выбора. Мы отобрали схожую по названию и смыслу литературу в надежде предоставить читателям больше вариантов отыскать новые, интересные, ещё непрочитанные произведения.


Обсуждение, отзывы о книге «Building the Balalaika» и просто собственные мнения читателей. Оставьте ваши комментарии, напишите, что Вы думаете о произведении, его смысле или главных героях. Укажите что конкретно понравилось, а что нет, и почему Вы так считаете.