James Flinn - Building the Balalaika
Здесь есть возможность читать онлайн «James Flinn - Building the Balalaika» весь текст электронной книги совершенно бесплатно (целиком полную версию без сокращений). В некоторых случаях можно слушать аудио, скачать через торрент в формате fb2 и присутствует краткое содержание. Год выпуска: 1984, ISBN: 1984, Жанр: Руководства, music, на английском языке. Описание произведения, (предисловие) а так же отзывы посетителей доступны на портале библиотеки ЛибКат.

- Название:Building the Balalaika
- Автор:
- Жанр:
- Год:1984
- ISBN:0-9613258-0-1
- Рейтинг книги:4 / 5. Голосов: 1
-
Избранное:Добавить в избранное
- Отзывы:
-
Ваша оценка:
Building the Balalaika: краткое содержание, описание и аннотация
Предлагаем к чтению аннотацию, описание, краткое содержание или предисловие (зависит от того, что написал сам автор книги «Building the Balalaika»). Если вы не нашли необходимую информацию о книге — напишите в комментариях, мы постараемся отыскать её.
Building the Balalaika — читать онлайн бесплатно полную книгу (весь текст) целиком
Ниже представлен текст книги, разбитый по страницам. Система сохранения места последней прочитанной страницы, позволяет с удобством читать онлайн бесплатно книгу «Building the Balalaika», без необходимости каждый раз заново искать на чём Вы остановились. Поставьте закладку, и сможете в любой момент перейти на страницу, на которой закончили чтение.
Интервал:
Закладка:
be trimmed after the ribs are in place and then cut down to a triangular shape. Do not be concerned with compression cracks on the inside of the curved surface which occur during the bending process. Set the linings aside but keep the platform handy.
The shoulder block (end block) is the next component to make. It is an odd shaped rascal and rather tricky to fabricate. Start with a rectangular block of tight-grained, light-weight wood (again, I like to use yellow poplar) 1 1/ 4x 2 1/ 4x 3 3/ 4" with the grain end on the narrow surface. Refer to Fig. 10 for a pictorial of how this block eventually gets shaped into the shoulder block. Keep these dimensions to a high tolerance as they will affect the setting of the neck.
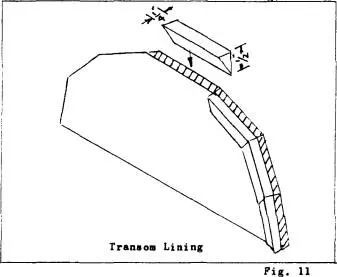
Now the linings, transom and shoulder block are to be assembled on the platform. However, before we do this, it is necessary to build up the edges of the transom upon which will be glued the ribs. This is done by gluing a 1/ 8x 3/ 16" lining on the inside surface of the transom at each facet that will join with a rib. Glue these rectangular strips to the transom as indicated in Fig. 11. I use Franklin Titebond glue for this purpose. (This applies to all other references of gluing unless stated to the contrary.) On the center and the two adjacent ribs be sure to extend the lining beyond the beveled edge and later plane it flat with this surface as well as with the other rib surfaces. In dressing these edges with a block plane, you will see why it was necessary to scribe pencil reference marks on the transom where the rib angle changes.
Carefully place the shoulder block in its proper position on the platform and attach it with small screws from underneath. Keep the block centered and in proper alignment. Attach the transom to the transom support block (gusset) by drilling a hole through the transom and screwing it to the block. The hole in the transom will be plugged later and covered with veneer.
For those using a solid transom, drill this hole near the top of the transom (long edge) where the peg for the middle string will be located. Fit the side linings snug against the transom and the shoulder block. If the curve you bent in the lining does not quite match the contour of the platform this is not a matter for concern. Make sure that the lining is even with, or extends beyond, the edge of the platform. Place a spot of glue on the ends of the linings as they butt the shoulder block and transom and then screw them in place from underneath. Excess stock on the lining should now be trimmed off with a small plane and dressed to conform to the outline of the platform.
See Fig. 6.
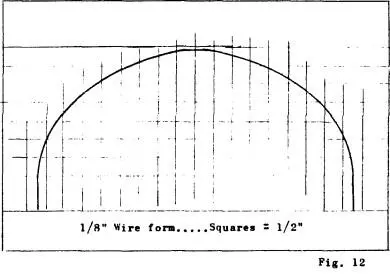
We have one more attachment to affix to the platform before rib cutting time. Please note the side profile of the balalaika in Fig.3. Note the graceful curve of the body as it flows from the transom to the shoulder (or heel if you prefer). To get this line it is helpful to add a stiff wire to the platform to assure that the curve is most pronounced on the center and the two adjacent ribs. Drill two holes in the platform the size of a heavy wire (approximately 1/ 8" diam.) as shown in Fig. 5. Steel wire is best because of its stiffness. A bail from an old bucket does fine. Bend the wire to the approximate shape shown in Fig. 12 and insert the ends in the two holes we have drilled in the platform.
We need not be too concerned at this time with the linesof the two outer ribs. The curve of these ribs will be governed by the shape of the platform. Some latitude is permitted here in forming the shape of the body. A deep or shallow body may be sought in attempts to improve the resonance of the soundbox. The wire will serve as a guide in scribing the light cardboard rib patterns and, at a later time, in gluing the finished ribs in place.
I highly recommend making your own rib patterns. First, they will be easier to fit because of the experience gained in shaping them,and second, the knowledge will be helpful in making the larger sized instruments. Poster board makes good stock for rib patterns. Paper stock slightly heavier than the cover of this publication is a good weight to use. If you plan to make several instruments it would be well to cut the patterns from a thin aluminum such as roof flashing material. On a seven-ribbed balalaika we will need four patterns. The center rib is a one-half pattern split on the center line. Before laying out the patterns, the end block must be marked with the position of each rib as it hits the small end of the block. Remember that the small end of the block was gridded as illustrated in Fig. 10. This will help in marking the rib edges accurately. The outer ribs are 3/ 4" high at the end block. Mark these positions on both sides of the block. Now divide the remainder of the block into five equal segments. The location of the seven ribs as they terminate at the small edge of the end block are now identified. Next locate the pencil marks made on the transom as noted in Fig. 7. Carry these marks forward on to the transom lining. These are the edges of the ribs as they will be positioned on the transom. Cut an over-sized blank pattern and thumb tack it in place on the outer edge of the platform along the lining, the end block and the transom. This is identified as rib number one. With a sharp pin-like instrument pierce the pattern from underneath at four points. Two points will be at the lining/transom and the lining/end block locations. The other two points will be at the end block and transom marks. Keep the pattern in place. Place a flexible straight-edge ( a piece of poster board is satisfactory) at the two bottom pin holes and draw a line between them. Do the same at the two higher points being careful to keep the natural contour of the rib. You may need two pairs of hands for this operation. Remove the pattern and cut along the marked lines.
This is the pattern for the two outer ribs... one left hand and the other right hand. The top edge of the pattern for rib number one is now marked on the bottom part of the next higher rib... rib number two. This edge is now cut. Thumb tack pattern number two in place and mark the two upper edges as was done before and mark its contour. Continue the process until all patterns are made.
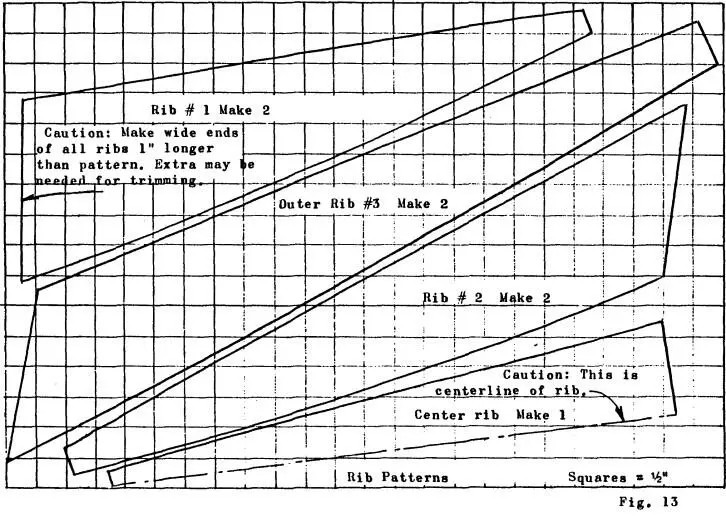
Fig. 13 provides the patterns for the ribs. It is best to have the stock for the ribs worked down to the approximate finished thickness before cutting them to shape. One-eighth of an inch is a good average for hard maple. Softer wood should be a bit thicker and harder wood such as rosewood perhaps a bit thinner. Make full-scale patterns from Fig. 13 and observe the cautionary note that states that the wider part of the rib extend at least 1" beyond the pattern. The reason for this is that the pattern is the actual size of the rib when it is finished. Making them longer allows sufficient stock to bevel the edges and have a margin of safety in the event that the ribs must be reshaped slightly when they are being fitted. I found that the best way to cut them to shape is with a bandsaw or coping saw, cutting them within l/8" of the final shape. A small hand plane is then used to shave the edges down to the final dimension. In laying out the pattern on the wood be sure to take advantage of the wood grain, especially if you are using a figured maple. Do not mix ribs of straight grain with those of a wavy pattern. Take advantage of the flow of the grain pattern so that it is balanced on both sides of the center rib.
Читать дальшеИнтервал:
Закладка:
Похожие книги на «Building the Balalaika»
Представляем Вашему вниманию похожие книги на «Building the Balalaika» списком для выбора. Мы отобрали схожую по названию и смыслу литературу в надежде предоставить читателям больше вариантов отыскать новые, интересные, ещё непрочитанные произведения.


Обсуждение, отзывы о книге «Building the Balalaika» и просто собственные мнения читателей. Оставьте ваши комментарии, напишите, что Вы думаете о произведении, его смысле или главных героях. Укажите что конкретно понравилось, а что нет, и почему Вы так считаете.