James Flinn - Building the Balalaika
Здесь есть возможность читать онлайн «James Flinn - Building the Balalaika» весь текст электронной книги совершенно бесплатно (целиком полную версию без сокращений). В некоторых случаях можно слушать аудио, скачать через торрент в формате fb2 и присутствует краткое содержание. Год выпуска: 1984, ISBN: 1984, Жанр: Руководства, music, на английском языке. Описание произведения, (предисловие) а так же отзывы посетителей доступны на портале библиотеки ЛибКат.

- Название:Building the Balalaika
- Автор:
- Жанр:
- Год:1984
- ISBN:0-9613258-0-1
- Рейтинг книги:4 / 5. Голосов: 1
-
Избранное:Добавить в избранное
- Отзывы:
-
Ваша оценка:
Building the Balalaika: краткое содержание, описание и аннотация
Предлагаем к чтению аннотацию, описание, краткое содержание или предисловие (зависит от того, что написал сам автор книги «Building the Balalaika»). Если вы не нашли необходимую информацию о книге — напишите в комментариях, мы постараемся отыскать её.
Building the Balalaika — читать онлайн бесплатно полную книгу (весь текст) целиком
Ниже представлен текст книги, разбитый по страницам. Система сохранения места последней прочитанной страницы, позволяет с удобством читать онлайн бесплатно книгу «Building the Balalaika», без необходимости каждый раз заново искать на чём Вы остановились. Поставьте закладку, и сможете в любой момент перейти на страницу, на которой закончили чтение.
Интервал:
Закладка:
It is good practice to cut a couple of spare ribs while the stock is handy because you may encounter difficulty later on and damage a rib. This is especially true when bending and twisting them to shape.
You now have seven ribs cut to shape but not beveled. Sand and scrape the best surface of each rib but not to ultimate perfection.
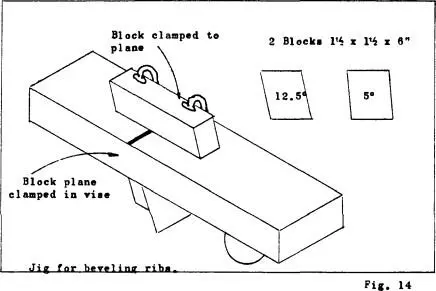
Put a noticeable mark such as a large "X" on the inside surface of each rib to prevent using a right-hand rib on the left-hand side as well as cutting the edge bevels on the wrong side. Refer to the illustration of the transom in Fig. 7. Notice that two of the rib joints are at a 25° angle and one at a 10° angle. On a seven rib balalaika, six joints are required... four at 25° and two at 10°. We must now make two guide blocks for a jig to cut these bevels accurately. The blocks will have a 12.5° and 5° angle which is one-half of the angle of the ribs to be joined. These blocks are illustrated in Fig. 14. The blocks are clamped on the sole of a plane and the plane in turn is clamped in a bench vise. It helps to write the angle you plan to plane on each edge of the inside surface. Now pass the edge of the rib over the blade of the inverted plane,using the tapered block as a guide, and bevel the appropriate angle on all ribs. Either side of the block can be used depending upon the grain structure of the wood.
The ribs must now be bent and twisted so as to conform to the shape of the platform and fit between the end block and the transom.
The hot pipe rig suggested in Fig.8 is satisfactory for this bending operation but I find that a 150 watt soldering iron (not a gun) clamped in a vise will do equally well. The iron is used without a tip and the wood run across the tube holding the heating element. Not much heat is needed to bend the thin ribs. Do not wet the ribs nor use too much heat. The iron is too hot when the wood begins to char easilly. Start with the two outer ribs first. Gently slide them over the hot iron while bending the curve and twisting them to shape. When they are correctly formed it may be necessary to trim the end block slightly for the best fit. Always start clamping them in place at the end block first. This end of the rib can best be held in place by devising a small softwood block which is shaped and bolted through the hole on the end block. By tightening a wing nut on this bolt the wood will grab the end of the rib and hold it tight. The outer ribs can be clamped to the side linings rather easily. The rib-to-transom clamp is 3/4" strapping tape (transparent tape with threads running through it). Apply the tape to the rib and pull the rib into place and secure the end to the transom. Use as much tape as necessary to get a good tight bond with the edge of the transom. Be sure to keep the top edge of each rib aligned with the pencil mark we have inscribed on the transom. Do both outer ribs and rest awhile.
On the top surface of the outer ribs glue a strip of ebony veneer (or other contrasting wood) and hole it in place with strips of masking tape until the glue is set. Bend and twist the next two ribs into shape and glue them in place. It may be necessary to make slight adjustments in the curvature of the ribs to conform to the rib already in place. Do this by hand-planing the lower edge of the rib to be fitted. You will probably encounter a problem in that the rib being bent will conform to the shape of the rib in place but the end bearing on the transom will not lay flat. No matter... as long as it is within 5/ 8" of home. Again start gluing and clamping from the small end of the shoulder block then back towards the transom. Use the strapping tape to pull the edges together. Do not skimp on tape.
When the edges are butted tightly, pull the wide end of the rib down tight on the transom with more tape and you will find that the rib will buckle into place. Follow the same procedures for the rest of the ribs. The center rib requires joining on two edges. I have always found that the shape of this rib must be adjusted slightly for a tight fit and then teased into place. Fortunately, the rib is in the form of a wedge and shaving the edges merely lets it slide forward toward the end block as the fit becomes tighter. Here is where the extra length comes in handy. When the rib fits to perfection, it is glued and pressed into place using a heavy weight to keep it pressed against the adjoining ribs. Strapping tape is also used to help with the alignment. The edge of the rib as it hits the transom can be clamped by spanning a clamp from the rib to the bottom of the platform.
The body is now separated from the platform by removing the screws from underneath the platform and gently tapping the units apart... like removing jello from a mold. A rough looking balalaika is now taking shape. The portions of the ribs which extend beyond the transom will now be removed. Do not cut the ribs which extend beyond the edge of the shoulder block at this time. I use a Dremel Moto-Tool inserted in a router attachment for this operation. A saw tool inserted in the chuck neatly slices away the excess rib stock. A fine-toothed flat saw, carefully manipulated, will work as well. After the excess rib stock has been removed, the surface of the transom can be trued up by running it across the surface sander described in a subsequent paragraph. Be especially careful not to splinter the outside surface of the ribs in this operation.
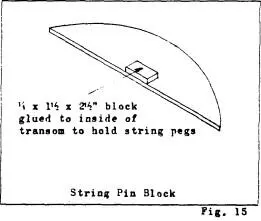
A block of hardwood of the dimensions and shape of that shown in Fig.
15 is glued to the inside surface of the transom. This block is needed to hold the string pins which will be discussed soon. After this block is glued in place, install a 1/ 4" triangular piece of lining to the top edge of the transom to widen the gluing surface to approximately 1/ 2".
Fig. 16 shows an example of a veneered transom. The pie-shaped wedges seem to be traditional but other designs can be used. It is preferable, but not mandatory, that the same species of wood used for the body be used for the face of the transom. Standard veneer is l/28” thick. The binding, however, should be thicker, at least 1/ 16", because one of the functions of the binding is to absorb bangs and bumps that may damage the instrument. The easy solution to this mismatch in dimensions is to cut your own veneer to the thickness of the binding. If this is not desirable, then the standard l/28" veneer should be glued to the transom right to the edge of the rib facets.
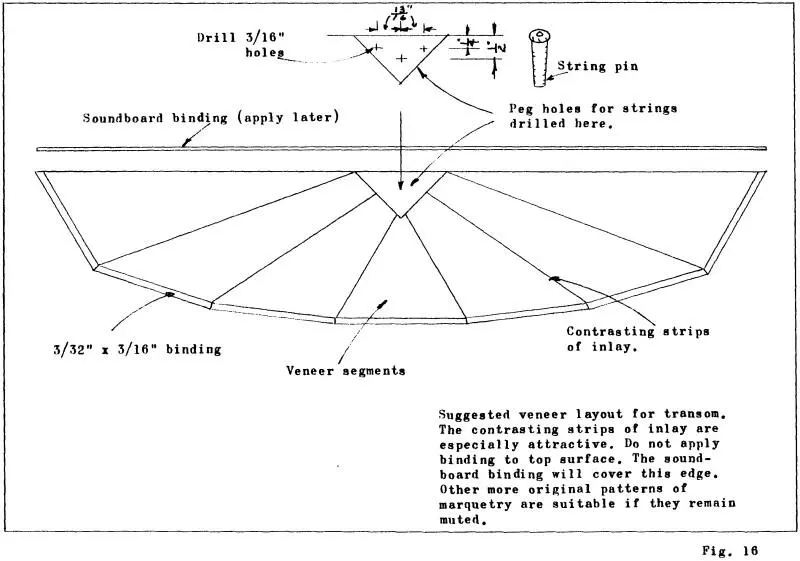
A rabbet is then cut along the edges of the transom to the depth of the binding. Again, the Dremel Moto-Tool mounted in its router base does a nice job on this sort of cut. Fine-toothed saws and sharp chisels, along with a steady hand, also work to perfection. Inlays of contrasting wood, most notably ebony, between each pie-shaped segment of veneer make attractive transoms. Gluing and clamping the veneer segments to the transom poses no particular problem as there is sufficient room to use clamps and cauls. The bindings present a problem because of the lack of clamping surfaces. I have found that masking tape stretched over the binding being glued and then pressed on to the transom and ribs does the job.
Drill three 3/ 16" holes, at a 15° angle to the transom, in the location shown in Fig. 16. These holes are for the string pins. I use Luthiers Mercantile’s Number Pi4m with a mother-of-pearl eye. The pins are tapered so it will be necessary to taper the hole to fit the pin by using a small rat-tail file as a reamer. Test the pin in each hole for a tight fit with about 1/ 4" of the pin extending above the surface of the transom being satisfactory.
Читать дальшеИнтервал:
Закладка:
Похожие книги на «Building the Balalaika»
Представляем Вашему вниманию похожие книги на «Building the Balalaika» списком для выбора. Мы отобрали схожую по названию и смыслу литературу в надежде предоставить читателям больше вариантов отыскать новые, интересные, ещё непрочитанные произведения.


Обсуждение, отзывы о книге «Building the Balalaika» и просто собственные мнения читателей. Оставьте ваши комментарии, напишите, что Вы думаете о произведении, его смысле или главных героях. Укажите что конкретно понравилось, а что нет, и почему Вы так считаете.