James Flinn - Building the Balalaika
Здесь есть возможность читать онлайн «James Flinn - Building the Balalaika» весь текст электронной книги совершенно бесплатно (целиком полную версию без сокращений). В некоторых случаях можно слушать аудио, скачать через торрент в формате fb2 и присутствует краткое содержание. Год выпуска: 1984, ISBN: 1984, Жанр: Руководства, music, на английском языке. Описание произведения, (предисловие) а так же отзывы посетителей доступны на портале библиотеки ЛибКат.

- Название:Building the Balalaika
- Автор:
- Жанр:
- Год:1984
- ISBN:0-9613258-0-1
- Рейтинг книги:4 / 5. Голосов: 1
-
Избранное:Добавить в избранное
- Отзывы:
-
Ваша оценка:
Building the Balalaika: краткое содержание, описание и аннотация
Предлагаем к чтению аннотацию, описание, краткое содержание или предисловие (зависит от того, что написал сам автор книги «Building the Balalaika»). Если вы не нашли необходимую информацию о книге — напишите в комментариях, мы постараемся отыскать её.
Building the Balalaika — читать онлайн бесплатно полную книгу (весь текст) целиком
Ниже представлен текст книги, разбитый по страницам. Система сохранения места последней прочитанной страницы, позволяет с удобством читать онлайн бесплатно книгу «Building the Balalaika», без необходимости каждый раз заново искать на чём Вы остановились. Поставьте закладку, и сможете в любой момент перейти на страницу, на которой закончили чтение.
Интервал:
Закладка:
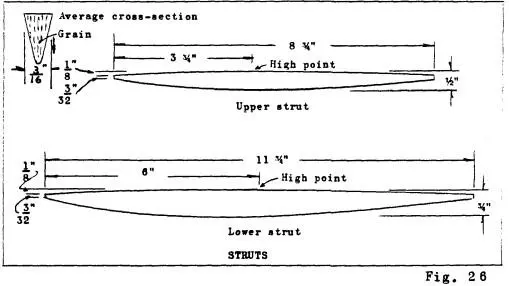
The top surface of the struts is arched to give the soundboard a corresponding curvature. Notice in Fig. 26 that the high point on the top of the strut is not the center of the strut. (Be careful of Prokopenko's wording... he means what I am saying). The high point of the strut is where it crosses the centerline of the instrument. It is essential that the struts be cut with proper grain orientation. They should be quarter-sawn with the grain running parallel along the flat surface rather than at right angles to it as is the case of the soundboard. This is the best cut to give strength to this part and allow minimum bending when pressure is applied to the top from the bridge.
We previously cut the side linings to a triangular shape. Go back now and glue small triangular blocks on the lining where the ends of the struts will nest. This is shown in Fig. 25. Fair the corners of these blocks into the linings by removing the straight edges and corners except for the top surface. Cut a small pocket approximately 3/ 32" deep and the width of the strut into this built-up section of the lining to accomodate the ends of the struts. Place the struts into these pockets and make sure that they fit well. Don’t glue them in place at this time. At each end of the struts, just in from the lining, wrap a piece of masking tape in a way that the sticky side will be on the outside. Now carefully center the soundboard over the body, press down on the top, and lift the top off with the struts adhered thereto. Precisely mark the position of the struts on the underside of the soundboard. Lift the struts off, remove the tape, and glue them in place permanently. Clamping the struts to the top may present a problem because the struts are curved and the object is to spring the soundboard to this arc. One effective way is to use large, squeeze-type, paper clips at the ends of the struts. Dry clamp the struts in place first and then inspect the prospective joint to make sure that the soundboard is going to adhere to the complete surface of the strut. This is an important gluing operation because there is considerable stress on this joint, the failure of which will lead to a distastefully sounding instrument. Place a maker's label inside the body below the soundhole. Conventionally, the label includes the maker's name, location and date.
We are now ready to glue the top to the body. This is another awkward clamping job. The top could be taped to the body but in many cases removal of the tape also removes slivers of wood from the soft soundboard. I have been tempted to make an elaborate press for this operation but am holding off until I find junk parts to make one.
Obtain a large supply of rubber bands of a size that will stretch around the body of the instrument. Spread glue along the body linings and place the soundboard on being careful that the strut ends fit into their pockets and that the soundboard lines up with the center-line. Stretch as many rubber bands as possible around the body and place under the bands, as they go over the edges, small blocks of softwood approximately 1/ 8x 1/ 2x 1/ 2”. These blocks transfer pressure to the edge. In addition to, or substitute for, the rubber bands a flat cloth tape (like a shoe lace) can be wrapped around the body and top thus binding the edges. In spots where the top is being stubborn and is not mating with the body,strapping tape can be used but make sure that the soundboard is covered with paper so that the tape does not touch it.
Binding and purfling the top is next. The total width of the binding and purfling should not exceed 5/ 16". We must not destroy the integrity of the soundboard/body glue joint by cutting away too much of the soundboard edge. Make sure that the surfaces of the ribs near the soundboard and the top surface of the transom are in their final dimensions. Sanding and scraping these surfaces after the binding has been installed will narrow the binding and result in an uneven look. After these precautions have been noted, cut a rabbet along the top edges of the soundboard a hair narrower than the combined width of the binding and purfling. This can be done with a purfling cutter, a tool similar to a marking gauge except that it has sharp knives instead of a pointed scriber. This rabbet can also be cut with a small machine router with proper guide attachments. The binding will probably not spring into place along the curved edges of the top without hot bending. Because we are bending along the narrow edge of the binding it is difficult to hold straight on the hot iron. This problem can be alleviated by making a sandwich of two or three pieces of binding and then bending them all at once. After the binding has been bent to the proper shape, glue the purfling to the inside edge of the binding and clamp with masking tape. Remove the tape when the glue has set and glue this assembly to the top edges. First fit the side bindings to the end near the neck, then miter the end near the transom.
The rubber band clamping procedure is used to clamp the binding to the top. It is best to glue one side binding on at a time and then bind the transom end last. Sand and scrape the binding and purfling flat with the top of the soundboard and along the edge of the body.
The edges should be rounded slightly.
In line with the transom nut decoration, mortise the binding to accept the transom nut. This nut is best made of ebony and glued in place with a few drops of cyanoacrylate glue (Elmers Wonder Bond Plus). Refer to Fig. 24 for details.
She Fingerboard
The twenty-four frets of the prima balalaika provide a musical range of two full octaves. Each octave is divided into twelve equal parts called semitones or half-steps. Fret spacing for this equal tempered tone range is computed in the traditional way. Divide the length of the string (nut to bridge) by 17.817. The quotient becomes the distance from the nut to the first fret. This distance is then subtracted from the length of the string and the difference is then divided by 17.817. This quotient then becomes the distance from the nut to the second fret. Continue with these calculations until the spacing for all frets is completed. A sample computation for a 17.0" string length is provided below:
*** Fret spacing.... 17" string ***
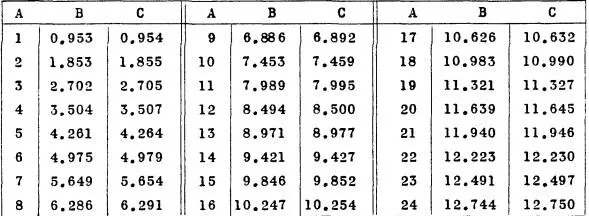
A = Fret number
B = Nut to fret distance (in inches) using constant 17.835
C = " " " " " " " "17.817
Notice that the 12th fret falls half way between the nut and the bridge. Some luthiers prefer to use a constant of 17.835 rather than 17.817. Tonal purity (acceptable tones at all frets) for both sets of calculations is obtained by minute changes in the position of the bridge. The above table lists both sets of computations for comparison with the 17.817 calculations being preferred. In reality, one cannot cut the fret slots much better than within one one-hundredths of an inch anyway!
A program for computing fret spacings on a personal computer, a Radio Shack TRS-80 in this case, is as follows;
10 REM spacing 65 C = C + X
30 C = 0 70 PRINT USING "##.###";C
40 K = 17.817 80 L = L-X
45 L = (insert length of string) 90 NEXT I
50 FOR I = 1 to 24 100 END
60 X = L/K
The fretboard (or fingerboard) is cut from a piece of ebony 3/ 16x 1 1/ 2x 13". As we discussed earlier, there are other suitable woods for this application but ebony remains the one of high choice. Make sure that it is absolutely flat and free of twist.
Читать дальшеИнтервал:
Закладка:
Похожие книги на «Building the Balalaika»
Представляем Вашему вниманию похожие книги на «Building the Balalaika» списком для выбора. Мы отобрали схожую по названию и смыслу литературу в надежде предоставить читателям больше вариантов отыскать новые, интересные, ещё непрочитанные произведения.


Обсуждение, отзывы о книге «Building the Balalaika» и просто собственные мнения читателей. Оставьте ваши комментарии, напишите, что Вы думаете о произведении, его смысле или главных героях. Укажите что конкретно понравилось, а что нет, и почему Вы так считаете.