James Flinn - Building the Balalaika
Здесь есть возможность читать онлайн «James Flinn - Building the Balalaika» весь текст электронной книги совершенно бесплатно (целиком полную версию без сокращений). В некоторых случаях можно слушать аудио, скачать через торрент в формате fb2 и присутствует краткое содержание. Год выпуска: 1984, ISBN: 1984, Жанр: Руководства, music, на английском языке. Описание произведения, (предисловие) а так же отзывы посетителей доступны на портале библиотеки ЛибКат.

- Название:Building the Balalaika
- Автор:
- Жанр:
- Год:1984
- ISBN:0-9613258-0-1
- Рейтинг книги:4 / 5. Голосов: 1
-
Избранное:Добавить в избранное
- Отзывы:
-
Ваша оценка:
Building the Balalaika: краткое содержание, описание и аннотация
Предлагаем к чтению аннотацию, описание, краткое содержание или предисловие (зависит от того, что написал сам автор книги «Building the Balalaika»). Если вы не нашли необходимую информацию о книге — напишите в комментариях, мы постараемся отыскать её.
Building the Balalaika — читать онлайн бесплатно полную книгу (весь текст) целиком
Ниже представлен текст книги, разбитый по страницам. Система сохранения места последней прочитанной страницы, позволяет с удобством читать онлайн бесплатно книгу «Building the Balalaika», без необходимости каждый раз заново искать на чём Вы остановились. Поставьте закладку, и сможете в любой момент перейти на страницу, на которой закончили чтение.
Интервал:
Закладка:
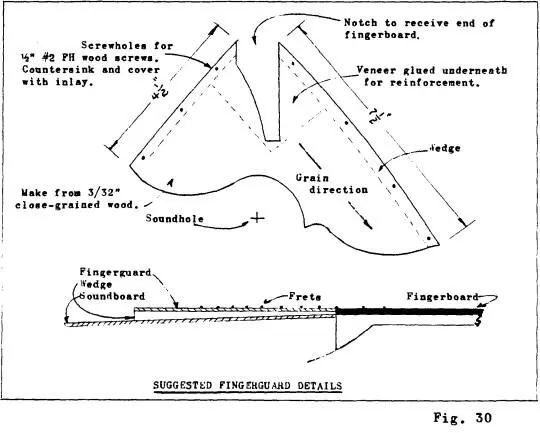
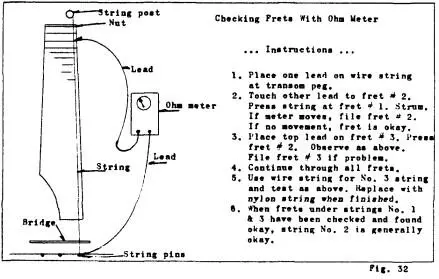
The instrument should now be strung and tested in its white (unfinished) form. The fingerguard can be reinstalled for this purpose but do not forget to remove it when we have completed the string tests. We now need a bridge. Many balalaika players prefer the solid ebony bridge although a bridge made of hard maple with an ebony inlay top is an effective one. Shape and dimensions of a bridge are shown in Fig. 31. The height of the bridge is determined by the position of the strings over the 16th fret. This distance should be approximately 4 mm which will result in a bridge about 1/ 2" tall. The final height and positioning of the bridge is best determined by the ultimate user of the instrument. This is a highly personal preference and proper positioning is very much a function of the player's style. Place the bridge 17" from the nut. Under the bridge place a piece of 120 grit sandpaper with the sand portion up. Rub the bottom of the bridge over the sandpaper until it conforms to the contour of the soundboard. String the instrument with strings sized per the data in Table I. Peg the loop end of the string to the transom with the string pegs and lightly tap them in place. Thread the other ends through the string post on the tuning machine (which we have reinstalled) and tighten the strings by a counter-clockwise turn of the keys. When the strings are reasonably tight, file slight indentations on the top of the nut and the bridge permitting the two outside (1 & 3) strings to lie in a straight position along the fingerboard 1/ 8" from the edge. The middle string should pass over the soundhole in its center. Gradually tighten the strings until they are nearly up to the proper pitch (see Fig. 1) and teat the strings for "buzzing". String problema are most apt to show up when the strings are slightly loose. The strings should run in small indentations (not slots) over the nut and bridge and be slightly higher ( 1/ 16") than the first fret. Plucking the strings should produce a sharp and clear note. If a rasping noise (buzzing) is detected, the string may be oscillating in the notch at either the nut or bridge. Verify this by applying sideward pressure with a finger to the outward side of the nut/bridge. This may correct the problem. Placing a small wad of paper in the notch, under the string, may also improve the situation, which means that corrective action to file the notch is required. After the open strings have been tested, it is necessary to check the fret clearances. Pressing the first fret should bring the string down on the fret without exerting an uncomfortable amount of pressure. Plucking the fretted string should produce a clear note without buzzing. If buzzing is detected it is probably because the string is hitting the next higher fret, in this case the second fret. The second fret should be filed lower until the buzzing is corrected. This problem is most likely to occur at the first five frets but all frets should be checked. Pinal polishing and deburring of the frets should now be completed. A system for electrically checking fret clearances is shown in Fig. 32. Remove the strings, bridge, tuning machine and fingerguard and prepare the balalaika for finishing.

Finishing
Most balalaika players want their instruments to have a high-gloss finish. As a matter of fact, I doubt if you will find one who would prefer a dull one! More on this later, especially as it refers to the top. There are many types of modern finishing material available on the market today. You can chose wax, lacquer, oil varnish, spirit varnish, French polish, etc. It would be impossible to cover all of these options in this book. The preferred finish seems to be French polish. This finish is made from orange shellac and other ingredients. It is applied with a rubbing pad and is extremely tricky. Because it is so sophisticated, and requires years of practice to get the hang of working it, I will eliminate it as a practical finish. This finishing material can be purchased in prepared mixtures and those with time and willingness to experiment should use it. It does produce a superior finish. A stringed instrument such as the guitar and balalaika is normally finished with a spirit varnish as opposed to an oil varnish. The oil varnish is recommended for the violin. Most factory made instruments like the guitar are finished with lacquer. I recommend that the balalaika be finished with a spirit varnish. Before proceeding in this direction I do wish to suggest that the body be varnished but that the soundboard be lacquered. This may result is a rais-match in sheen between the body and the soundboard but the idea is to keep the finishing material used on the top as light as possible from a thickness perspective. A heavy varnish build-up on a small instrument like the prima balalaika most probably will have an adverse affect on the resonance of the instrument. Behlen sanding sealer 101-0803 and their clear gloss lacquer B101-0800, in spray cans, are very good items to use for small applications.
We will continue assuming that you will wish to finish the balalaika completely with the spirit varnish. Some musicians prefer to keep the neck in an unfinished state. In my judgement, the majority of them have no preference, so we shall finish ours. The fingerboard, bridge, and fingerguard are not finished. If ebony is used for the fingerboard, white or gray streaks may appear on its surface.
There are products on the market such as Ebonholzbeize made to stain the ebony a uniform color. Remove all dust from the instrument and mask the fingerboard to prevent the finish from straying on it. With a very damp cloth, go over the instrument to remove stubborn particles of dust. This will raise the grain ever so slightly. Now sand it with 600 grit silicon sandpaper. Dust it again.
Woods such as spruce and hard maple do not need wood fillers because the grain structure is tight. Woods such as mahogany and rosewood do need a filler to even out the surface caused by the uneven grain structure. There are many manufacturers producing paste wood filler. Most of the fillers have to be mixed with a stain compatible with the ingredients of the filler. It is best to follow manufacturers' instructions for the use of the product rather than provide specific data here.
The soundboard is not generally stained but remains in its natural color. If the instrument is to be stained it is essential that a stain that can be used under shellac and spirit varnish be applied. Again, follow manufacturers' instructions. Do not use an oil stain under a shellac or spirit varnish.
After the instrument has been stained, or if it is not to be stained, apply a thin coat of white shellac. After four or more hours drying, lightly sand it with 600 grit sandpaper. Apply a second coat and sand as before. Then apply two or three coats of spirit varnish.
Prior to applying the last coat of varnish carefully rub down the finish with 600 grit sandpaper moistened with oil. This is best done after the varnish has cured for several weeks. Apply the finish coat. Again, after several weeks of curing, the final polish can be given. This is done by rubbing the instrument with a paste made of oil and a fine grade of powdered pumice stone and a soft felt pad. The pumice will level all blemishes such as runs, dust marks, etc. Care should be taken to avoid cutting too deeply into the finish... especially at the edges. The final polish is with powdered rottenstone applied the same way as was the pumice stone. Try practicing this polishing on test panels before working on the balalaika. Reinstall the tuning machine and fingerguard. Cover the screw holes in the fingerguard with mother-of-pearl dots and sand flush. String up the instrument as it is completed!
Читать дальшеИнтервал:
Закладка:
Похожие книги на «Building the Balalaika»
Представляем Вашему вниманию похожие книги на «Building the Balalaika» списком для выбора. Мы отобрали схожую по названию и смыслу литературу в надежде предоставить читателям больше вариантов отыскать новые, интересные, ещё непрочитанные произведения.


Обсуждение, отзывы о книге «Building the Balalaika» и просто собственные мнения читателей. Оставьте ваши комментарии, напишите, что Вы думаете о произведении, его смысле или главных героях. Укажите что конкретно понравилось, а что нет, и почему Вы так считаете.