The Magazine - The Artist’s Problem Solver
Здесь есть возможность читать онлайн «The Magazine - The Artist’s Problem Solver» — ознакомительный отрывок электронной книги совершенно бесплатно, а после прочтения отрывка купить полную версию. В некоторых случаях можно слушать аудио, скачать через торрент в формате fb2 и присутствует краткое содержание. Жанр: unrecognised, на английском языке. Описание произведения, (предисловие) а так же отзывы посетителей доступны на портале библиотеки ЛибКат.
- Название:The Artist’s Problem Solver
- Автор:
- Жанр:
- Год:неизвестен
- ISBN:нет данных
- Рейтинг книги:4 / 5. Голосов: 1
-
Избранное:Добавить в избранное
- Отзывы:
-
Ваша оценка:
The Artist’s Problem Solver: краткое содержание, описание и аннотация
Предлагаем к чтению аннотацию, описание, краткое содержание или предисловие (зависит от того, что написал сам автор книги «The Artist’s Problem Solver»). Если вы не нашли необходимую информацию о книге — напишите в комментариях, мы постараемся отыскать её.
The Artist’s Problem Solver — читать онлайн ознакомительный отрывок
Ниже представлен текст книги, разбитый по страницам. Система сохранения места последней прочитанной страницы, позволяет с удобством читать онлайн бесплатно книгу «The Artist’s Problem Solver», без необходимости каждый раз заново искать на чём Вы остановились. Поставьте закладку, и сможете в любой момент перейти на страницу, на которой закончили чтение.
Интервал:
Закладка:
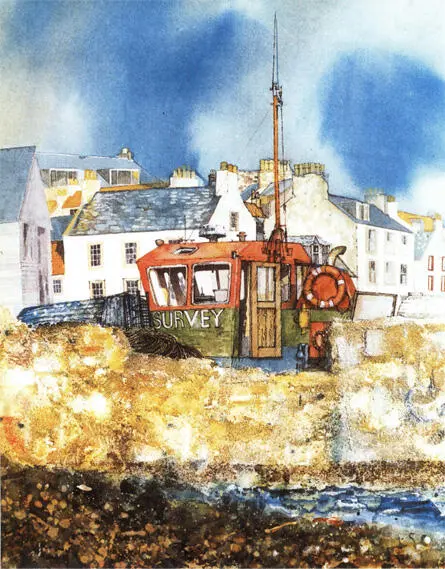
HARBOUR WALL
watercolour, pen and ink, 63 × 44 cm (25 × 17 in)
Linear perspective was used in the drawing of the houses and the boat’s cabin. Notice that because the house tops are above us the roof lines slope down into the distance and we cannot see the top surfaces of the chimney supports. Aerial perspective has been suggested by using lighter tones and gentler contrasts in the background, saving the stronger effects for the middle and foregrounds. Overlapping was used extensively.
TEXTURE
Texture is a quality that can be so easily overlooked in painting. Try to develop your skill with it. Perhaps you could use thin washy paint layers in the background and thicker textural layers in the foreground. This is easier in oils or acrylics, but you can create varied textures in watercolours as well, by using dry brush, for example. Do not try using watercolour straight from the tube, however; it may crack as it dries. Respect your medium and work within its limitations.
Take one landscape or still-life subject and work it out in several versions using different depth techniques in each. Then try a combination of methods, in different proportions, to see which is most effective. These do not have to be ‘finished’ pieces; after all, you are hoping to learn from them. Quick, small studies are ideal.
Depth is something most of us try to achieve in our work. By experimenting with these techniques and exercises your skill will increase and your paintings improve.
4
SEVEN-MINUTE SKIES
Is there a quick and simple method of painting a sky in watercolour?
Answered by: Winston Oh
Have we not all had the experience of drawing a good landscape complete with fine architectural detail and then wrecking it immediately by messing up the sky? In order to succeed, it is important to pay attention to details such as your brush, paper, amount of water, paint, and speed of application.
Think of the sky as a loosening-up exercise. It is the least demanding component of your landscape. Unlike a building or other physical structures, you are not expected to paint the exact sky before you. Instead, you have the freedom to create the sky of your choice to suit the overall composition or the atmosphere you have chosen to depict.
Using the wet-on-wet technique is preferable because it results in a soft effect in cool colours, without hard edges, naturally contrasting with the stronger landscape tones and putting the clouds in the far distance where they belong.
INITIAL PREPARATION
For a support choose 200 gsm (140 lb) paper or more, as heavier weights do not cockle during the wet-on-wet exercise. A Rough or Not surface provides absorbency, which helps to produce soft fluffy clouds. A rougher surface makes it easier to leave random, irregular white unpainted accents on cloud edges, and facilitates the attractive flocculent textured effect of French Ultramarine when it dries.
BERNEY ARMS WINDMILL, NORFOLK
watercolour, 30 × 46 cm (12 × 18 in)
A grey, windy day, with low scudding clouds, enlivened by streaks of white paper showing through. This was painted with a large squirrel hair brush, in swift horizontal strokes, using various mixes of French Ultramarine and Burnt Umber. Payne’s Grey was used for the heavy rain cloud. Th distant trees were painted with a mix of French Ultramarine and Indian Red.
Your brush has to be large enough to hold sufficient water. For a picture about 30 × 45 cm (12 × 18 in) use a large squirrel hair brush, or a size 10 or 12 sable. On a picture 25 × 35 cm (10 × 14 in) use a size 9 or 10 brush.
Step 1 shows a soft grey sky, achieved with wet-on-wet technique.
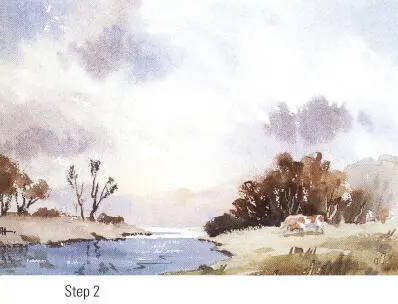
In Step 2 brisker brushstrokes are added to produce a cloudy sky that is fresh and lively.
For the purposes of the two demonstration pictures of a cloudy sky above, I used a combination of French Ultramarine and Burnt Umber predominantly. My other usual colours are Cobalt Blue, Coeruleum, Light Red and Raw Sienna. A blue sky may gradate from Ultramarine to Cobalt Blue to Coeruleum towards the horizon as a result of refraction through the atmosphere. Often there is a warm glow just above the horizon, for which I use dilute Raw Sienna. Light Red is mixed with French Ultramarine or Cobalt Blue to create a cooler grey for distant clouds that are near the horizon.
Roughly plan where your cloud or clouds and darker tones are going to be placed, in relation to the rest of your composition. Indicate lightly with pencil the shape or rough outline of the cloud pattern. After gaining experience with this sky technique, it can be fun to improvise cloud formations without prior drawing.
THE WET-ON-WET METHOD
To start, angle the painting surface at 10 or 20 degrees. Wet the sky area fairly liberally and briskly with sweeping strokes. On rough surfaces this action will leave a few random irregular dry spots for accents. Unwanted spots can be covered over in the next stage. Leave larger dry irregular areas if you wish to create a prominent white cloud edge. Of course, you could wet the whole surface evenly for a soft fluffy cloud effect, as in Step 1.
Charge the brush with a moderate amount of a mixture of French Ultramarine and Burnt Umber of moderate intensity. More of one or other colour will determine how grey or bright a day you wish to portray. This is the base layer, so lay it on loosely in broad, preferably oblique, strokes, starting in one top corner. I use this as my tester corner. If the first stroke is too light, I can then stiffen the mixture immediately. I like a fairly strong toned corner anyway. As you move away from the corner, lighten the tone, varying the mixture with each brushload. If one corner is grey, make the other corner bluer. Where you wish to have white clouds, leave a gap of 2.5–5 cm (1–2 in) to allow for some diffusion of colour from the wet edges. Work your way down the sky, and by the bottom third dilute the grey towards the horizon, leaving it almost white around the middle third of the horizon.
Proceed immediately to the next stage (Step 2), where it gets more enjoyable. Use a significantly stiffer mixture of the same colours, with less water. This is important, because anything more dilute will make a mess and ‘cauliflowers’ may appear. Use this to darken clouds. As you move down the sky, narrow down the height of the clouds as they recede towards the horizon. Use Light Red mixed with French Ultramarine for the lower distant clouds with cooler tones. Do not forget to vary the size of the clouds.
Then, while the surface is still quite wet, you are ready for the final accents. Fill the tip of the brush with strong pure French Ultramarine and drop this into one or two small areas among the grey clouds to suggest blue sky peeping through. If you place the spot of blue beside a white cloud, it will accentuate the white edge immensely. Try washing in a dash of dilute Raw Sienna at the mid-horizon, behind a mountain or a pale area within a white cloud. You will be surprised at how this lifts the colour in the sky.
Now stop! Lay the painting flat and let it dry. Do not rework any part of the sky before it is completely dry. There is a cut-off point when the paper is about two-thirds dry, beyond which any application of paint will spoil it. Some accentuation can be done after drying. Wet the area first with clean water, and then drop in a darker, stiffer paint lightly. This exercise should take you no more than ten minutes. I call it the ‘seven-minute sky’ simply to emphasize the key element of the technique – its swift application. A loosely painted, fresh-looking sky only works well while the surface of the paper remains fairly wet.
Читать дальшеИнтервал:
Закладка:
Похожие книги на «The Artist’s Problem Solver»
Представляем Вашему вниманию похожие книги на «The Artist’s Problem Solver» списком для выбора. Мы отобрали схожую по названию и смыслу литературу в надежде предоставить читателям больше вариантов отыскать новые, интересные, ещё непрочитанные произведения.


Обсуждение, отзывы о книге «The Artist’s Problem Solver» и просто собственные мнения читателей. Оставьте ваши комментарии, напишите, что Вы думаете о произведении, его смысле или главных героях. Укажите что конкретно понравилось, а что нет, и почему Вы так считаете.