Michael Alexander - Excel Power Pivot & Power Query For Dummies
Здесь есть возможность читать онлайн «Michael Alexander - Excel Power Pivot & Power Query For Dummies» — ознакомительный отрывок электронной книги совершенно бесплатно, а после прочтения отрывка купить полную версию. В некоторых случаях можно слушать аудио, скачать через торрент в формате fb2 и присутствует краткое содержание. Жанр: unrecognised, на английском языке. Описание произведения, (предисловие) а так же отзывы посетителей доступны на портале библиотеки ЛибКат.
- Название:Excel Power Pivot & Power Query For Dummies
- Автор:
- Жанр:
- Год:неизвестен
- ISBN:нет данных
- Рейтинг книги:5 / 5. Голосов: 1
-
Избранное:Добавить в избранное
- Отзывы:
-
Ваша оценка:
Excel Power Pivot & Power Query For Dummies: краткое содержание, описание и аннотация
Предлагаем к чтению аннотацию, описание, краткое содержание или предисловие (зависит от того, что написал сам автор книги «Excel Power Pivot & Power Query For Dummies»). Если вы не нашли необходимую информацию о книге — напишите в комментариях, мы постараемся отыскать её.
Excel PowerPivot & Power Query For Dummies
Excel PowerPivot & Power Query For Dummies
Excel Power Pivot & Power Query For Dummies — читать онлайн ознакомительный отрывок
Ниже представлен текст книги, разбитый по страницам. Система сохранения места последней прочитанной страницы, позволяет с удобством читать онлайн бесплатно книгу «Excel Power Pivot & Power Query For Dummies», без необходимости каждый раз заново искать на чём Вы остановились. Поставьте закладку, и сможете в любой момент перейти на страницу, на которой закончили чтение.
Интервал:
Закладка:
Nevertheless, it’s important to understand the maximum and configurable limits for Power Pivot Data Models. Table 2-1highlights them.
WHERE’S THE POWER PIVOT TAB?
Organizations often install Excel in accordance with their own installation policies. In some organizations, Excel is installed without the PowerPivot add-in activated, so the Power Pivot tab won’t be visible. If you don’t see the Power Pivot tab shown in Figure 2-1, you can follow these steps to activate it:
1 Go up to the Excel Ribbon and choose File ⇒ Options.
2 Select the Add-Ins option on the left.
3 From the Manage drop-down list, select COM Add-Ins and click Go.
4 In the list of available COM Add-Ins, check the box next to Microsoft Office Power Pivot for Excel and click OK.
5 If the Power Pivot tab doesn’t appear on the Ribbon, quit and restart Excel.
TABLE 2-1Limitations of the Internal Data Model
| Object | Specification |
|---|---|
| Data model size | In 32-bit environments, Excel workbooks are subject to a 2GB limit. This includes the in-memory space shared by Excel, the Internal Data Model, and add-ins that run in the same process. In 64-bit environments, there are no hard limits on file size. Workbook size is limited only by available memory and system resources. |
| Number of tables in the data model | No hard limits exist on the count of tables. However, all tables in the data model cannot exceed 2,147,483,647 bytes. |
| Number of rows in each table in the data model | 1,999,999,997 |
| Number of columns and calculated columns in each table in the data model | The number cannot exceed 2,147,483,647 bytes. |
| Number of distinct values in a column | 1,999,999,997 |
| Characters in a column name | 100 characters |
| String length in each field | It’s limited to 536,870,912 bytes (512MB), equivalent to 268,435,456 Unicode characters (256 mega-characters). |
A WORD ON COMPATIBILITY
Since Excel 2010 was released, Microsoft has made several versions of Power Pivot available. Different versions of Power Pivot are being used, depending on the version of Excel. Be careful when sharing Power Pivot workbooks in environments where some of your audience is using earlier versions of Excel while others are using more recent versions of Excel. Opening and refreshing a workbook that contains a Power Pivot model created with an older version of the Power Pivot add-in will trigger an automatic upgrade of the underlying model. When this happens, users with older versions of Excel will no longer be able to use the Power Pivot model in the workbook.
Power Pivot workbooks created in a version of Excel that is older than your version should give you no problems. However, you won’t be able use Power Pivot workbooks created in a version of Excel newer than your version.
Linking Excel Tables to Power Pivot
The first step in using Power Pivot is to fill it with data. You can either import data from external data sources or link to Excel tables in your current workbook. I cover importing data from external data sources in Chapter 4. For now, let me start this walkthrough by showing you how to link three Excel tables to Power Pivot.
 You can find the sample file for this chapter on this book’s companion website at
 www.dummies.com/go/excelpowerpivotpowerqueryfd2e in the workbook named Chapter 2 Samples.xlsx.
In this scenario, you have three data sets in three different worksheets: Customers, InvoiceHeader, and InvoiceDetails (see Figure 2-2).
The Customers data set contains basic information, such as CustomerID, Customer Name, and Address. The InvoiceHeader data set contains data that points specific invoices to specific customers. The InvoiceDetails data set contains the specifics of each invoice.
To analyze revenue by customer and month, it’s clear that you first need to somehow join these three tables together. In the past, you would have to go through a series of gyrations involving VLOOKUP or other clever formulas. But with Power Pivot, you can build these relationships in just a few clicks.
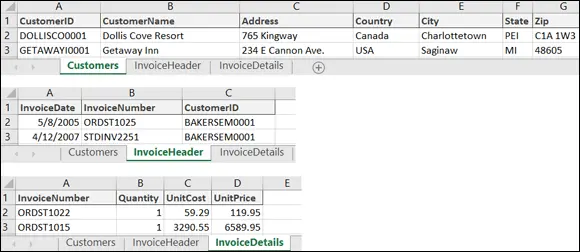
FIGURE 2-2:You want to use Power Pivot to analyze the data in the Customers, InvoiceHeader, and InvoiceDetails worksheets.
Preparing Excel tables
When linking Excel data to Power Pivot, best practice is to first convert the Excel data to explicitly named tables. Although not technically necessary, giving tables friendly names helps track and manage your data in the Power Pivot data model. If you don’t convert your data to tables first, Excel does it for you and gives your tables useless names like Table1, Table2, and so on.
Follow these steps to convert each data set into an Excel table:
1 Go to the Customers tab and click anywhere inside the data range.
2 Press Ctrl+T on the keyboard.This step opens the Create Table dialog box, shown in Figure 2-3. FIGURE 2-3:Convert the data range into an Excel table.
3 In the Create Table dialog box, ensure that the range for the table is correct and that the My Table Has Headers check box is selected. Click the OK button.You should now see the Table Design tab on the Ribbon.
4 Click the Table Design tab, and use the Table Name input to give your table a friendly name, as shown in Figure 2-4.This step ensures that you can recognize the table when adding it to the Internal Data Model.
5 Repeat Steps 1 through 4 for the Invoice Header and Invoice Details data sets.

FIGURE 2-4:Give your newly created Excel table a friendly name.
Adding Excel Tables to the data model
After you convert your data to Excel tables, you’re ready to add them to the Power Pivot data model. Follow these steps to add the newly created Excel tables to the data model using the Power Pivot tab:
1 Place the cursor anywhere inside the Customers Excel table.
2 Go to the Power Pivot tab on the Ribbon and click the Add to Data Model command.
Power Pivot creates a copy of the table and opens the Power Pivot window, shown in Figure 2-5.
Although the Power Pivot window looks like Excel, it’s a separate program altogether. Notice that the grid for the Customers table offers row numbers but no column references. Also notice that you cannot edit the data within the table. This data is simply a snapshot of the Excel table you imported.
Additionally, if you look at the Windows taskbar at the bottom of the screen, you can see that Power Pivot has a separate window from Excel. You can switch between Excel and the Power Pivot window by clicking each respective program on the taskbar.
 If your Windows taskbar combines taskbar buttons, the Power Pivot button may be hidden with the Excel group of buttons. Click or mouse over the Excel icon on the taskbar to reach the Power Pivot button.
Интервал:
Закладка:
Похожие книги на «Excel Power Pivot & Power Query For Dummies»
Представляем Вашему вниманию похожие книги на «Excel Power Pivot & Power Query For Dummies» списком для выбора. Мы отобрали схожую по названию и смыслу литературу в надежде предоставить читателям больше вариантов отыскать новые, интересные, ещё непрочитанные произведения.


Обсуждение, отзывы о книге «Excel Power Pivot & Power Query For Dummies» и просто собственные мнения читателей. Оставьте ваши комментарии, напишите, что Вы думаете о произведении, его смысле или главных героях. Укажите что конкретно понравилось, а что нет, и почему Вы так считаете.