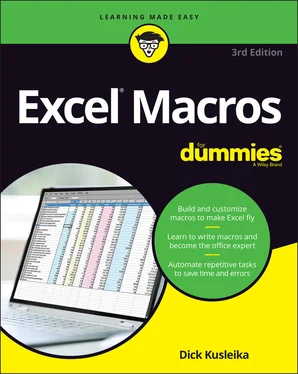
Dick Kusleika - Excel Macros For Dummies
Здесь есть возможность читать онлайн «Dick Kusleika - Excel Macros For Dummies» — ознакомительный отрывок электронной книги совершенно бесплатно, а после прочтения отрывка купить полную версию. В некоторых случаях можно слушать аудио, скачать через торрент в формате fb2 и присутствует краткое содержание. Жанр: unrecognised, на английском языке. Описание произведения, (предисловие) а так же отзывы посетителей доступны на портале библиотеки ЛибКат.
- Название:Excel Macros For Dummies
- Автор:
- Жанр:
- Год:неизвестен
- ISBN:нет данных
- Рейтинг книги:4 / 5. Голосов: 1
-
Избранное:Добавить в избранное
- Отзывы:
-
Ваша оценка:
- 80
- 1
- 2
- 3
- 4
- 5
Excel Macros For Dummies: краткое содержание, описание и аннотация
Предлагаем к чтению аннотацию, описание, краткое содержание или предисловие (зависит от того, что написал сам автор книги «Excel Macros For Dummies»). Если вы не нашли необходимую информацию о книге — напишите в комментариях, мы постараемся отыскать её.
Excel Macros For Dummies
Excel Macros For Dummies
Excel Macros For Dummies — читать онлайн ознакомительный отрывок
Ниже представлен текст книги, разбитый по страницам. Система сохранения места последней прочитанной страницы, позволяет с удобством читать онлайн бесплатно книгу «Excel Macros For Dummies», без необходимости каждый раз заново искать на чём Вы остановились. Поставьте закладку, и сможете в любой момент перейти на страницу, на которой закончили чтение.
Интервал:
Закладка:
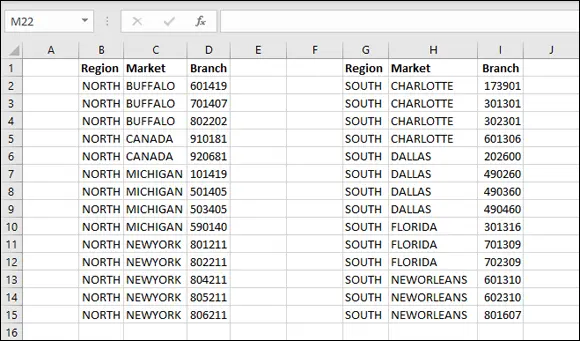
FIGURE 1-2:Your pre-totaled worksheet containing two tables.
Follow these steps to record the macro:
1 Before recording, make sure cell A1 is selected.
2 Select Record Macro from the Developer tab.
3 Name the macro AddTotal.
4 Choose This Workbook for the save location.
5 Click OK to start recording.At this point, Excel is recording your actions. While Excel is recording, perform the following steps:Select cell A16 and type Total in the cell.Select the first empty cell in Column D (D16) and enter = COUNTA(D2:D15).This gives a count of branch numbers at the bottom of column D. You need to use the COUNTA function because the branch numbers are stored as text.
6 Click Stop Recording on the Developer tab to stop recording the macro.
The formatted worksheet should look something like the one in Figure 1-3.
To see your macro in action, delete the total row you just added and play back your macro by following these steps:
1 Click Macros on the Developer tab.
2 Find and select the AddTotal macro you just recorded.
3 Click the Run button.
If all goes well, the macro plays back your actions to a T and gives your table a total. Now here’s the thing: No matter how hard you try, you can’t make the AddTotal macro work on the second table (G1:I15 in Figure 1-3). Why? Because you recorded the macro using absolute references.
To understand what this means, examine the underlying code. To examine the code, click Macros on the Developer tab to open the Macro dialog box, as shown in Figure 1-4.
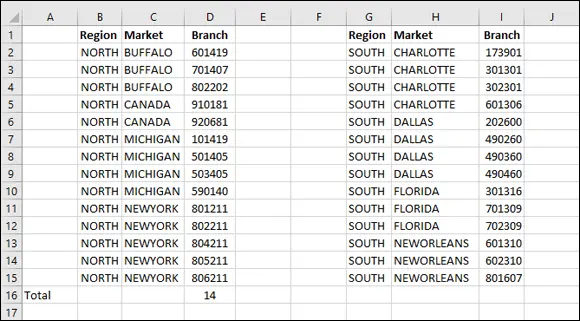
FIGURE 1-3:Your post-totaled worksheet.
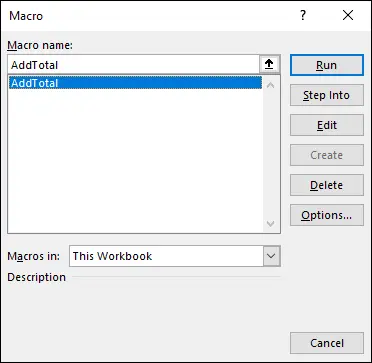
FIGURE 1-4:The Excel Macro dialog box.
Select the AddTotal macro and click the Edit button. This opens the Visual Basic Editor to show you the code that was written when you recorded your macro:
Sub AddTotal() Range("A16").Select ActiveCell.FormulaR1C1 = "Total" Range("D16").Select ActiveCell.FormulaR1C1 = "=COUNTA(R[-14]C:R[-1]C)" End Sub
Pay particular attention to lines 2 and 4 of the macro. When you asked Excel to select cell range A16 and then D16, those cells are exactly what it selected. Because the macro was recorded in absolute reference mode, Excel interpreted your range selection as absolute. In other words, if you select cell A16, that cell is what Excel gives you. In the next section, you take a look at what the same macro looks like when recorded in relative reference mode.
Recording macros with relative references
In the context of Excel macros, relative means relative to the currently active cell. So you should use caution with your active cell choice — both when you record the relative reference macro and when you run it.
First, make sure the Chapter 1 Sample File.xlsx file is open. Then, use the following steps to record a relative-reference macro:
1 Click Use Relative References from the Developer tab, as shown in Figure 1-5.
2 Before recording, make sure cell A1 is selected.
3 Click Record Macro from the Developer tab.
4 Name the macro AddTotalRelative.
5 Choose This Workbook in the Macros In drop-down list.
6 Click OK to start recording.
7 Select cell A16 and type Total in the cell.
8 Select the first empty cell in Column D (D16) and type = COUNTA(D2:D15).
9 Click Stop Recording on the Developer tab to stop recording the macro.
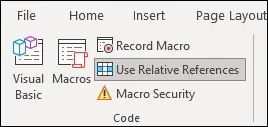
FIGURE 1-5:Recording a macro with relative references.
At this point, you have recorded two macros. Take a moment to examine the code for your newly created macro.
Click Macros from the Developer tab to open the Macro dialog box. Here, choose the AddTotalRelative macro and click Edit.
Again, this opens the Visual Basic Editor to show you the code that was written when you recorded your macro. This time, your code looks something like the following:
Sub AddTotalRelative() ActiveCell.Offset(15, 0).Range("A1").Select ActiveCell.FormulaR1C1 = "Total" ActiveCell.Offset(0, 3).Range("A1").Select ActiveCell.FormulaR1C1 = "=COUNTA(R[-14]C:R[-1]C)" End Sub
Notice that there are no references to any specific cell ranges at all. Take a look at what the relevant parts of this VBA code really mean.
In line 2, Excel uses the Offset property of the active cell. This property tells the cursor to move a certain number of cells up or down and a certain number of cells left or right.
The Offset property code tells Excel to move 15 rows down and 0 columns across from the active cell (in this case, A1). Excel doesn’t select a cell with a specific address as it did when recording an absolute reference macro.
Between Offset and Select on the second line is Range(“A1”). This is Excel recording that you only selected one cell — the first cell of the range that is offset from the active cell. It’s a quirk of the Macro Recorder and isn’t necessary when you select only one cell. (The Macro Recorder records a lot of unnecessary code.) If you had selected, say A16:B17 instead of just A16, it would have recorded:
ActiveCell.Offset(15, 0).Range("A1:B2").Select
To see this macro in action, delete the total row for both tables and do the following:
1 Select cell A1.
2 Click Macros on the Developer tab.
3 Select the AddTotalRelative macro.
4 Click the Run button.
5 Select cell F1.
6 Click Macros on the Developer tab.
7 Select the AddTotalRelative macro.
8 Click the Run button.
Notice that this macro, unlike your previous macro, works on both sets of data. Because the macro applies the totals relative to the currently active cell, the totals are applied correctly.
For this macro to work, you simply need to ensure that
You’ve selected the correct starting cell before running the macro.
The block of data has the same number of rows and columns as the data on which you recorded the macro.
Hopefully, this simple example has given you a firm grasp of macro recording with both absolute and relative references.
Understanding Macro Security
At this point, you should feel comfortable recording your own Excel macros. In the wrong hands, macros can be destructive. Because macros are so powerful, some people have used them to create macro viruses that can be harmful to your computer. For that reason, Microsoft has built some security measures around macros. Here are some important security concepts you need to keep in mind when working with macros.
Macro-enabled file extensions
Excel's default file format, called Excel Workbook, has a .xlsx file extension. Files with the .xlsx extension cannot contain macros. If your workbook contains macros and you then save that workbook as an .xlsx file, your macros are removed automatically. Excel warns you that macro content will be removed when saving a workbook with macros as an .xlsx file.
If you want to retain the macros, you must save your file as an Excel Macro-Enabled Workbook. This gives your file an .xlsm extension. The idea is that all workbooks with an .xlsx file extension are automatically known to be safe, whereas you can recognize .xlsm files as a potential threat.
Читать дальшеИнтервал:
Закладка:
Похожие книги на «Excel Macros For Dummies»
Представляем Вашему вниманию похожие книги на «Excel Macros For Dummies» списком для выбора. Мы отобрали схожую по названию и смыслу литературу в надежде предоставить читателям больше вариантов отыскать новые, интересные, ещё непрочитанные произведения.
Обсуждение, отзывы о книге «Excel Macros For Dummies» и просто собственные мнения читателей. Оставьте ваши комментарии, напишите, что Вы думаете о произведении, его смысле или главных героях. Укажите что конкретно понравилось, а что нет, и почему Вы так считаете.
