Dick Kusleika - Excel Macros For Dummies
Здесь есть возможность читать онлайн «Dick Kusleika - Excel Macros For Dummies» — ознакомительный отрывок электронной книги совершенно бесплатно, а после прочтения отрывка купить полную версию. В некоторых случаях можно слушать аудио, скачать через торрент в формате fb2 и присутствует краткое содержание. Жанр: unrecognised, на английском языке. Описание произведения, (предисловие) а так же отзывы посетителей доступны на портале библиотеки ЛибКат.

- Название:Excel Macros For Dummies
- Автор:
- Жанр:
- Год:неизвестен
- ISBN:нет данных
- Рейтинг книги:4 / 5. Голосов: 1
-
Избранное:Добавить в избранное
- Отзывы:
-
Ваша оценка:
Excel Macros For Dummies: краткое содержание, описание и аннотация
Предлагаем к чтению аннотацию, описание, краткое содержание или предисловие (зависит от того, что написал сам автор книги «Excel Macros For Dummies»). Если вы не нашли необходимую информацию о книге — напишите в комментариях, мы постараемся отыскать её.
Excel Macros For Dummies
Excel Macros For Dummies
Excel Macros For Dummies — читать онлайн ознакомительный отрывок
Ниже представлен текст книги, разбитый по страницам. Система сохранения места последней прочитанной страницы, позволяет с удобством читать онлайн бесплатно книгу «Excel Macros For Dummies», без необходимости каждый раз заново искать на чём Вы остановились. Поставьте закладку, и сможете в любой момент перейти на страницу, на которой закончили чтение.
Интервал:
Закладка:
Macro Recording Basics
To start recording your first macro, you need to first find the Macro Recorder, which is on the Developer tab. Unfortunately, Excel comes out of the box with the Developer tab hidden — you may not see it on your version of Excel at first. If you plan to work with VBA macros, you'll want to make sure that the Developer tab is visible. To display this tab
1 Choose File ⇒ Options.
2 In the Excel Options dialog box, click Customize Ribbon.
3 In the list box on the right, place a check mark next to Developer.
4 Click OK to return to Excel.
Now that you have the Developer tab showing in the Excel Ribbon, you can start up the Macro Recorder by selecting Record Macro from the Developer tab. This activates the Record Macro dialog box, as shown in Figure 1-1.
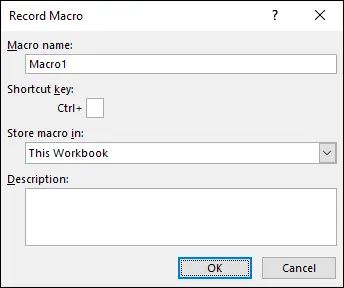
FIGURE 1-1:The Record Macro dialog box.
Here are the four parts of the Record Macro dialog box:
Macro Name: Excel gives a default name to your macro, such as Macro1, but you should give your macro a name more descriptive of what it actually does. For example, you might name a macro that formats a generic table as FormatTable. You have to follow a few rules when naming a macro. The first character must be a letter. Generally, special characters other than underscore aren't allowed. And the total number of characters can't be more than 255, although hopefully you don't get close to that limit.
Shortcut Key: Every macro needs an event, or something to happen, for it to run. This event can be a button press, a workbook opening, or if you use this field, a keystroke combination. When you assign a shortcut key to your macro, entering that combination of keys triggers your macro to run. This is an optional field.
Store Macro In: This Workbook is the default option. Storing your macro in This Workbook simply means that the macro is stored along with the active Excel file. The next time you open that particular workbook, the macro is available to run. Similarly, if you send the workbook to another user, that user can run the macro as well (provided the macro security is properly set by your user — more on that later in this chapter). You can also choose New Workbook to tell Excel to create a new workbook to store the macro or Personal Macro Workbook, a special workbook used to store macros you want access to all the time. See “Storing and Running Macros” later in this chapter for more on the Personal Macro Workbook.
Description: This field is optional, but it can come in handy if you have numerous macros in a workbook or if you need to give a user a more detailed description about what the macro does.
With the Record Macro dialog box open, follow these steps to create a simple macro that enters your name into a worksheet cell:
1 Enter a new single-word name for the macro to replace the default Macro1 name.A good name for this example is MyName.
2 Assign this macro to the shortcut key Ctrl+Shift+N.You do this by entering uppercase N in the edit box labeled Shortcut Key.
3 Click OK.This closes the Record Macro dialog box and begins recording your actions.
4 Select cell B3 on your worksheet, type your name into the selected cell, and then press Enter.
5 Choose Developer ⇒ Code ⇒ Stop Recording (or click the Stop Recording button in the status bar).
Examining the macro
The macro was recorded in a new module named Module1. To view the code in this module, you must activate the Visual Basic Editor. (See Chapter 2to find out more about the Visual Basic Editor.) You can activate the VB Editor in one of three ways:
Press Alt+F11.
Choose Developer ⇒ Code ⇒ Visual Basic.
Choose Developer ⇒ Code ⇒ Macros, select a macro, and click Edit.
In the VB Editor, the Project window displays a list of all open workbooks and add-ins. If the Project Explorer isn’t visible, choose View ⇒ Project Explorer. This list is displayed as a tree diagram, which you can expand or collapse. The code that you recorded previously is stored in Module1 in the current workbook. When you double-click Module1, the code in the module appears in the Code window.
The macro should look something like this:
Sub MyName()'' MyName Macro'' Keyboard Shortcut: Ctrl+Shift+N' Range("B3").Select ActiveCell.FormulaR1C1 = "Dick Kusleika" Range("B4").SelectEnd Sub
The macro recorded is a Sub procedure named MyName. The statements tell Excel what to do when the macro is executed.
Notice that Excel inserted some comments at the top of the procedure. These comments are some of the information that appeared in the Record Macro dialog box. These comment lines (which begin with an apostrophe) aren’t really necessary, and deleting them has no effect on how the macro runs. If you ignore the comments, you'll see that this procedure has three VBA statements, the second of which is:
ActiveCell.FormulaR1C1 = "Dick Kusleika"
The first statement is selecting cell B3. The last statement is pressing Enter after you enter your name, which moves the active cell down one row. The middle statement, the one that does all the work, causes the name you typed while recording to be inserted into the active cell.
Editing the macro
After you record a macro, you can make changes to it. The macro you recorded in the previous section always inserts your name into cell B3. Edit the macro so that it enters your name in whatever cell you happen to be in when you run it. To do that, delete the first and third lines of the macro. The edited macro appears as follows:
Sub MyName()'' MyName Macro'' Keyboard Shortcut: Ctrl+Shift+N' ActiveCell.FormulaR1C1 = "Dick Kusleika"End Sub
This macro inserts text into the active cell because the first Select statement was removed. That same cell remains active because the second Select statement was removed.
Testing the macro
Before you recorded this macro, you set an option that assigned the macro to the Ctrl+Shift+N shortcut key combination. To test the macro, return to Excel by using either of the following methods:
Press Alt+F11.
Click the View Microsoft Excel button on the VB Editor toolbar.
When Excel is active, activate a worksheet. (It can be in the workbook that contains the VBA module or in any other workbook.) Select a cell and press Ctrl+Shift+N. The macro immediately enters your name into the cell.
Comparing Absolute and Relative Macro Recording
Excel has two modes for recording — absolute reference and relative reference. These modes affect what statements Excel generates when you select cell while recording. In this section, I discuss the two modes and when to use them.
Recording macros with absolute references
In the example in the preceding section, you selected cell B3 while recording a macro and Excel dutifully recorded a statement that selects cell B3. This is an example of an absolute reference and it’s the default mode when recording macros. The term absolute reference is often used in the context of cell references found in formulas. When a cell reference in a formula is an absolute reference, it does not automatically adjust when the formula is pasted to a new location.
The best way to understand how this concept applies to macros is to try it. Open the Chapter 1 Sample File.xlsx file and record a macro that counts the rows in the Branchlist worksheet. (See Figure 1-2.)
 The sample dataset used in this chapter can be found on the book’s companion website.
Интервал:
Закладка:
Похожие книги на «Excel Macros For Dummies»
Представляем Вашему вниманию похожие книги на «Excel Macros For Dummies» списком для выбора. Мы отобрали схожую по названию и смыслу литературу в надежде предоставить читателям больше вариантов отыскать новые, интересные, ещё непрочитанные произведения.


Обсуждение, отзывы о книге «Excel Macros For Dummies» и просто собственные мнения читателей. Оставьте ваши комментарии, напишите, что Вы думаете о произведении, его смысле или главных героях. Укажите что конкретно понравилось, а что нет, и почему Вы так считаете.