Guy Hart-Davis - Teach Yourself VISUALLY MacBook Pro & MacBook Air
Здесь есть возможность читать онлайн «Guy Hart-Davis - Teach Yourself VISUALLY MacBook Pro & MacBook Air» — ознакомительный отрывок электронной книги совершенно бесплатно, а после прочтения отрывка купить полную версию. В некоторых случаях можно слушать аудио, скачать через торрент в формате fb2 и присутствует краткое содержание. Жанр: unrecognised, на английском языке. Описание произведения, (предисловие) а так же отзывы посетителей доступны на портале библиотеки ЛибКат.

- Название:Teach Yourself VISUALLY MacBook Pro & MacBook Air
- Автор:
- Жанр:
- Год:неизвестен
- ISBN:нет данных
- Рейтинг книги:3 / 5. Голосов: 1
-
Избранное:Добавить в избранное
- Отзывы:
-
Ваша оценка:
Teach Yourself VISUALLY MacBook Pro & MacBook Air: краткое содержание, описание и аннотация
Предлагаем к чтению аннотацию, описание, краткое содержание или предисловие (зависит от того, что написал сам автор книги «Teach Yourself VISUALLY MacBook Pro & MacBook Air»). Если вы не нашли необходимую информацию о книге — напишите в комментариях, мы постараемся отыскать её.
Teach Yourself VISUALLY: MacBook Pro & MacBook Air
Teach Yourself VISUALLY
Teach Yourself VISUALLY: MacBook Pro & MacBook Air
Teach Yourself VISUALLY MacBook Pro & MacBook Air — читать онлайн ознакомительный отрывок
Ниже представлен текст книги, разбитый по страницам. Система сохранения места последней прочитанной страницы, позволяет с удобством читать онлайн бесплатно книгу «Teach Yourself VISUALLY MacBook Pro & MacBook Air», без необходимости каждый раз заново искать на чём Вы остановились. Поставьте закладку, и сможете в любой момент перейти на страницу, на которой закончили чтение.
Интервал:
Закладка:
Choose Written and Spoken Languages Settings
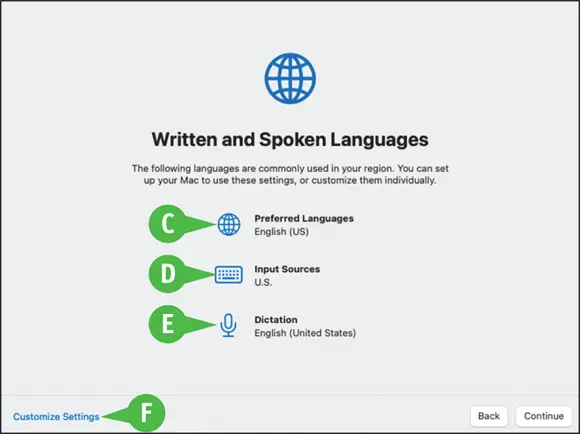
On the Written and Spoken Languages screen, verify that Preferred Languages (  , C) shows the language you want the macOS user interface to use, that Input Sources (
  , D) shows the keyboard layout you want to use, and that Dictation (
  , E) shows the language you will use for dictating text to your MacBook. If you want to change any of these settings, click Customize Settings(F) and then choose your preferred language, keyboard layout, or dictation language.
When the Written and Spoken Languages screen shows the settings you want, click Continueto proceed.
Apply Any Accessibility Settings You Need
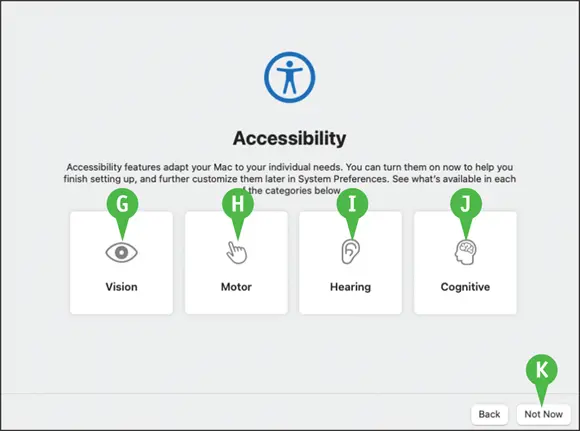
On the Accessibility screen, you can choose whether to enable any of macOS’s accessibility features now so that you can use them during setup and thereafter. Click Vision(  , G) to enable features such as VoiceOver, Zoom, and Pointer Size. Click Motor(
  , H) to enable Accessibility Keyboard, an on-screen keyboard. Click Hearing(
  , I) to enable the Closed Captions feature and the Flash for Alerts feature. Click Cognitive(
  , J) to enable features including Appearance, Speak Selection, and Typing Feedback.
You can enable and disable these accessibility features — and others — at any point after finishing setup. Click Not Now(K) if you do not want to set up any Accessibility features.
Choose Whether to Transfer Information to Your MacBook
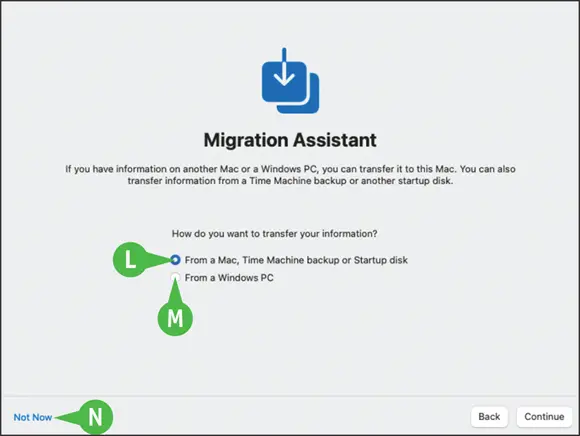
On the Migration Assistant screen, you can choose whether to transfer information to your MacBook.
If you have information on another Mac, a Time Machine backup, or a Mac’s startup disk, click From a Mac, Time Machine backup or Startup disk(  changes to
  , L), click Continue, and then follow the prompts.
If you have information on a Windows PC, click From a Windows PC( changes to , M), click Continue, and then follow the prompts.
If you have no information to transfer, click Not Now(N).
When creating an account, you can use either your full name or a shortened version. You can edit the username that macOS suggests based on that name. You can choose whether to set a password hint to help yourself remember your password. You can also choose whether to let your Apple ID reset the password, enabling you to recover from a lost password by logging in using your Apple ID.
Sign In to Apple’s Services with Your Apple ID
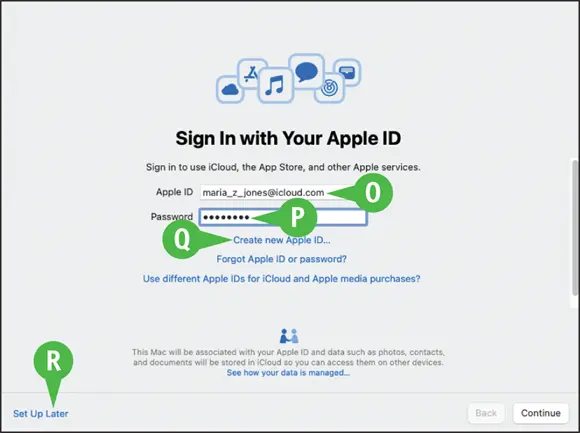
The Sign In with Your Apple ID screen enables you to sign in to Apple’s services using your Apple ID, a credential consisting of an e-mail address and a password.
If you already have an Apple ID, type the e-mail address in the Apple ID box (O), and then click Continue. The Sign In with Your Apple ID screen then displays the Password box. Type your password in the Password box (P), and then click Continue.
If you do not have an Apple ID, you can click Create new Apple ID(Q) and follow the prompts to create one.
If you prefer not to sign in with an Apple ID at this point, click Set Up Later(R).
Set Up Your Computer Account
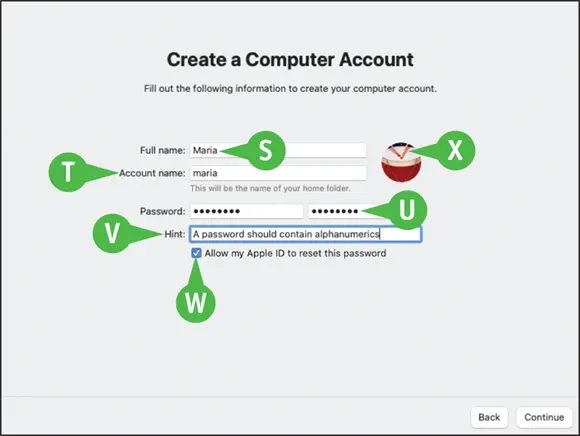
On the Create a Computer Account screen, type your name the way you want it to appear in the Full Name box (S). In the Account Name box (T), macOS automatically enters a default account name consisting of your Full Name entry changed to lowercase and stripped of spaces and punctuation — for example, if you type Maria Jones as the full name, macOS suggests mariajones as the account name. You can edit the account name as needed.
Type a new password twice, once in each Password box (U). Optionally, click Hint(V) and type a password hint that will help you to recall your password.
Select (  ) Allow my Apple ID to reset this password(W) if you want to be able to reset this password by using your Apple ID. This feature helps you avoid getting locked out of your MacBook.
Click the account icon (X) and choose the icon or image you want to use for your account. Then click Continue.
Choose Settings on the All Your Files and Photos in iCloud Screen
The All Your Files and Photos in iCloud screen lets you decide whether to store your key files in iCloud. Storing the files in the Documents folder and the Desktop folder, plus your photos and videos, in iCloud enables you to work with the files easily on multiple Macs, devices such as iPhones and iPads, and Windows computers that have iCloud integration installed. It also keeps the files backed up online, reducing the possibility of you losing the files if your MacBook gets damaged or goes missing.
Select ( ) Store files from Documents and Desktop in iCloud Driveif you want to store these folders in iCloud. Select ( ) Store photos and videos in iCloud Photosif you want to store your photos and videos in iCloud as well.
Интервал:
Закладка:
Похожие книги на «Teach Yourself VISUALLY MacBook Pro & MacBook Air»
Представляем Вашему вниманию похожие книги на «Teach Yourself VISUALLY MacBook Pro & MacBook Air» списком для выбора. Мы отобрали схожую по названию и смыслу литературу в надежде предоставить читателям больше вариантов отыскать новые, интересные, ещё непрочитанные произведения.


Обсуждение, отзывы о книге «Teach Yourself VISUALLY MacBook Pro & MacBook Air» и просто собственные мнения читателей. Оставьте ваши комментарии, напишите, что Вы думаете о произведении, его смысле или главных героях. Укажите что конкретно понравилось, а что нет, и почему Вы так считаете.