Doug Abbott - Embedded Linux development using Eclipse
Здесь есть возможность читать онлайн «Doug Abbott - Embedded Linux development using Eclipse» весь текст электронной книги совершенно бесплатно (целиком полную версию без сокращений). В некоторых случаях можно слушать аудио, скачать через торрент в формате fb2 и присутствует краткое содержание. Год выпуска: 2009, ISBN: 2009, Издательство: Elsevier, Жанр: Программирование, ОС и Сети, Программы, на английском языке. Описание произведения, (предисловие) а так же отзывы посетителей доступны на портале библиотеки ЛибКат.
- Название:Embedded Linux development using Eclipse
- Автор:
- Издательство:Elsevier
- Жанр:
- Год:2009
- ISBN:978-0-7506-8654-9
- Рейтинг книги:4 / 5. Голосов: 1
-
Избранное:Добавить в избранное
- Отзывы:
-
Ваша оценка:
Embedded Linux development using Eclipse: краткое содержание, описание и аннотация
Предлагаем к чтению аннотацию, описание, краткое содержание или предисловие (зависит от того, что написал сам автор книги «Embedded Linux development using Eclipse»). Если вы не нашли необходимую информацию о книге — напишите в комментариях, мы постараемся отыскать её.
• Overview of the latest C/C++ Development toolkit
• Includes case studies of eclipse use including Monta Vista, LynuxWorks, and WindRiver
Embedded Linux development using Eclipse — читать онлайн бесплатно полную книгу (весь текст) целиком
Ниже представлен текст книги, разбитый по страницам. Система сохранения места последней прочитанной страницы, позволяет с удобством читать онлайн бесплатно книгу «Embedded Linux development using Eclipse», без необходимости каждый раз заново искать на чём Вы остановились. Поставьте закладку, и сможете в любой момент перейти на страницу, на которой закончили чтение.
Интервал:
Закладка:
CVS uses a client/server paradigm to store a set of files on a server and then make those files accessible to all users who need them. The system provides commands to “check out” a copy of a file for modification and subsequently “commit” changes back to the repository. It also scans files as they are moved to and from the repository, to prevent one person’s changes from overwriting another’s.
The system also maintains a history of each file, which allows you to go back and recreate any previous version.
8.2.1 Branches
CVS is based on the notion of branches , where programming teams can share and integrate ongoing work. A branch is a shared work area that can be updated at any time by any member of the team. This allows individuals to share their own work with other members of the team and to access the work of others during all stages of a project. The branch effectively represents the current shared state of the project.
The process is illustrated graphically in Figure 8.17. Two programmers each check files out of the branch, update them, and commit them back to the branch. It is entirely possible that both programmers are working on the same file. Both programmers need to synchronize the file to check for conflicting changes before committing.
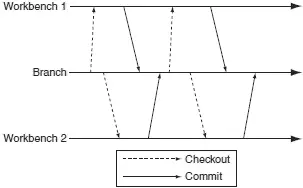
Figure 8.17: CVS workflow.
Every CVS repository has a special branch called HEAD that is the main branch. HEAD, also referred to as the trunk, is considered sacrosanct. You don’t commit something to HEAD until you are absolutely certain that it’s correct. Other branches are created to provide a safe place to make changes before committing file to the HEAD branch.
8.2.2 CVS in Eclipse
Like most Unix/Linux software packages, CVS is strictly command line-driven. But of course, Eclipse wraps a graphical user interface around that, just like it does for gdb. The CVS GUI is embodied in the CVS Repository Exploring perspective. The blank CVS perspective shown in Figure 8.18 isn’t very exciting.
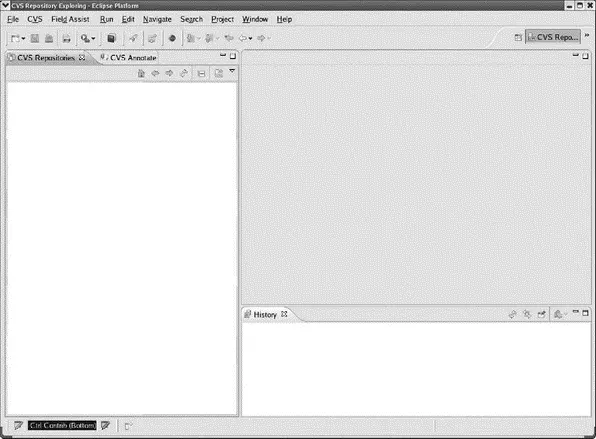
Figure 8.18: Blank CVS Repository Exploring perspective.
To see how CVS works, we’ll have to connect to a repository on a CVS server. There’s a large number of CVS repositories at sourceforge.net. I happened to choose nxtOSEK, an RTOS for the Lego Mindstorm NXT, as my sample project, but feel free to select whatever strikes your fancy at SourceForge, or anywhere else for that matter. nxtOSEK is found at http://sourceforge.net/projects/lejos-osek.
In a web browser, go to that page, or the page for your selected project, and scroll down until you find a link to the CVS Repository. Upon clicking the link you’ll see some basic information about CVS and about anonymous access. There you’ll see a command line, something like:
cvs –d:pserver:anonymous@lejos-osek.cvs.sourceforge.net:/cvsroot/lejos-osek login
Note that this is in fact one line.
This tells us the following:
• The repository uses the CVS protocol pserver.
• The user login name is anonymous with no password.
• The server name is lejos-osek.cvs.sourceforge.net.
• The root path to the project is cvsroot/lejos-osek.
This is enough information to get Eclipse to connect to the project. Right-click in the CVS Repositories view and select New→ Repository Location…. Fill out the resulting dialog, as shown in Figure 8.19. The User: field is a drop-down menu whose only entry is anonymous.
Figure 8.19: Add Repository dialog.
Click Finish. You’ll find a new entry in the CVS Repositories view. Expand that to look like Figure 8.20. Each time you expand an entry by clicking on the right arrow, Eclipse goes out to the server to retrieve the information for that directory.
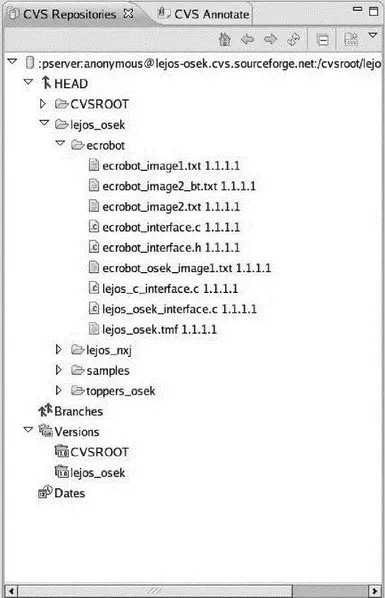
Figure 8.20: CVS Repositories view.
Right-click one of the file entries under the ecrobotdirectory and select Show History. The History view (Figure 8.21) now shows the full history of this file including author, timestamp, comments, and so on. You may have to expand the Older than This Month entry to see the history. There’s not much here, but it gives you the idea.
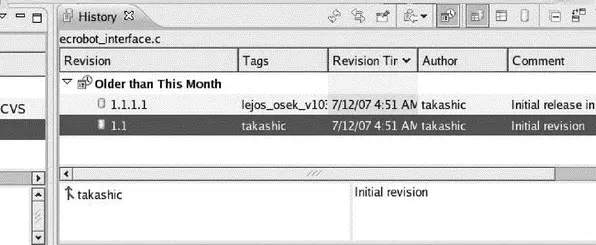
Figure 8.21: CVS History view.
Other items in the CVS Repositories view context menu include Show Annotationand Open, both of which retrieve the file from the repository and open it in a read-only editor window.
Having connected to a repository, we might want to check out some or all of the contents to work on locally. Right-click the ecrobotentry again and select Check Out. Eclipse retrieves all the files in ecrobotand creates a new project of the same name in the default workspace. The Console view shows the CVS commands and responses.
Go back to the C/C++ perspective and you’ll see that the ecrobot project is identified as having come from a CVS repository. All the files have their version number listed, and are identified as ASCII files.
Select Propertiesfrom the context menu for ecrobot. There’s a section called CVS shown in Figure 8.22. This lists all the properties of the repository from which the project came. You can now edit the files in the local project.
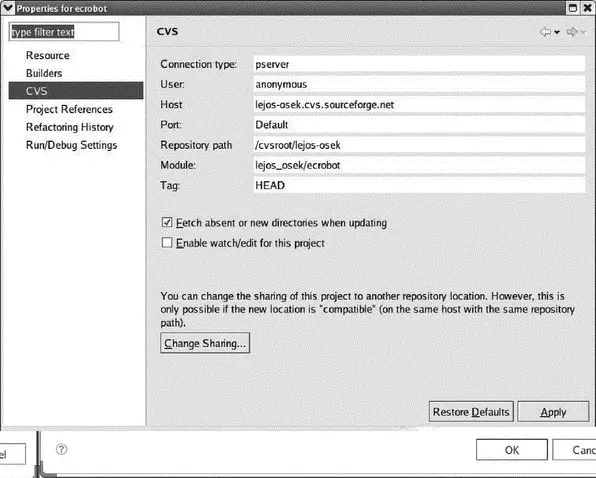
Figure 8.22: Project CVS properties.
The next thing we might want to do is create a branch where we can safely share the project files with other team members, and make changes until we’re ready to check them back into HEAD. The branch is created on the repository server and requires write access, which anonymous users normally don’t have.
8.2.3 Setting Up a CVS server
To continue our exploration of CVS, you’ll need write access to a CVS server. If you don’t have one, there’s a nice server called CVSNT that runs both on Windows and Linux, that’s available from http://www.cvsnt.org/. CVSNT was originally developed to provide CVS server functionality under Windows and was later ported to Linux. The download for Linux is in the form of a gzipped RPM.
There’s a fairly complete installation guide for Linux at the cvsnt.org wiki at http://www.cvsnt.org/wiki/InstallationLinux, so I won’t bother going into a lot of detail here. You only need to install the required package, cvsnt2.5.03.2382-1.i386.rpm. None of the optional database or protocol packages are necessary for our purposes.
There are a couple of incompatibilities between Eclipse and CVSNT that need to be dealt with. RPM created a cvsnt/directory under etc/with files Pserver.exampleand Plugins.example. Copy Pserver.exampleto Pserverand open it in an editor. Find a line that says #Compat0_OldVersion=0and uncomment it by deleting the #. Then uncomment the line #Compat0_OldCheckout=0a little farther down.
You’ll need to create an initial CVS repository. Create a directory in a suitable place, /usr/local/cvsrootis what I chose, and then as root user execute:
Интервал:
Закладка:
Похожие книги на «Embedded Linux development using Eclipse»
Представляем Вашему вниманию похожие книги на «Embedded Linux development using Eclipse» списком для выбора. Мы отобрали схожую по названию и смыслу литературу в надежде предоставить читателям больше вариантов отыскать новые, интересные, ещё непрочитанные произведения.


Обсуждение, отзывы о книге «Embedded Linux development using Eclipse» и просто собственные мнения читателей. Оставьте ваши комментарии, напишите, что Вы думаете о произведении, его смысле или главных героях. Укажите что конкретно понравилось, а что нет, и почему Вы так считаете.