Wei-Meng Lee - C# 2008 Programmer's Reference
Здесь есть возможность читать онлайн «Wei-Meng Lee - C# 2008 Programmer's Reference» весь текст электронной книги совершенно бесплатно (целиком полную версию без сокращений). В некоторых случаях можно слушать аудио, скачать через торрент в формате fb2 и присутствует краткое содержание. Город: Indianapolis, Год выпуска: 2009, ISBN: 2009, Издательство: Wiley Publishing, Inc., Жанр: Программирование, на английском языке. Описание произведения, (предисловие) а так же отзывы посетителей доступны на портале библиотеки ЛибКат.
- Название:C# 2008 Programmer's Reference
- Автор:
- Издательство:Wiley Publishing, Inc.
- Жанр:
- Год:2009
- Город:Indianapolis
- ISBN:978-0-470-28581-7
- Рейтинг книги:4 / 5. Голосов: 1
-
Избранное:Добавить в избранное
- Отзывы:
-
Ваша оценка:
C# 2008 Programmer's Reference: краткое содержание, описание и аннотация
Предлагаем к чтению аннотацию, описание, краткое содержание или предисловие (зависит от того, что написал сам автор книги «C# 2008 Programmer's Reference»). Если вы не нашли необходимую информацию о книге — напишите в комментариях, мы постараемся отыскать её.
C# 2008 Programmer's Reference — читать онлайн бесплатно полную книгу (весь текст) целиком
Ниже представлен текст книги, разбитый по страницам. Система сохранения места последней прочитанной страницы, позволяет с удобством читать онлайн бесплатно книгу «C# 2008 Programmer's Reference», без необходимости каждый раз заново искать на чём Вы остановились. Поставьте закладку, и сможете в любой момент перейти на страницу, на которой закончили чтение.
Интервал:
Закладка:
Select the Multiple Startup Projects option (see Figure 2-27), and set the appropriate action for each project (None, Start, or Start Without Debugging).
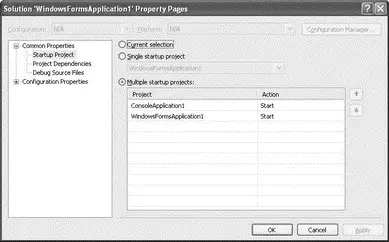
Figure 2-27
Then when you press F5, the projects configured to start launch at the same time.
The Properties window shows the list of properties associated with the various items in your projects (Windows Forms, controls, projects, solutions, etc).
Figure 2-28 shows the Properties window displaying the list of properties of a Windows Form (Form1, in this example). By default, the properties are displayed in Categorized view, but you can change it to Alphabetical view, which lists all the properties in alphabetical order.
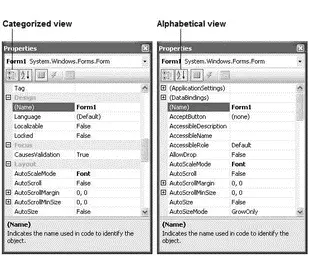
Figure 2-28
All default property values are displayed in normal font, while nondefault values are displayed in bold. This feature is very useful for debugging because it enables you to quickly trace the property values that you have changed.
Besides displaying properties of items, the Properties window also displays events. When the Properties window is displaying an item (such as a Windows Form or a control) that supports events, you can click the Events icon (see left side of Figure 2-29) to view the list of events supported by that item. To create an event handler stub for an event, simply double-click the event name and Visual Studio 2008 automatically creates an event handler for you (see right side of Figure 2-29).
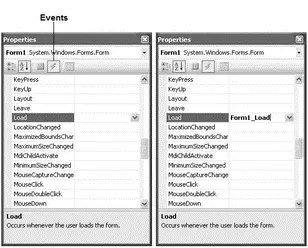
Figure 2-29
The Error List window (see Figure 2-30) is used to display:
□ Errors, warnings, and messages produced as you edit and compile code.
□ Syntax errors noted by IntelliSense.

Figure 2-30
To display the Error List window, select View→Error List.
You can double-click on an error message to open the source file and locate the position of the error. Once the error is located, press F1 for help.
The Output window (View→Output) displays status messages for your application when you are debugging in Visual Studio 2008. The Output window is useful for displaying debugging messages in your application. For example, you can use the Console.WriteLine()statement to display a message to the Output window:
Console.WriteLine(DateTime.Now.ToString());
Figure 2-31 shows the message displayed in the Output window.
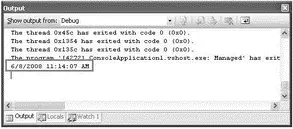
Figure 2-31
The Designer window enables you to visually design the UI of your application. Depending on the type of projects you are creating, the Designer displays a different design surface where you can drag and drop controls onto it. Figure 2-32 shows the Designer for creating different types of projects — Windows Forms (left), Windows Mobile (right), and Web (bottom left).
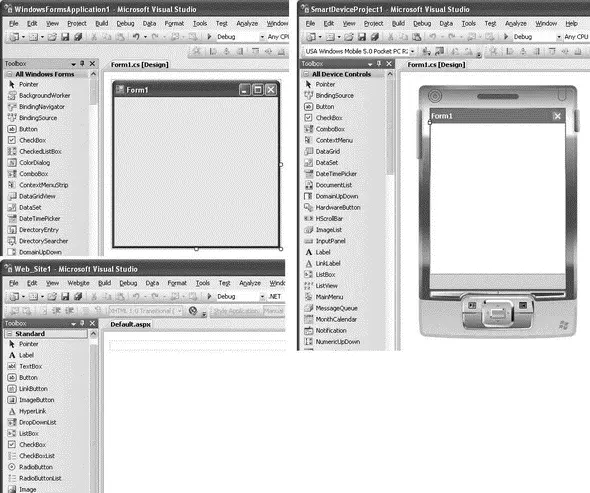
Figure 2-32
To switch to the code-behind of the application, you can either double-click on the surface of the designer, or right-click the item in Solution Explorer and select View Code. For example, if you are developing a Windows Forms application, you can right-click on a form, say Form1.cs, in Solution Explorer and select View Code. The code-behind for Form1then displays (see Figure 2-33).

Figure 2-33
Code view is where you write the code for your application. You can switch between design view and code view by clicking on the relevant tabs (see Figure 2-34).

Figure 2-34
In Visual Studio, you can right-click on the tabs (see Figure 2-35) to arrange the code view either horizontally or vertically, to maximize the use of your monitor(s).
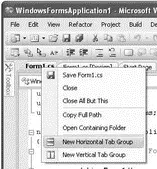
Figure 2-35
Figure 2-36 shows the code view and design view displaying horizontally.
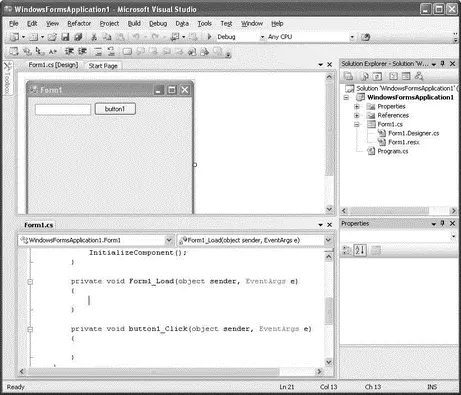
Figure 2-36
Figure 2-37 shows the code view and design view displaying vertically.

Figure 2-37
Having multiple views at the same time is useful if you have a big monitor (or multiple monitors).
Code and Text Editor
Within the code view of Visual Studio 2008 is the Code and Text Editor, which provides several rich features that make editing your code easy and efficient, including:
□ Code Snippets
□ IntelliSense statement completion
□ IntelliSense support for object properties, methods and events
□ Refactoring support
Code Snippets
The Code Snippet feature in Visual Studio 2008 enables you to insert commonly used code blocks into your project, thereby improving the efficiency of your development process. To insert a code snippet, right-click on the location where you want to insert the code snippet in the Code Editor, and select Insert Snippet (see Figure 2-38).
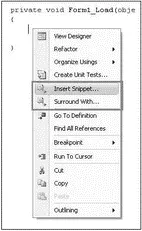
Figure 2-38
Select the snippet category by clicking on the category name (see the top of Figure 2-39) and then selecting the code snippet you want to insert (see bottom of Figure 2-39).
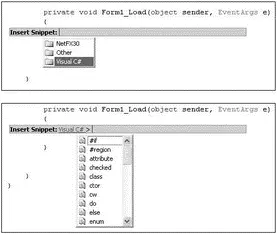
Figure 2-39
For example, suppose that you select the trycode snippet. The following block of code will be inserted automatically:
private void Form1_Load(object sender, EventArgs e) {
try {
} catch (Exception) {
throw;
}
}
You can also use the Surround With code snippets feature. Suppose that you have the following statements:
private void Form1_Load(object sender, EventArgs e) {
int num1 = 5;
int num2 = 0;
int result = num1 / num2;
}
The third statement is dangerous because it could result in a division-by-zero runtime error, so it would be good to wrap the code in a try-сatchblock. To do so, you can highlight the block of code you want to put within a try-сatchblock and right-click it. Select Surround With (see Figure 2-40), and then select the try code snippet.
Интервал:
Закладка:
Похожие книги на «C# 2008 Programmer's Reference»
Представляем Вашему вниманию похожие книги на «C# 2008 Programmer's Reference» списком для выбора. Мы отобрали схожую по названию и смыслу литературу в надежде предоставить читателям больше вариантов отыскать новые, интересные, ещё непрочитанные произведения.


Обсуждение, отзывы о книге «C# 2008 Programmer's Reference» и просто собственные мнения читателей. Оставьте ваши комментарии, напишите, что Вы думаете о произведении, его смысле или главных героях. Укажите что конкретно понравилось, а что нет, и почему Вы так считаете.