Wei-Meng Lee - C# 2008 Programmer's Reference
Здесь есть возможность читать онлайн «Wei-Meng Lee - C# 2008 Programmer's Reference» весь текст электронной книги совершенно бесплатно (целиком полную версию без сокращений). В некоторых случаях можно слушать аудио, скачать через торрент в формате fb2 и присутствует краткое содержание. Город: Indianapolis, Год выпуска: 2009, ISBN: 2009, Издательство: Wiley Publishing, Inc., Жанр: Программирование, на английском языке. Описание произведения, (предисловие) а так же отзывы посетителей доступны на портале библиотеки ЛибКат.
- Название:C# 2008 Programmer's Reference
- Автор:
- Издательство:Wiley Publishing, Inc.
- Жанр:
- Год:2009
- Город:Indianapolis
- ISBN:978-0-470-28581-7
- Рейтинг книги:4 / 5. Голосов: 1
-
Избранное:Добавить в избранное
- Отзывы:
-
Ваша оценка:
C# 2008 Programmer's Reference: краткое содержание, описание и аннотация
Предлагаем к чтению аннотацию, описание, краткое содержание или предисловие (зависит от того, что написал сам автор книги «C# 2008 Programmer's Reference»). Если вы не нашли необходимую информацию о книге — напишите в комментариях, мы постараемся отыскать её.
C# 2008 Programmer's Reference — читать онлайн бесплатно полную книгу (весь текст) целиком
Ниже представлен текст книги, разбитый по страницам. Система сохранения места последней прочитанной страницы, позволяет с удобством читать онлайн бесплатно книгу «C# 2008 Programmer's Reference», без необходимости каждый раз заново искать на чём Вы остановились. Поставьте закладку, и сможете в любой момент перейти на страницу, на которой закончили чтение.
Интервал:
Закладка:
In the next chapter, you start your journey to C# programming by learning use the development environment of Visual Studio 2008.
Chapter 2
Getting Started with Visual Studio 2008
Microsoft Visual Studio 2008 is an extremely versatile and powerful environment for developing .NET applications. This chapter explores some of the commonly used features that you will likely use in the process of your development work. Because there are literally hundreds and thousands of ways in which you can customize Visual Studio 2008, this chapter can only explore, for the most part, the default settings in Visual Studio. While some of the topics covered are discussed in more detail in subsequent chapters, you'll want to breeze through this chapter to get an overall look at this version of Visual Studio.
This chapter examines:
□ Components of the IDE (Menu bar, Toolbar, Toolbox, and so on)
□ Code and Text Editor and the features it contains, including IntelliSense and Refactoring support
□ Using the debugger in Visual Studio 2008
□ Unit testing in Visual Studio 2008
Visual Studio 2008 Overview
In early 2008, Microsoft released the latest version of Visual Studio — Visual Studio 2008. With it comes a plethora of editions designed for the different types of developers in mind:
□ Visual Web Developer 2008 Express Edition
□ Visual Basic 2008 Express Edition
□ Visual C# 2008 Express Edition
□ Visual C++ 2008 Express Edition
□ Visual Studio 2008 Standard Edition
□ Visual Studio 2008 Professional Edition
□ Visual Studio 2008 Team System 2008 Architecture Edition
□ Visual Studio 2008 Team System 2008 Database Edition
□ Visual Studio 2008 Team System 2008 Development Edition
□ Visual Studio 2008 Team System 2008 Test Edition
□ Visual Studio 2008 Team System 2008 Team Suite
For a detailed discussion of the features available in each edition, check out the following URL: http://msdn.microsoft.com/en-us/vs2008/products/cc149003.aspx.
The Express editions are designed for hobbyists and are available for download at no charge. This is a great way to get started with Visual Studio 2008 and is ideal for students and beginning programmers. However, if you are a professional developer, you should purchase either the Standard or Professional Edition. Note that if you are developing Windows Mobile applications, you need the Professional Edition (or higher). If you are working in a large development environment and need to develop collaboratively with other developers on large projects, check out the Team System editions.
If you are not ready to purchase Visual Studio 2008, you can always download a 90-day trial edition of Visual Studio 2008 Professional from http://msdn.microsoft.com/en-us/vs2008/products/cc268305.aspx.
Choosing the Development Settings
The first time you launch Visual Studio 2008, you choose the default environment settings. If you are going to use the C# language most of the time, choose the Visual C# Development Settings (see Figure 2-1). Choosing this option does not mean that you cannot use other languages (such as Visual Basic); it just means that C# will be listed as the default project type when you create a new project.
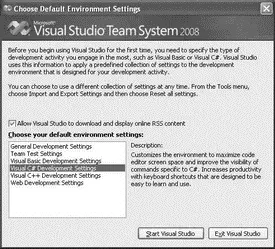
Figure 2-1
If the Visual C# Development Settings is chosen, Visual C# appears at the top of the Project Types list (see the left screenshot in Figure 2-2). In contrast, choosing the General Development Settings puts the Visual Basic language at the top (see the right screenshot in Figure 2-2).
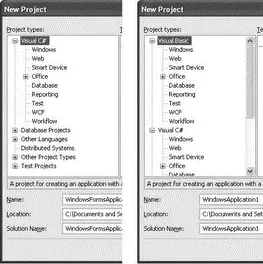
Figure 2-2
Resetting the Development Settings
If for some reason you want to change the development settings after you have set them, you can always select Tools→Import and Export Settings to reset the settings. In the Import and Export Settings Wizard dialog that appears (see Figure 2-3), you can:
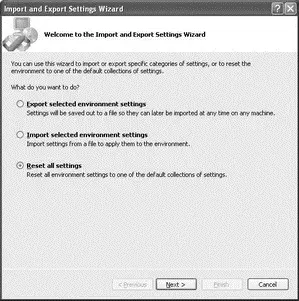
Figure 2-3
□ Export the settings to a file so that they can be exported to another machine
□ Import a saved setting
□ Reset all the settings
To reset to another setting, check the Reset All Settings option and click Next. In the next step, you can choose either to save your current settings or to just reset the settings without saving. Once you have selected the option, click Next, and you can select another setting (see Figure 2-4).
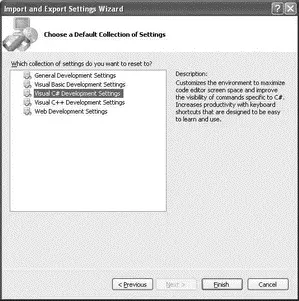
Figure 2-4
Creating a New Project
After you select a default setting, Visual Studio 2008 takes a couple of minutes to initialize. Once that's done, you will see something as shown in Figure 2-5.
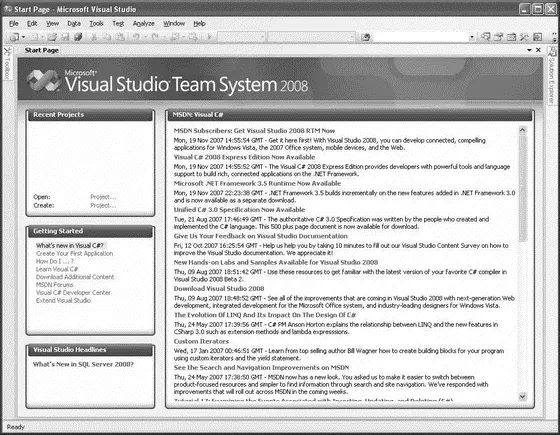
Figure 2-5
To create a new project, select File→New→Project (see Figure 2-6).
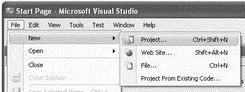
Figure 2-6
In the Visual C# development setting, you see the New Project dialog shown in Figure 2-7.
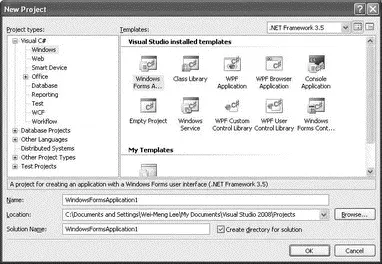
Figure 2-7
The default project name ( WindowsFormApplication1in this example) is provided, along with the following:
□ The default location for saving the project.
□ The solution name. The solution name by default is the same as your project name and is changed automatically to be the same as the project name. However, you can modify the solution name if you want it to have a different name than the project name.
□ A separate directory to store the solution; if you uncheck the Create Directory For Solution checkbox, a solution is not be created for your project.
You can target a different version of the .NET Framework by selecting it from the dropdown list at the top right corner of the New Project dialog (see Figure 2-8).
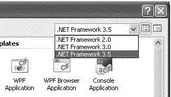
Figure 2-8
Remember: A solution contains one or more projects.
Components of the IDE
Figure 2-9 shows the various parts of the Visual Studio 2008 development environment.
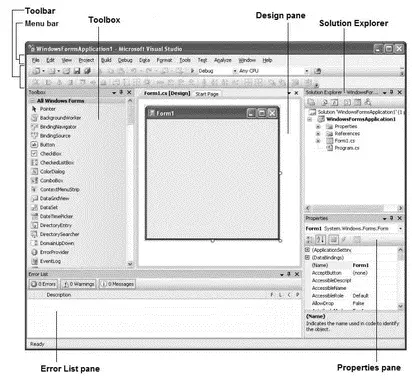
Figure 2-9
These parts are described in the following sections.
The Menu bar contains standard Visual Studio commands. For example, Figure 2-10 shows that the File menu (see Figure 2-10) contains commands that enable you to create new projects, open existing projects, save the current form, and so on.
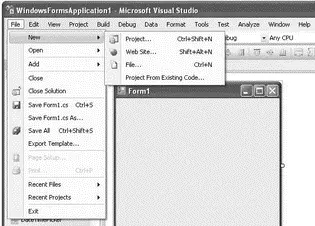
Figure 2-10
To customize the items displayed in the Menu bar, select Tools→Customize to display the Customize dialog (see Figure 2-11). Click on the Commands tab; the list of main menu items (Action, Addins, Analyze, and so forth) is on the left. Selecting a main menu item displays the list of available submenu items on the right. You can rearrange the submenu items by dragging them and dropping them onto the desired main menu item.
Читать дальшеИнтервал:
Закладка:
Похожие книги на «C# 2008 Programmer's Reference»
Представляем Вашему вниманию похожие книги на «C# 2008 Programmer's Reference» списком для выбора. Мы отобрали схожую по названию и смыслу литературу в надежде предоставить читателям больше вариантов отыскать новые, интересные, ещё непрочитанные произведения.


Обсуждение, отзывы о книге «C# 2008 Programmer's Reference» и просто собственные мнения читателей. Оставьте ваши комментарии, напишите, что Вы думаете о произведении, его смысле или главных героях. Укажите что конкретно понравилось, а что нет, и почему Вы так считаете.