Wei-Meng Lee - C# 2008 Programmer's Reference
Здесь есть возможность читать онлайн «Wei-Meng Lee - C# 2008 Programmer's Reference» весь текст электронной книги совершенно бесплатно (целиком полную версию без сокращений). В некоторых случаях можно слушать аудио, скачать через торрент в формате fb2 и присутствует краткое содержание. Город: Indianapolis, Год выпуска: 2009, ISBN: 2009, Издательство: Wiley Publishing, Inc., Жанр: Программирование, на английском языке. Описание произведения, (предисловие) а так же отзывы посетителей доступны на портале библиотеки ЛибКат.

- Название:C# 2008 Programmer's Reference
- Автор:
- Издательство:Wiley Publishing, Inc.
- Жанр:
- Год:2009
- Город:Indianapolis
- ISBN:978-0-470-28581-7
- Рейтинг книги:4 / 5. Голосов: 1
-
Избранное:Добавить в избранное
- Отзывы:
-
Ваша оценка:
C# 2008 Programmer's Reference: краткое содержание, описание и аннотация
Предлагаем к чтению аннотацию, описание, краткое содержание или предисловие (зависит от того, что написал сам автор книги «C# 2008 Programmer's Reference»). Если вы не нашли необходимую информацию о книге — напишите в комментариях, мы постараемся отыскать её.
C# 2008 Programmer's Reference — читать онлайн бесплатно полную книгу (весь текст) целиком
Ниже представлен текст книги, разбитый по страницам. Система сохранения места последней прочитанной страницы, позволяет с удобством читать онлайн бесплатно книгу «C# 2008 Programmer's Reference», без необходимости каждый раз заново искать на чём Вы остановились. Поставьте закладку, и сможете в любой момент перейти на страницу, на которой закончили чтение.
Интервал:
Закладка:
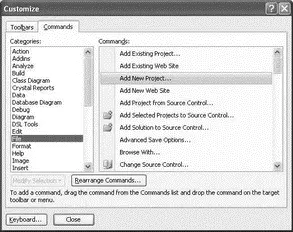
Figure 2-11
To add a new submenu item to a main menu item, click the Rearrange Commands button. In the Rearrange Commands dialog (see Figure 2-12), select the menu you want to customize, and click the Add button. You can then select the various submenu items from the different categories to add to the menu.
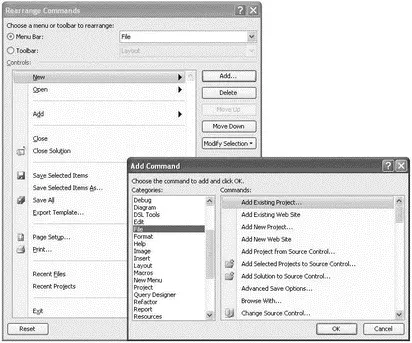
Figure 2-12
The Toolbar (see Figure 2-13) contains shortcuts to many of the often used commands contained in the Menu bar.

Figure 2-13
As with the Menu bar, the Toolbar is also customizable. To add additional toolbars, simply right-click on any existing toolbar and check the toolbar(s) you want to add to Visual Studio from the list of toolbars available (see Figure 2-14).
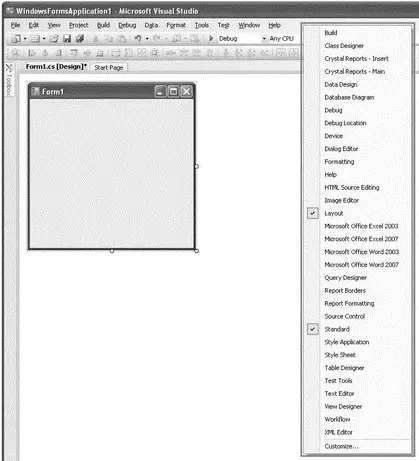
Figure 2-14
To customize the Toolbar, select Tools→Customize. On the Toolbars tab of the Customize dialog (see Figure 2-15), check the toolbar(s) you want to add to Visual Studio. You can create your own custom toolbar by clicking the New button.
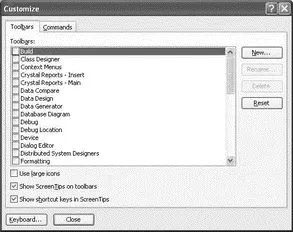
Figure 2-15
As with the Menu bar, you can also rearrange the items displayed in each toolbar. To customize the items displayed in the Toolbar, select Tools→Customize to open the Customize dialog and then click the Rearrange Commands button. The Rearrange Commands dialog allows you to add/delete items from each toolbar (see Figure 2-16).
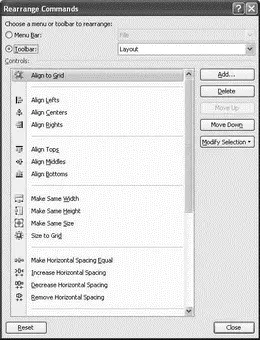
Figure 2-16
Each toolbar in the Toolbar can also be physically rearranged in Visual Studio by dragging the four-dot line on the left edge of the toolbar (see Figure 2-17) and relocating it to the new desired position.
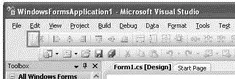
Figure 2-17
The Toolbox (see Figure 2-18) contains all the controls that you can use in your applications. You can drag controls from the Toolbox and drop them onto the design surface of your application.
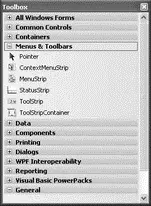
Figure 2-18
Each tab in the Toolbox contains controls that are related to a specific purpose. You can create your own tab to house your own controls. To do so, right-click on the Toolbox and select Add Tab. Name the newly created tab (see Figure 2-19).
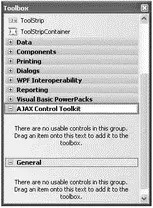
Figure 2-19
To add controls to the Toolbox, right-click on the tab to which you want the controls added and select Choose Items. The Choose Toolbox Items dialog (see Figure 2-20) opens.
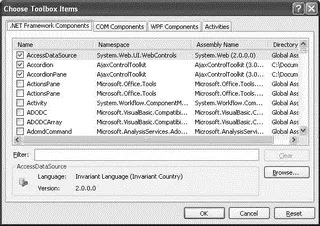
Figure 2-20
You can add the following types of controls to the Toolbox:
□ .NET Framework components
□ COM components
□ WPF components
□ Workflow activities
You can also click the Browse button to locate the .dllfile that contains your own custom controls.
Another way to add controls to the Toolbox is to simply drag the DLL containing the controls and drop it directly onto the Toolbox.
You can relocate the Toolbox by dragging it and repositioning it on the various anchor points on the screen. Figure 2-21 shows the anchor points displayed by Visual Studio 2008 when you drag the Toolbox.
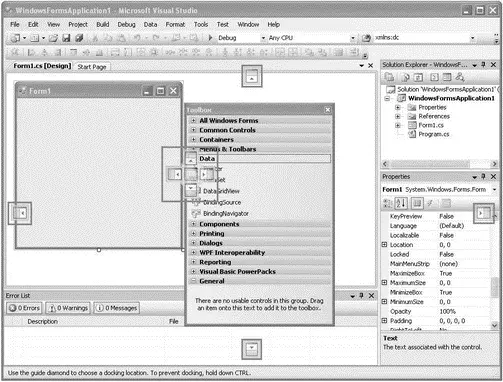
Figure 2-21
If you have limited screen real estate, you might want to auto-hide the Toolbox by clicking the Auto Hide button (see Figure 2-22).
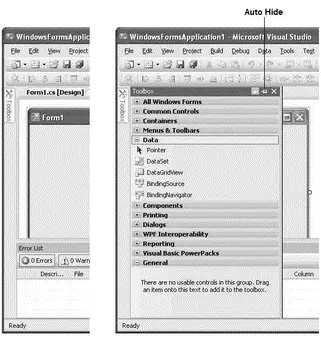
Figure 2-22
Sometimes, for some unknown reasons, the controls in the Toolbox may suddenly go missing. The usual remedy is to right-click the Toolbox and select Reset Toolbox. This works most of the time. However, if that fails to work, you may need to do the following:
Navigate to C:\Documents and Settings\\Local Settings\Application Data\Microsoft\VisualStudio\9.0.
Within this folder are some hidden files. Simply delete the following files: toolbox.tbd, toolboxIndex.tbd, toolbox_reset.tbd, and toolboxIndex_reset.tbd.
Then restart Visual Studio 2008. Your controls should now come back up!
The Solution Explorer window contains all the files and resources used in your project. A solution contains one or more projects. Figure 2-23 shows the various buttons available in the Solution Explorer.
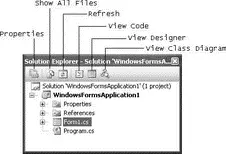
Figure 2-23
The buttons in the Solution Explorer window are context sensitive, which means that some buttons will not be visible when certain items are selected. For instance, if you select the project name, the View Code and View Designer buttons will not be shown.
To add additional items such as a Windows Form or a Class to your current project, right-click the project name in Solution Explorer, select Add (see Figure 2-24), and then choose the item you want to add from the list.
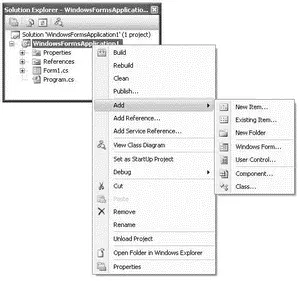
Figure 2-24
You can also add new (or existing) projects to the current solution. To do so, right-click on the solution name in Solution Explorer, select Add (see Figure 2-25), and then select what you want to add.
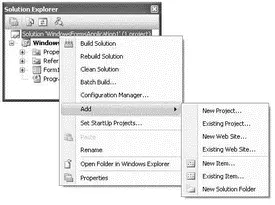
Figure 2-25
When you have multiple projects in a solution, one of the projects will be set as the startup project (the project name that is displayed in bold in Solution Explorer is the startup project). That is, when you press F5 to debug the application, the project set as the startup project will be debugged. To change the startup project, right-click the project that you want to set as the startup and select Set as Startup Project (see Figure 2-26).
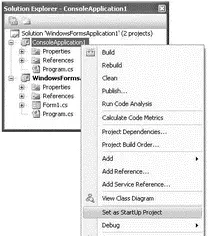
Figure 2-26
To debug multiple projects at the same time when you press the F5 key, set multiple projects as the startup projects. To do so, right-click on the solution name in Solution Explorer and select Properties.
Читать дальшеИнтервал:
Закладка:
Похожие книги на «C# 2008 Programmer's Reference»
Представляем Вашему вниманию похожие книги на «C# 2008 Programmer's Reference» списком для выбора. Мы отобрали схожую по названию и смыслу литературу в надежде предоставить читателям больше вариантов отыскать новые, интересные, ещё непрочитанные произведения.


Обсуждение, отзывы о книге «C# 2008 Programmer's Reference» и просто собственные мнения читателей. Оставьте ваши комментарии, напишите, что Вы думаете о произведении, его смысле или главных героях. Укажите что конкретно понравилось, а что нет, и почему Вы так считаете.