Wei-Meng Lee - C# 2008 Programmer's Reference
Здесь есть возможность читать онлайн «Wei-Meng Lee - C# 2008 Programmer's Reference» весь текст электронной книги совершенно бесплатно (целиком полную версию без сокращений). В некоторых случаях можно слушать аудио, скачать через торрент в формате fb2 и присутствует краткое содержание. Город: Indianapolis, Год выпуска: 2009, ISBN: 2009, Издательство: Wiley Publishing, Inc., Жанр: Программирование, на английском языке. Описание произведения, (предисловие) а так же отзывы посетителей доступны на портале библиотеки ЛибКат.
- Название:C# 2008 Programmer's Reference
- Автор:
- Издательство:Wiley Publishing, Inc.
- Жанр:
- Год:2009
- Город:Indianapolis
- ISBN:978-0-470-28581-7
- Рейтинг книги:4 / 5. Голосов: 1
-
Избранное:Добавить в избранное
- Отзывы:
-
Ваша оценка:
C# 2008 Programmer's Reference: краткое содержание, описание и аннотация
Предлагаем к чтению аннотацию, описание, краткое содержание или предисловие (зависит от того, что написал сам автор книги «C# 2008 Programmer's Reference»). Если вы не нашли необходимую информацию о книге — напишите в комментариях, мы постараемся отыскать её.
C# 2008 Programmer's Reference — читать онлайн бесплатно полную книгу (весь текст) целиком
Ниже представлен текст книги, разбитый по страницам. Система сохранения места последней прочитанной страницы, позволяет с удобством читать онлайн бесплатно книгу «C# 2008 Programmer's Reference», без необходимости каждый раз заново искать на чём Вы остановились. Поставьте закладку, и сможете в любой момент перейти на страницу, на которой закончили чтение.
Интервал:
Закладка:
ToolStripStatusLabel1.Text =
ftpResp.StatusDescription.Replace("\r\n", string.Empty);
} catch (Exception ex) {
MessageBox.Show(ex.ToString());
}
}
If a directory is not empty (that is, if it contains files and subdirectories), the deletion process will fail. The user will have to remove its content before removing the directory.
Uploading Photos
To upload photos to the FTP server, you first select a folder to upload the photos to and then use the OpenFileDialogclass to ask the user to select the photo(s) he wants to upload. Finally, you upload the photos individually, using the UploadImage()function:
private void btnUploadPhotos_Click(object sender, EventArgs e) {
//---ensure user selects a folder---
if (TreeView1.SelectedNode.ImageIndex == ico_PHOTO) {
MessageBox.Show("Please select a folder to upload the photos.");
return;
}
OpenFileDialog openFileDialog1 = new OpenFileDialog() {
Filter = "jpg files (*.jpg)|*.jpg",
FilterIndex = 2,
RestoreDirectory = true,
Multiselect = true
};
//---formulate the full path for the folder to be created---
string currentSelectedPath =
Properties.Settings.Default.FTP_SERVER +
TreeView1.SelectedNode.FullPath.Substring(1).Replace("\r", "");
//---let user select the photos to upload---
if (openFileDialog1.ShowDialog() ==
System.Windows.Forms.DialogResult.OK) {
//---upload each photo individually---
for (int i = 0; i <= openFileDialog1.FileNames.Length - 1; i++) {
UploadImage(currentSelectedPath + "/" +
openFileDialog1.FileNames[i].Substring(
openFileDialog1.FileNames[i].LastIndexOf(@"\") + 1),
openFileDialog1.FileNames[i]);
}
}
//---refresh the folder to show the uploaded photos---
RefreshCurrentFolder();
}
The UploadImage()function uploads a photo from the hard disk to the FTP server:
□ First, create a new instance of the WebClientclass.
□ Specify the login credential to the FTP server.
□ Upload the file to the FTP server, using the UploadFile()method from the WebClientclass. Note that the full pathname of the file to be uploaded to the FTP server must be specified.
//---upload a photo to the FTP server---
private void UploadImage(string path, string filename) {
try {
WebClient client = new WebClient();
client.Credentials = new NetworkCredential(
Properties.Settings.Default.UserName,
Properties.Settings.Default.Password);
//---upload the photo---
client.UploadFile(path, filename);
//---update the statusbar---
ToolStripStatusLabel1.Text = filename + " uploaded!";
} catch (Exception ex) {
Console.WriteLine(ex.ToString());
}
}
Deleting a Photo
To delete a photo, the user first selects a photo to delete and then you call the PerformWebRequest()helper function you have defined earlier:
private void btnDeletePhoto_Click(object sender, EventArgs e) {
if (TreeView1.SelectedNode.ImageIndex != ico_PHOTO) {
MessageBox.Show("Please select a photo to delete.");
return;
} try {
string FullPath = Properties.Settings.Default.FTP_SERVER +
TreeView1.SelectedNode.FullPath.Substring(1).Replace("\r", "");
//---delete the photo---
FtpWebResponse ftpResp =
PerformWebRequest(FullPath, WebRequestMethod.DeleteFile);
//---delete the current node---
TreeView1.SelectedNode.Remove();
//---update the statusbar---
ToolStripStatusLabel1.Text =
ftpResp.StatusDescription.Replace("\r\n", string.Empty);
} catch (Exception ex) {
MessageBox.Show(ex.ToString());
}
}
Once the photo is removed from the FTP server, you also need to delete its node in the TreeViewcontrol.
Testing the Application
That's it! You can now test the application by pressing F5. Ensure that the credentials for logging in to the FTP server are correct. If the login is successful, you should be able to create a new folder on the FTP server and then upload photos. Figure 16-12 shows the complete application.
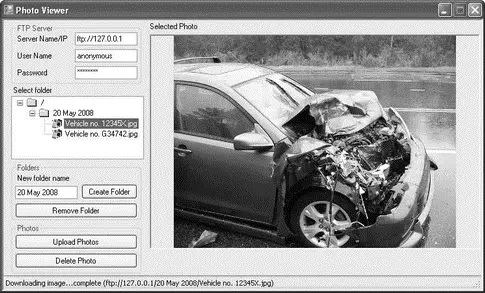
Figure 16-12
Adding Print Capability
The .NET Framework contains classes that make it easy for you to support printing in your applications. In this section, you add printing support to the PhotoViewer application so that you can print the photos. You'll explore the basics of printing in .NET and see how to configure page setup, print multiple pages, and preview a document before it is printed, as well as let users select a printer with which to print.
Basics of Printing in .NET
In .NET, all the printing functionality is encapsulated within the PrintDocumentcontrol/class, which can be found in the Toolbox (see Figure 16-13). The PrintDocumentcontrol defines the various methods that allow you to send output to the printer.
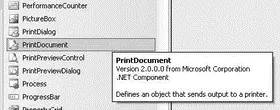
Figure 16-13
To incorporate printing functionality into your Windows application, you can either drag and drop the PrintDocumentcontrol onto your form or create an instance of the PrintDocumentclass at runtime. This example uses the latter approach.
To start the printing process, you use the Print()method of the PrintDocumentclass. To customize the printing process using the PrintDocumentobject, there are generally three events with which you need to be acquainted:
Интервал:
Закладка:
Похожие книги на «C# 2008 Programmer's Reference»
Представляем Вашему вниманию похожие книги на «C# 2008 Programmer's Reference» списком для выбора. Мы отобрали схожую по названию и смыслу литературу в надежде предоставить читателям больше вариантов отыскать новые, интересные, ещё непрочитанные произведения.


Обсуждение, отзывы о книге «C# 2008 Programmer's Reference» и просто собственные мнения читателей. Оставьте ваши комментарии, напишите, что Вы думаете о произведении, его смысле или главных героях. Укажите что конкретно понравилось, а что нет, и почему Вы так считаете.