Chris Tyler - Fedora Linux
Здесь есть возможность читать онлайн «Chris Tyler - Fedora Linux» весь текст электронной книги совершенно бесплатно (целиком полную версию без сокращений). В некоторых случаях можно слушать аудио, скачать через торрент в формате fb2 и присутствует краткое содержание. Год выпуска: 2006, ISBN: 2006, Издательство: O'Reilly, Жанр: ОС и Сети, на английском языке. Описание произведения, (предисловие) а так же отзывы посетителей доступны на портале библиотеки ЛибКат.

- Название:Fedora Linux
- Автор:
- Издательство:O'Reilly
- Жанр:
- Год:2006
- ISBN:978-0-596-52682-5
- Рейтинг книги:5 / 5. Голосов: 1
-
Избранное:Добавить в избранное
- Отзывы:
-
Ваша оценка:
Fedora Linux: краткое содержание, описание и аннотация
Предлагаем к чтению аннотацию, описание, краткое содержание или предисловие (зависит от того, что написал сам автор книги «Fedora Linux»). Если вы не нашли необходимую информацию о книге — напишите в комментариях, мы постараемся отыскать её.
Fedora Linux: A Complete Guide to Red Hat's Community Distribution In this book, you'll learn how to:
Install Fedora and perform basic administrative tasks
Configure the KDE and GNOME desktops
Get power management working on your notebook computer and hop on a wired or wireless network
Find, install, and update any of the thousands of packages available for Fedora
Perform backups, increase reliability with RAID, and manage your disks with logical volumes
Set up a server with file sharing, DNS, DHCP, email, a Web server, and more
Work with Fedora's security features including SELinux, PAM, and Access Control Lists (ACLs)
Whether you are running the stable version of Fedora Core or bleeding-edge Rawhide releases, this book has something for every level of user. The modular, lab-based approach not only shows you how things work - but also explains why--and provides you with the answers you need to get up and running with Fedora Linux.
Fedora Linux — читать онлайн бесплатно полную книгу (весь текст) целиком
Ниже представлен текст книги, разбитый по страницам. Система сохранения места последней прочитанной страницы, позволяет с удобством читать онлайн бесплатно книгу «Fedora Linux», без необходимости каждый раз заново искать на чём Вы остановились. Поставьте закладку, и сможете в любой момент перейти на страницу, на которой закончили чтение.
Интервал:
Закладка:
6.1.1.2. Shrinking a logical volume
Shrinking a logical volume using the graphical tool is done exactly the same way as growing it: select the LV you wish to resize, click Edit Properties, enter the new size, and click OK.
The catch is that logical volumes containing ext3 filesystems can be reduced in size only when they are unmounted, so you will be asked if the filesystem may be unmounted during the resize operation. Click Yes.
Whenever the system is booted normally, the root ( / ) and /var filesystems will be in use, so you will not be able to unmount them, and therefore the resize will fail. You'll need to use a special procedure (detailed shortly) to shrink those filesystems.
The /home filesystem is a different story; if you log in as root instead of using a normal user account, the /home filesystem will not be in use, and you can successfully shrink /home . If any non- root users have logged in since the system was booted, they may have left processes running, such as the esound daemon (esd). These can be terminated with the fuser command:
# fuser -k /home/*
/home/chris: 13464c
The output shows that the directory /home/chris was in use as the current directory ( c ) of process 13464 . That process is killed, as specified by the -k option. Once this has been done, you can resize the /home directory.
6.1.1.2.1. Creating a new logical volume
You can create a new logical volume at any time, as long as there is some free space in the volume group you wish to use.
Select the volume group's Logical View element in the lefthand panel, then click Create New Logical Volume at the bottom of the center panel. The dialog shown in Figure 6-4 will appear.
Figure 6-4. Create New Logical Volume dialog
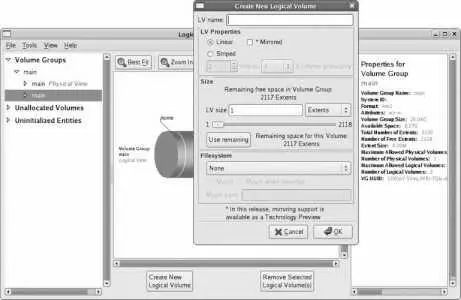
Enter an LV name consisting of letters, digits, and underscores. Change the LV size unit from Extents to Gigabytes (or Megabytes) and enter the desired LV size directly or by using the slider (click the "Use remaining" button to use all of the free space in the PV).
To create a filesystem in this LV, change the Filesystem type control (near the bottom of the dialog) from None to ext3, and select the checkboxes for Mount and "Mount when rebooted." In the "Mount point" field, type the name of the directory where you wish the new filesystem to appear.
For example, to create a 10 GB partition for music and video files, you could enter an LV name of multimedia , set the size to 10 GB, and create an ext3 filesystem with a mount point of /media .
Click OK. The LV and filesystem will be created and mounted, and you can start using the filesystem immediately.
6.1.1.2.2. Creating a snapshot
LVM has the ability to create a snapshot of an LV. The snapshot is an exact copy of the LV as it stood when the snapshot was created, but this is an illusion because the snapshot really stores only a copy of data that was changed since the snapshot was created. You can change the data in the origin LV without affecting the snapshot, and change the data in the snapshot without affecting the original LV.
Snapshots enable you to make a self-consistent backup of a filesystem to media such as tape. If you don't use snapshots and you back up an active filesystem containing a database to tape, the database tables would get copied at different times; if the database contained e-commerce data, perhaps the customer table would get copied before the order table. If an order was received from a new customer while the backup was in progress, it is possible that the order table on the tape will include the order but the customer table may not include the new customer. This could lead to severe problems when trying to use the data at a later time. On the other hand, if you take a snapshot and then back that up, the various files will all be in the same state on tape.
In addition, snapshots are useful for self-administered document recovery: if you take a snapshot of your users' files each night and make that snapshot available to them, they can recover from their own mistakes if they mess up a spreadsheet or delete an important document. For example, if you take a snapshot of /home and make it available as /yesterday/home , the deleted document /home/jamie/budget.ods can be recovered as /yesterday/home/jamie/budget.ods .
Snapshots are also used to test software or procedures without affecting live data. For example, if you take a snapshot of the logical volume containing the /home filesystem, and then unmount the original filesystem and mount the snapshot in its place, you can experiment with procedures that change the contents of home directories. To undo the results of your experiments, simply unmount the snapshot, remount the original directory, and then destroy the snapshot.
To create a snapshot of a LV using the graphical tool, select the LV in the left pane, and then click on the Create Snapshot button at the bottom of the middle pane. You will see the dialog box shown in Figure 6-5 .
Figure 6-5. Creating a snapshot
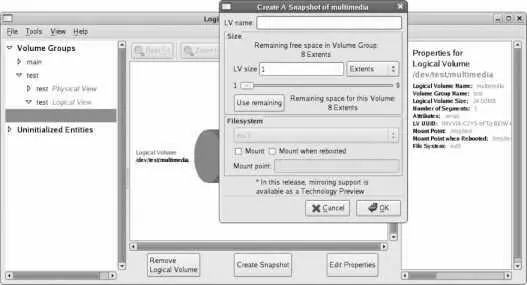
This dialog looks a lot like the dialog used to create a logical volume ( Figure 6-4 ), and it shouldbecause a snapshot is a special type of LV. Enter a name for the snapshot; I recommend the name of the origin LV, with -snap added to the end. For example, a snapshot of the multimedia LV would be called multimedia-snap .
Next, set the size of the snapshot. The snapshot will appear to be the same size as the origin LV; the size setting here is used to reserve disk space to track the differences between the origin LV and the snapshot. Therefore, if you have a 100 GB LV and the data in that LV changes slowly, a 1 GB snapshot might be reasonable; but if the data in that LV changes rapidly, you will need a much larger snapshot size.
Select the Mount and "Mount when rebooted" checkboxes, and then enter the "Mount point" that you wish to use (such as /backup/media ).
You can view the amount of storage used by the snapshot by selecting the snapshot LV in the left pane, then looking at the snapshot usage in the right pane. The usage is reported as a percentage of the total snapshot size and increases as data is changed in the origin or snapshot volumes. If it approaches 100 percent, you can increase the size of the snapshot LV in the same way that you would resize a regular LV.
6.1.1.2.3. Removing a logical volume or a snapshot
To permanently remove a logical volume, select it in the left pane, and then click the Remove Logical Volume button at the bottom of the middle pane. A dialog box will appear, asking you to confirm your choice; when you click Yes, the logical volume will be gone forever.
6.1.1.2.4. Adding a partition
You can add a partition to a volume group at any time.
The first step is to make the partition a physical volume. Select the disk partition you wish to use under Uninitialized Entities in the left pane, and then click the Initialize Entity button at the bottom of the center pane. A dialog box will warn you of possible data loss; double-check the partition information, and then click Yes if you are certain that you will not lose any critical data.
Be extremely careful with this option because it will delete all of the data on an entire disk partition. If you select the wrong partition on a dual-boot system, you could wipe out all of the data used by the other operating system (such as Windows).
Читать дальшеИнтервал:
Закладка:
Похожие книги на «Fedora Linux»
Представляем Вашему вниманию похожие книги на «Fedora Linux» списком для выбора. Мы отобрали схожую по названию и смыслу литературу в надежде предоставить читателям больше вариантов отыскать новые, интересные, ещё непрочитанные произведения.


Обсуждение, отзывы о книге «Fedora Linux» и просто собственные мнения читателей. Оставьте ваши комментарии, напишите, что Вы думаете о произведении, его смысле или главных героях. Укажите что конкретно понравилось, а что нет, и почему Вы так считаете.