Chris Tyler - Fedora Linux
Здесь есть возможность читать онлайн «Chris Tyler - Fedora Linux» весь текст электронной книги совершенно бесплатно (целиком полную версию без сокращений). В некоторых случаях можно слушать аудио, скачать через торрент в формате fb2 и присутствует краткое содержание. Год выпуска: 2006, ISBN: 2006, Издательство: O'Reilly, Жанр: ОС и Сети, на английском языке. Описание произведения, (предисловие) а так же отзывы посетителей доступны на портале библиотеки ЛибКат.

- Название:Fedora Linux
- Автор:
- Издательство:O'Reilly
- Жанр:
- Год:2006
- ISBN:978-0-596-52682-5
- Рейтинг книги:5 / 5. Голосов: 1
-
Избранное:Добавить в избранное
- Отзывы:
-
Ваша оценка:
Fedora Linux: краткое содержание, описание и аннотация
Предлагаем к чтению аннотацию, описание, краткое содержание или предисловие (зависит от того, что написал сам автор книги «Fedora Linux»). Если вы не нашли необходимую информацию о книге — напишите в комментариях, мы постараемся отыскать её.
Fedora Linux: A Complete Guide to Red Hat's Community Distribution In this book, you'll learn how to:
Install Fedora and perform basic administrative tasks
Configure the KDE and GNOME desktops
Get power management working on your notebook computer and hop on a wired or wireless network
Find, install, and update any of the thousands of packages available for Fedora
Perform backups, increase reliability with RAID, and manage your disks with logical volumes
Set up a server with file sharing, DNS, DHCP, email, a Web server, and more
Work with Fedora's security features including SELinux, PAM, and Access Control Lists (ACLs)
Whether you are running the stable version of Fedora Core or bleeding-edge Rawhide releases, this book has something for every level of user. The modular, lab-based approach not only shows you how things work - but also explains why--and provides you with the answers you need to get up and running with Fedora Linux.
Fedora Linux — читать онлайн бесплатно полную книгу (весь текст) целиком
Ниже представлен текст книги, разбитый по страницам. Система сохранения места последней прочитанной страницы, позволяет с удобством читать онлайн бесплатно книгу «Fedora Linux», без необходимости каждый раз заново искать на чём Вы остановились. Поставьте закладку, и сможете в любой момент перейти на страницу, на которой закончили чтение.
Интервал:
Закладка:
Maximum RPM : http://www.rpm.org/max-rpm-snapshot/
The Fight , an RPM guide by Matthias Saou: http://freshrpms.net/docs/fight/
IBM DeveloperWorks article on creating RPM packages: http://www-128.ibm.com/developerworks/library/l-rpm1/
5.8. Rebuilding an RPM Package for a Different Architecture
Sometimes you'll find an RPM has been prepared that would be perfect for your systemexcept that the RPM was built for a machine of a different architecture. This can be frustrating, but if you can obtain the source RPM, it's a fairly simple matter to make a binary RPM that is tuned to your system.
5.8.1. How Do I Do That?
Assuming that you have set up your ~/.rpmmacros file (see Lab 5.7, "Making Your Own RPM Packages "), simply obtain a source RPM file, and then execute rpmbuild with the --rebuild option:
$ rpmbuild --rebuild
$ rpmbuild --rebuild ImageMagick*.src.rpm
Installing ImageMagick-6.2.2.0-2.src.rpm
Executing(%prep): /bin/sh -e /home/chris/rpm/tmp/rpm-tmp.32955
+ umask 022
+ cd /home/chris/rpm/tmp
...(Lines snipped)...
Executing(--clean): /bin/sh -e /home/chris/rpm/tmp/rpm-tmp.88067
+ umask 022
+ cd /home/chris/rpm/tmp
+ rm -rf ImageMagick-6.2.2
+ exit 0
The new RPM packages will be found in ~/rpm/RPMS/ .
5.8.2. How Does It Work?
When rebuilding a package, rpmbuild performs the equivalent of a source package installation ( rpm -i ), followed by a build-all ( rpmbuild -ba ), and then deletes the source files.
5.8.3. What About...
5.8.3.1. ...editing the spec file before rebuilding?
rpmbuild 's --rebuild option is useful only for a direct rebuild without any changes. If you need to edit the spec file, install the source RPM, edit the spec file, and then build the RPM packages normally (see Lab 5.7, "Making Your Own RPM Packages ").
5.8.4. Where Can I Learn More?
The manpage for rpmbuild
Chapter 6. Storage Administration
Data storage is a critical part of computing. Fedora includes some powerful facilities for managing your data storage. These tools enable you to build high-availability, fault-tolerant storage systems that can be adjusted and tuned while in use, and also enable you to build backup tools that permit automated, self-consistent backups.
6.1. Using Logical Volume Management
Fedora uses the Linux Logical Volume Management (LVM) system by default for disk storage. LVM combines one or more disk partitions, called Physical Volumes (PVs), into a pool of storage called a Volume Group (VG). From this volume group, one or more Logical Volumes (LVs) are allocated. Each LV is used as a block storage device to contain a filesystem or a swapspace.
Here's where the fun begins: LVs can be resized, created, or deleted on the fly, and disks can be added and deletedwhile the system is in use!
When changing a storage configuration, it is possible to make a mistake and lose data. Take your time, ensure that you are confident of what each step will do before performing it, and make sure you back up your data before performing any LVM operations.
6.1.1. How Do I Do That?
Fedora Core permits you to manage logical volumes graphically or from the command line.
In the examples given here, the volume-group and logical-volume names recommended in Chapter 1 have been used: the volume group is main , and the logical volumes are named root , home , and swap .
If you used the Fedora default names, the main volume group will be named VolGroup00 , and the logical volumes will be named LogVol00 , LogVol01 , and so forth.
Although you can increase or decrease the size of any logical volume at any time, an ext3 filesystem within a logical volume can be reduced in size only when it is not in use (unmounted). If the filesystem is the root filesystem, it is in use whenever the system is running; therefore, the only way to shrink the root filesystem is to use another disk as a temporary root filesystem, which is usually done by running the system from the installation CD in rescue mode (see Lab 10.6, "Using Rescue Mode on an Installation Disc "). There is also a limit to how large a filesystem can grow while in use; growing the filesystem past that point must be done when the filesystem is unmounted.
6.1.1.1. Managing LVM graphically
Start the LVM administration tool by selecting System→Administration→Logical Volume Management. After you enter the root password, the three-panel display shown in Figure 6-1 will appear.
Figure 6-1. Logical Volume Management window
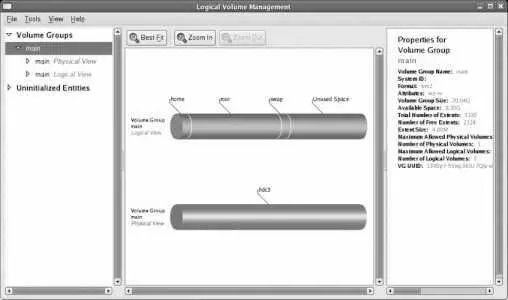
The left pane displays a list of the elements managed by LVM, the middle pane displays the current element in visual form, and the right pane displays a description of the current element.
The element list in the left pane is a collapsing outline. To view the elements within a particular category, click on the small arrow to the left of the category name to rotate it to a downward-pointing position; the elements within that category will be listed immediately below it. For example, to see the logical volumes within the main volume group ( VolGroup00 if you used the default Fedora configuration), click on the arrow beside "main Logical View" (or "VolGroup00 Logical View"), and a list of volume groups will appear beneath that line.
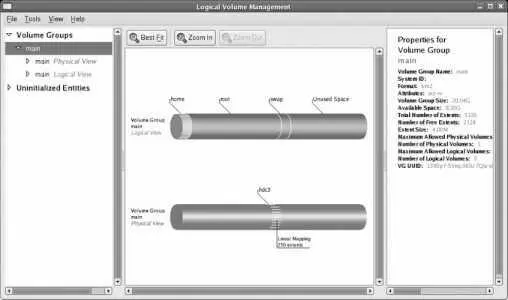
The initial display shows the physical (red) and logical (blue) views of the last volume group listed. If you click on a logical volume in the Logical View, the corresponding areas in the physical view are highlighted, as shown in Figure 6-2 .
Figure 6-2. Viewing the location of LV data within PVs
6.1.1.1.1. Growing a logical volume
To increase the size of a logical volume and the filesystem contained in it, select that LV in the lefthand pane, and then click Edit Properties. A properties dialog like the one in Figure 6-3 will appear.
Figure 6-3. LVM properties dialog
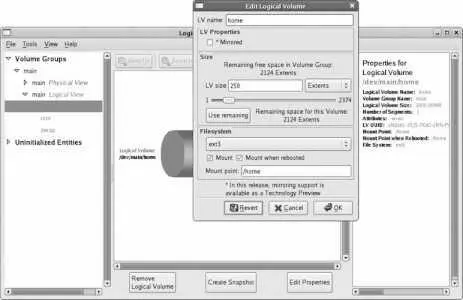
Change the unit control from Extents to Gigabytes or Megabytes so that the LV size is displayed in meaningful units; then click on the horizontal slider and drag it to the desired size (or type the size into the "LV size" field or click "Use Remaining").
Click OK. The LV will be resized, then the filesystem will be resized, and then the LVM information will be reloaded to update the display. On most systems, this will take just a few seconds.
If the resize fails with the message "No space left on device," you may have attempted to resize the filesystem past the maximum that can be done while the filesystem is mounted (in use). You can attempt to unmount the filesystem by deselecting the checkbox labeled Mount and then retry the operation (this will always fail for the root filesystem and will usually fail for filesystems containing /var and /home , in which case you may need to use single-user mode).
Читать дальшеИнтервал:
Закладка:
Похожие книги на «Fedora Linux»
Представляем Вашему вниманию похожие книги на «Fedora Linux» списком для выбора. Мы отобрали схожую по названию и смыслу литературу в надежде предоставить читателям больше вариантов отыскать новые, интересные, ещё непрочитанные произведения.


Обсуждение, отзывы о книге «Fedora Linux» и просто собственные мнения читателей. Оставьте ваши комментарии, напишите, что Вы думаете о произведении, его смысле или главных героях. Укажите что конкретно понравилось, а что нет, и почему Вы так считаете.