Andrew Hudson - Fedora™ Unleashed, 2008 edition
Здесь есть возможность читать онлайн «Andrew Hudson - Fedora™ Unleashed, 2008 edition» весь текст электронной книги совершенно бесплатно (целиком полную версию без сокращений). В некоторых случаях можно слушать аудио, скачать через торрент в формате fb2 и присутствует краткое содержание. Город: Indianapolis, Год выпуска: 2008, ISBN: 2008, Издательство: Sams Publishing, Жанр: ОС и Сети, на английском языке. Описание произведения, (предисловие) а так же отзывы посетителей доступны на портале библиотеки ЛибКат.

- Название:Fedora™ Unleashed, 2008 edition
- Автор:
- Издательство:Sams Publishing
- Жанр:
- Год:2008
- Город:Indianapolis
- ISBN:978-0-672-32977-7
- Рейтинг книги:5 / 5. Голосов: 1
-
Избранное:Добавить в избранное
- Отзывы:
-
Ваша оценка:
Fedora™ Unleashed, 2008 edition: краткое содержание, описание и аннотация
Предлагаем к чтению аннотацию, описание, краткое содержание или предисловие (зависит от того, что написал сам автор книги «Fedora™ Unleashed, 2008 edition»). Если вы не нашли необходимую информацию о книге — напишите в комментариях, мы постараемся отыскать её.
Finding information you need is not always easy. This short index provides a list of common tasks discussed inside this book. Browse the table of contents or index for detailed listings and consult the specified chapter for in-depth discussions about each subject.
left How Do I…?
See…
How Do I…?
See…
left Back up my system?
Chapter 13
Partition a hard drive?
Appendix B, Chapters 1, 35
left Build a new Linux kernel?
Chapter 36
Play MP3s and other music?
Chapter 7
left Burn a CD?
Chapter 7
Print a file?
Chapter 8
left Change a password?
Chapter 4
Read a text file?
Chapter 4
left Change the date and time?
Chapter 32
Read or send email?
Chapter 21
left Compress a file?
Chapter 13
Read or post to newsgroups?
Chapter 5
left Configure a modem?
Chapter 2
Reboot Fedora?
Chapter 1
left Configure a printer?
Chapter 8
Rescue my system?
Chapter 13
left Configure a scanner?
Chapter 7
Set up a DNS server?
Chapter 23
left Configure a sound card?
Chapter 7
Set up a firewall?
Chapter 14
left Configure my desktop settings?
Chapter 3
Set up a web server?
Chapter 15
left Connect to the Internet?
Chapter 5
Set up an FTP server?
Chapter 20
left Control a network interface?
Chapter 14
Set up Samba with SWAT?
Chapter 19
left Copy files or directories?
Chapters 13, 32
Set up wireless networking?
Chapter 14
left Create a boot disk to boot Fedora?
Chapter 1
Shut down Fedora?
Chapter 1
left Create a database?
Chapter 16
Use a spreadsheet?
Chapter 6
left Create a user?
Chapter 4
Use Instant Messaging?
Chapter 5
left Delete a file or directory?
Chapter 32
Watch television on my computer?
Chapter 7
left Get images from a digital camera?
Chapter 7
Edit a text file?
Chapter 4
left Install Fedora?
Chapter 1
Make Fedora more secure?
Chapter 14
left Log in to Fedora?
Chapter 1
Mount a CD-ROM or hard drive?
Chapter 35
Fedora™ Unleashed, 2008 edition — читать онлайн бесплатно полную книгу (весь текст) целиком
Ниже представлен текст книги, разбитый по страницам. Система сохранения места последней прочитанной страницы, позволяет с удобством читать онлайн бесплатно книгу «Fedora™ Unleashed, 2008 edition», без необходимости каждый раз заново искать на чём Вы остановились. Поставьте закладку, и сможете в любой момент перейти на страницу, на которой закончили чтение.
Интервал:
Закладка:
You see an installation dialog box when The GIMP is started for the first time, and then a series of dialog boxes that display information regarding the creation and contents of a local GIMP directory. This directory can contain personal settings, preferences, external application resource files, temporary files, and symbolic links to external software tools used by the editor.
Although The GIMP is powerful, it does lack two features Adobe Photoshop offers that are important to some graphics professionals.
The first of these is the capability to generate color separations for commercial press printers (CMYK for the colors cyan, magenta, yellow, and key [or black]). The GIMP uses RGB (red, green, and blue), which is great for video display, but not so great for printing presses. The second feature The GIMP lacks is the use of Pantone colors (a patented color specification) to ensure accurate color matching.
If these features are unimportant to you, The GIMP is an excellent tool. If you must use Adobe Photoshop, the current version of CodeWeavers' CrossOver Office will run Photoshop in Linux.
These deficiencies might not last long. A CMYK plug-in is in the works, and the Pantone issues are likely to be addressed in the near future as well.
After the initial configuration has finished, The GIMP's main windows and toolboxes appear. The GIMP's main window contains tools used for selecting, drawing, moving, view enlarging or reducing, airbrushing, painting, smudging, copying, filling, and selecting color. Depending on the version installed on your system, the toolbox can host more than 25 different tools.
The toolbox's File, Xtns, and Help menus are used for file operations (including sending the current image by electronic mail), image acquisition or manipulation, and documentation, respectively. If you right-click an open image window, you see the wealth of The GIMP's menus, as shown in Figure 7.5.
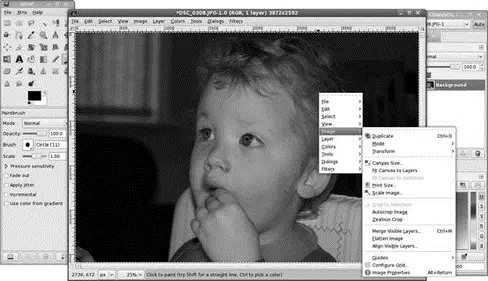
FIGURE 7.5 Right-click on an image window to access The GIMP's cascading menus.
Using Scanners in Fedora
With the rise of digital photography, there has been an equal decline in the need for image scanners. However, there are still times that you want to use a scanner, and Fedora makes it easy.
You can also use many types of image scanners with The GIMP. In the past, the most capable scanners required a SCSI port. Today, however, most scanners work through a USB port. You must have scanner support enabled for Linux (usually through a loaded kernel module, scanner.o) before using a scanner with The GIMP.
Although some scanners can work via the command line, you will enjoy more productive scanning sessions if you use a graphical interface because GUI features, such as previewing and cropping, can save time before actually scanning an image. Most scanners in use with Linux use the Scanner Access Now Easy (SANE) package, which supports and enables graphical scanning sessions.
SANE consists of two software components. A low-level driver enables the hardware support and is specific to each scanner. Next, a graphical scanner interface X client known as xsaneis used as a plug-in or ancillary program (or script) that adds features to The GIMP.
Although xsaneis commonly used as a GIMP plug-in, it can also be used as a standalone program. Another useful program is Joerg Schulenburg's gocrclient, used for optical character recognition (OCR). Although not a standalone application, it is included in the Kooka scanning application. This program works best with 300 dots per inch (dpi) scans in several different graphics formats. OCR is a resource-intensive task and can require hundreds of megabytes of disk storage!
A list of currently supported scanners can be found at http://www.sane-project.org/sane- supported-devices.html. Unfortunately, if your scanner doesn't appear on the list, you should not expect it to work with the SANE software. There is also a list on that same page for drivers not yet included, but you must be able to compile the application from source to use them.
Supported USB scanners are automatically detected and the appropriate driver is loaded automatically. The USB devices tell the USB system several pieces of information when they are connected — the most important of which are the vendor ID and the device ID. This identification is used to look up the device in a table and load the appropriate driver.
You will find that Fedora successfully identifies and configures most modern USB-based scanners.
Many scanners are supported in Linux. If yours is not, it still might be possible to use it. The Kooka and Xsane scanner applications are included with Fedora and are fairly straight forward to use. They can both be found in the Graphics menu as the Scanner Tool.
Working with Graphics Formats
Image file formats are developed to serve a specific technical purpose (lossless compression, for example, where the file size is reduced without sacrificing image quality) or to meet a need for a proprietary format for competitive reasons. Many file formats are covered by one or more patents. For example, the GIF format had fallen into disfavor with the open-source crowd because the patent holder waited a while before deciding to enforce his patent rights.
If you want to view or manipulate an image, you need to identify the file format to choose the proper tool for working with the image. The file's extension is your first indicator of the file's format. The graphics image formats supported by the applications included with Fedora include the following:
► .bmp — Bitmapped graphics, commonly used in Microsoft Windows
► .gif — CompuServe Graphics Interchange Format
► .jpg — Joint Photographic Experts Group
► .pcx — IBM Paintbrush
► .png — Portable Network Graphics
► .svg — Scalable Vector Graphics
► .tif — Tagged Image File format
An extensive list of image file extensions can be found in the manpage for ImageMagick, an excellent application included with Fedora, which you learn more about in upcoming sections of this chapter.
Fedora includes dozens of graphics conversion programs that are accessible through the command line, and there are few, if any, graphics file formats that cannot be manipulated when using Linux. These programs can be called in Perl scripts, shell scripts, or command-line pipes to support many types of complex format conversion and image manipulation tasks. See the man pages for the ppm, pbm, pnm,and pgmfamilies of commands. Also see the man page for the convertcommand, which is part of a suite of extremely capable programs included with the ImageMagick suite.
Often, a file you want to manipulate in some way is in a format that cannot be used by either your graphics application or the final application. The solution is to convert the image file — sometimes through several formats. The convertutility from ImageMagick is useful, as is the netpbmfamily of utilities. If it is not already installed, ImageMagick can be installed with the Add Remove Software GUI found in the System Settings menu; the netpbmtools are always installed by default.
The convertutility converts between image formats recognized by ImageMagick. Color depth and size also can be manipulated during the conversion process. You can use ImageMagick to append images, surround them with borders, add labels, rotate and shade them, and perform other manipulations well suited to scripting. Commands associated with ImageMagick include display, animate, identify,and import .The application supports more than 130 different image formats (all listed in the man page for ImageMagick).
Интервал:
Закладка:
Похожие книги на «Fedora™ Unleashed, 2008 edition»
Представляем Вашему вниманию похожие книги на «Fedora™ Unleashed, 2008 edition» списком для выбора. Мы отобрали схожую по названию и смыслу литературу в надежде предоставить читателям больше вариантов отыскать новые, интересные, ещё непрочитанные произведения.


![Andrew Radford - Linguistics An Introduction [Second Edition]](/books/397851/andrew-radford-linguistics-an-introduction-second-thumb.webp)


Обсуждение, отзывы о книге «Fedora™ Unleashed, 2008 edition» и просто собственные мнения читателей. Оставьте ваши комментарии, напишите, что Вы думаете о произведении, его смысле или главных героях. Укажите что конкретно понравилось, а что нет, и почему Вы так считаете.