Andrew Hudson - Fedora™ Unleashed, 2008 edition
Здесь есть возможность читать онлайн «Andrew Hudson - Fedora™ Unleashed, 2008 edition» весь текст электронной книги совершенно бесплатно (целиком полную версию без сокращений). В некоторых случаях можно слушать аудио, скачать через торрент в формате fb2 и присутствует краткое содержание. Город: Indianapolis, Год выпуска: 2008, ISBN: 2008, Издательство: Sams Publishing, Жанр: ОС и Сети, на английском языке. Описание произведения, (предисловие) а так же отзывы посетителей доступны на портале библиотеки ЛибКат.

- Название:Fedora™ Unleashed, 2008 edition
- Автор:
- Издательство:Sams Publishing
- Жанр:
- Год:2008
- Город:Indianapolis
- ISBN:978-0-672-32977-7
- Рейтинг книги:5 / 5. Голосов: 1
-
Избранное:Добавить в избранное
- Отзывы:
-
Ваша оценка:
Fedora™ Unleashed, 2008 edition: краткое содержание, описание и аннотация
Предлагаем к чтению аннотацию, описание, краткое содержание или предисловие (зависит от того, что написал сам автор книги «Fedora™ Unleashed, 2008 edition»). Если вы не нашли необходимую информацию о книге — напишите в комментариях, мы постараемся отыскать её.
Finding information you need is not always easy. This short index provides a list of common tasks discussed inside this book. Browse the table of contents or index for detailed listings and consult the specified chapter for in-depth discussions about each subject.
left How Do I…?
See…
How Do I…?
See…
left Back up my system?
Chapter 13
Partition a hard drive?
Appendix B, Chapters 1, 35
left Build a new Linux kernel?
Chapter 36
Play MP3s and other music?
Chapter 7
left Burn a CD?
Chapter 7
Print a file?
Chapter 8
left Change a password?
Chapter 4
Read a text file?
Chapter 4
left Change the date and time?
Chapter 32
Read or send email?
Chapter 21
left Compress a file?
Chapter 13
Read or post to newsgroups?
Chapter 5
left Configure a modem?
Chapter 2
Reboot Fedora?
Chapter 1
left Configure a printer?
Chapter 8
Rescue my system?
Chapter 13
left Configure a scanner?
Chapter 7
Set up a DNS server?
Chapter 23
left Configure a sound card?
Chapter 7
Set up a firewall?
Chapter 14
left Configure my desktop settings?
Chapter 3
Set up a web server?
Chapter 15
left Connect to the Internet?
Chapter 5
Set up an FTP server?
Chapter 20
left Control a network interface?
Chapter 14
Set up Samba with SWAT?
Chapter 19
left Copy files or directories?
Chapters 13, 32
Set up wireless networking?
Chapter 14
left Create a boot disk to boot Fedora?
Chapter 1
Shut down Fedora?
Chapter 1
left Create a database?
Chapter 16
Use a spreadsheet?
Chapter 6
left Create a user?
Chapter 4
Use Instant Messaging?
Chapter 5
left Delete a file or directory?
Chapter 32
Watch television on my computer?
Chapter 7
left Get images from a digital camera?
Chapter 7
Edit a text file?
Chapter 4
left Install Fedora?
Chapter 1
Make Fedora more secure?
Chapter 14
left Log in to Fedora?
Chapter 1
Mount a CD-ROM or hard drive?
Chapter 35
Fedora™ Unleashed, 2008 edition — читать онлайн бесплатно полную книгу (весь текст) целиком
Ниже представлен текст книги, разбитый по страницам. Система сохранения места последней прочитанной страницы, позволяет с удобством читать онлайн бесплатно книгу «Fedora™ Unleashed, 2008 edition», без необходимости каждый раз заново искать на чём Вы остановились. Поставьте закладку, и сможете в любой момент перейти на страницу, на которой закончили чтение.
Интервал:
Закладка:
identifyYou can use ImageMagick's identifycommand to identify details about image files. The welcoming splash image used for the GRUB bootloader is located in /boot/gruband is a gzipped .xpmimage. If you run identifyon the image, you'll discover that it's a 640×480 xpmimage with 16-bit color depth. That's all you need to know to construct a replacement image of your own. Using The GIMP or another graphics tool, crop or resize your chosen image to 640×480 and change the color depth to 16 bits. Save the image as splash.xpmand then gzipthe resulting file. Replace the original Fedora file, and you now have a custom boot image. The use of identifyhelped you duplicate the parameters of the original image to comply with the requirements of GRUB. The identifycommand is also useful to identify unknown image files and to determine whether they're corrupt.
The netpbmtools are installed by default because they compose the underpinnings of graphics format manipulation. The man page for each image format lists related conversion utilities; the number of those utilities gives you some indication of the way that format is used and shows how one is built on another:
► The man page for ppm,the portable pixmap file format, lists 47 conversion utilities related to ppm.This makes sense because ppm,or portable pixmap , is considered the lowest common denominator for color image files. It is therefore often used as an intermediate format.
► The man page for pgm,the portable graymap file format, lists 22 conversion utilities. This makes sense because pgmis the lowest common denominator for grayscale image files.
► The man page for pnm,the portable anymap file format, lists 31 conversion utilities related to it. However, there is no format associated with PNM because it operates in concert with ppm, pgm,and pbm.
► An examination of the man page for pbm,the portable bitmap file format, reveals no conversion utilities. It's a monochrome format and serves as the foundation of the other related formats.
Capturing Screen Images
You can use graphics manipulation tools to capture images that are displayed on your computer screen. Although this technique was used for the production of this book, it has broader uses; there is truth to the cliche that a picture is worth a thousand words. Sometimes it is easier to show an example than it is to describe it.
A captured screen image (also called a screen grab or a screenshot) can be used to illustrate an error in the display of an application (a font problem, for example) or an error dialog that is too complex to copy down by hand. You might just want to share an image of your beautifully crafted custom desktop configuration with your friends or illustrate your written documents.
When using the GNOME desktop, you can take advantage of the built-in screenshot mechanism ( gnome-panel-screenshot). Access this tool by pressing the Print Screen key. (Alt+Print Screen takes a screenshot of only the window that has focus on a desktop.) Captured images are saved in .pngformat.
Using Digital Cameras with Fedora
Most digital cameras used in connection with Fedora fall into one of two categories: webcams (small, low-resolution cameras connected to the computer's interface) or hand held digital cameras that record image data on disks or memory cards for downloading and viewing on a PC. Fedora supports both types. Other types of cameras, such as surveillance cameras that connect directly to a network via wire or wireless connections, need no special support (other than a network connection and viewing software) to be used with a Linux computer.
Fedora supports hundreds of different digital cameras, from early parallel-port (CPiA chipset-based) cameras to today's USB-based cameras. You can even use Intel's QX3 USB microscope with Fedora. If you prefer a standalone network-based webcam, explore the capabilities of Linux-based cameras from Axis (at http://www.axis.com/products/video/camera/productguide.htm). The following sections describe some of the more commonly used still camera hardware and software supported by Fedora.
Handheld Digital Cameras
Digital cameras are one of the major success stories of the last few years. Now you can take pictures and see previews of your pictures immediately. The pictures themselves are stored on discs or memory cards that can be easily plugged into Fedora for further manipulation, using The GIMP or other software. Unfortunately, most of the supplied software that comes with the cameras tend to be for Windows users only, making you reliant on the packages supplied with Fedora.
The good news, though, is that because of the good development carried out in Fedora and GNOME, you are now able to plug pretty much any camera into your computer through a USB interface and Fedora automatically recognizes the camera as a USB mass storage device. You can even set Fedora to recognize when a camera is plugged in so that it automatically imports your photographs for you.
To do this, you need to set up your settings for removable drives and media. You can find this in the System, Preferences, Hardware menu. Click the Cameras tab and select the option to import digital photographs when connected (see Figure 7.6).

FIGURE 7.6 Use GNOME's intelligent handling of removable media by setting it to import your photographs automatically.
Now whenever you connect a digital camera to your computer GNOME automatically detects it (see Figure 7.7), and asks whether you want to import the photographs.
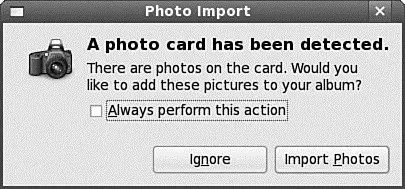
FIGURE 7.7 GNOME detects the presence of a digital camera and asks whether the photos should be imported.
By default GNOME uses the excellent gThumb package (see Figure 7.8), which, although basic-looking, offers an easy-to-use interface and powerful cataloging capabilities.
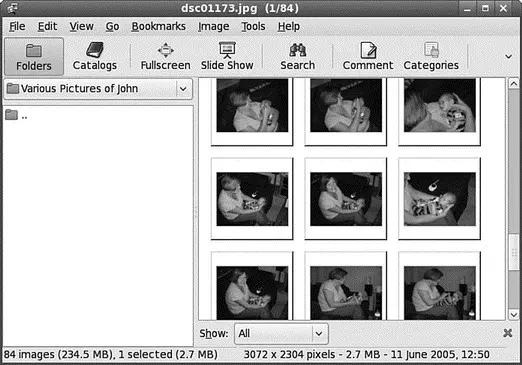
FIGURE 7.8 Make use of gThumb to manage your extensive photo collection.
Using F-Spot
With the inclusion of Mono into Fedora Extras, Fedora now has access to the superb F-Spot photo management application. You can find F-Spot under the Applications, Graphics menu listed as F-Spot Photo Manager. If you have used the popular Google Picasa application, you will feel instantly at home with F-Spot because it is similar in many ways.
The first time you open F-Spot, you are asked to import your first batch of photographs, as shown in Figure 7.9. You can also assign a tag to them, if you want to track particular types of photographs. You might want to allow F-Spot to copy the photograph to a new directory, Photos— something that may help you organize your photos on the system.
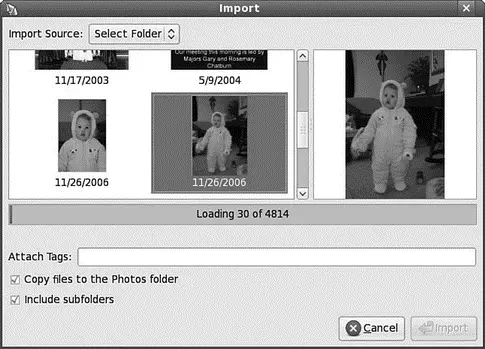
FIGURE 7.9 The versatile F-Spot makes adding photos to your library easy.
When you are ready, click Import to let F-Spot import the photos into the library. The pictures appear in the F-Spot library, and are stored according to the date they were taken. This information is given to F-Spot by the EXIF information that your camera stores each time you take a picture. In Figure 7.10, you can see the standard F-Spot window.
Читать дальшеИнтервал:
Закладка:
Похожие книги на «Fedora™ Unleashed, 2008 edition»
Представляем Вашему вниманию похожие книги на «Fedora™ Unleashed, 2008 edition» списком для выбора. Мы отобрали схожую по названию и смыслу литературу в надежде предоставить читателям больше вариантов отыскать новые, интересные, ещё непрочитанные произведения.


![Andrew Radford - Linguistics An Introduction [Second Edition]](/books/397851/andrew-radford-linguistics-an-introduction-second-thumb.webp)


Обсуждение, отзывы о книге «Fedora™ Unleashed, 2008 edition» и просто собственные мнения читателей. Оставьте ваши комментарии, напишите, что Вы думаете о произведении, его смысле или главных героях. Укажите что конкретно понравилось, а что нет, и почему Вы так считаете.