William Stanek - Windows Server 2012 R2 Storage, Security, & Networking Pocket Consultant
Здесь есть возможность читать онлайн «William Stanek - Windows Server 2012 R2 Storage, Security, & Networking Pocket Consultant» весь текст электронной книги совершенно бесплатно (целиком полную версию без сокращений). В некоторых случаях можно слушать аудио, скачать через торрент в формате fb2 и присутствует краткое содержание. Жанр: ОС и Сети, на английском языке. Описание произведения, (предисловие) а так же отзывы посетителей доступны на портале библиотеки ЛибКат.
- Название:Windows Server 2012 R2 Storage, Security, & Networking Pocket Consultant
- Автор:
- Жанр:
- Год:неизвестен
- ISBN:нет данных
- Рейтинг книги:3 / 5. Голосов: 1
-
Избранное:Добавить в избранное
- Отзывы:
-
Ваша оценка:
Windows Server 2012 R2 Storage, Security, & Networking Pocket Consultant: краткое содержание, описание и аннотация
Предлагаем к чтению аннотацию, описание, краткое содержание или предисловие (зависит от того, что написал сам автор книги «Windows Server 2012 R2 Storage, Security, & Networking Pocket Consultant»). Если вы не нашли необходимую информацию о книге — напишите в комментариях, мы постараемся отыскать её.
Windows Server 2012 R2 Storage, Security, & Networking Pocket Consultant — читать онлайн бесплатно полную книгу (весь текст) целиком
Ниже представлен текст книги, разбитый по страницам. Система сохранения места последней прочитанной страницы, позволяет с удобством читать онлайн бесплатно книгу «Windows Server 2012 R2 Storage, Security, & Networking Pocket Consultant», без необходимости каждый раз заново искать на чём Вы остановились. Поставьте закладку, и сможете в любой момент перейти на страницу, на которой закончили чтение.
Интервал:
Закладка:
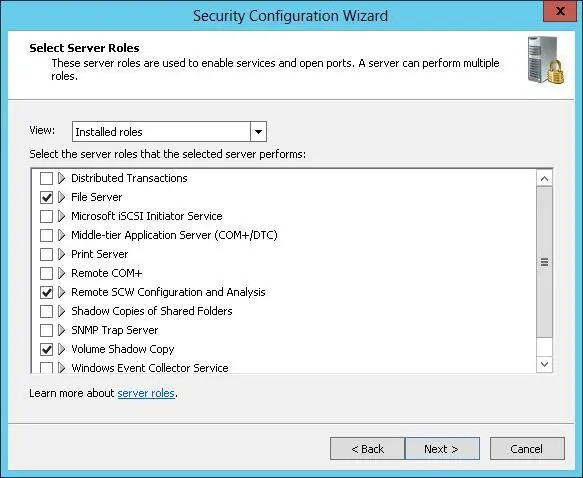
FIGURE 5-12Select the server roles to enable.
7.On the Select Client Features page, you’ll find the installed client features used to enable services. Select each feature that should be enabled, and clear each feature that should be disabled. Selecting a feature enables services required for that feature. Clearing a feature disables services required for that feature, if they aren’t required by an enabled feature. Tap or click Next.
8.On the Select Administration And Other Options page, you’ll see the installed options used to enable services and open ports. Select each option that should be enabled, and clear each option that should be disabled. Selecting an option enables services required for that option. Clearing an option disables services required for that option, if they aren’t required by an enabled option. Tap or click Next.
9.On the Select Additional Services page, you’ll find a list of additional services found on the selected server while processing the security configuration database. Select each service that should be enabled, and clear each service that should be disabled. Selecting a service enables services required for that service. Clearing a service disables services required for that service, if they aren’t required by an enabled service. Tap or click Next.
10.On the Handling Unspecified Services page, indicate how unspecified services should be handled. Unspecified services are services that are not installed on the selected server and are not listed in the security configuration database. By default, the startup mode of unspecified services is not changed. To disable unspecified services instead, select Disable The Service. Tap or click Next.
11.On the Confirm Service Changes page, review the services that will be changed on the selected server if the security policy is applied. Note the current startup mode and the startup mode that will be applied by the policy. Tap or click Next.
12.On the introductory page for Network Security, tap or click Next. On the Network Security Rules page, you’ll find a list of firewall rules needed for the roles, features, and options you previously selected. You can add, edit, or remove inbound and outbound rules by using the options provided. Tap or click Next when you are ready to continue.
13.On the introductory page for Registry Settings, tap or click Next. On the Require SMB Security Signatures page, review the server message block (SMB) security signature options. By default, minimum operating system requirements and digital signing are used, and you won’t want to change these settings. Tap or click Next.
14.For domain controllers and servers with LDAP, on the Require LDAP Signing page, you can set minimum operating system requirements for all directory-enabled computers that access Active Directory Domain Services.
15.On the Outbound Authentication Methods page, choose the methods that the selected server uses to authenticate with remote computers. Your choices set the outbound LAN Manager authentication level that will be used. If the computer communicates only with domain computers, select Domain Accounts, but do not select the other options. This will ensure that the computer uses the highest level of outbound LAN Manager authentication. If the computer communicates with both domain and workgroup computers, select Domain Accounts and Local Accounts On The Remote Computers. In most cases, you won’t want to select the file-sharing option because this will result in a substantially lowered authentication level. Tap or click Next.
16.The outbound authentication methods you choose determine what additional Registry Settings pages are displayed. Keep the following in mind:
■If you don’t select any outbound authentication methods, the outbound LAN Manager authentication level is set as Send NTLMv2 Response Only, and an additional page is displayed to enable you to set the inbound authentication method. On the Inbound Authentication Using Domain Accounts page, choose the types of computers from which the selected server will accept connections. Your choices set the inbound LAN Manager authentication level that will be used. If the computer communicates only with Windows XP Professional or later computers, clear both options to ensure that the computer uses the highest level of inbound LAN Manager authentication. If the computer communicates with older PCs, accept the default selections. Tap or click Next.
■If you select domain accounts, local accounts, or both, you’ll have additional related pages that enable you to set the LAN Manager authentication level used when making outbound connections. You’ll also be able to specify that you want to synchronize clocks with this server’s clock. Inbound authentication is set as Accept All.
■If you allow file sharing passwords for early releases of Windows, the outbound LAN Manager authentication level is set as Send LM NTLM Only and the inbound authentication level is set as Accept All. Because of this, when you tap or click Next, the Registry Settings Summary page is displayed.
17.On the Registry Settings Summary page, review the values that will be changed on the selected server if the security policy is applied. Note the current value and the value that will be applied by the policy. Tap or click Next.
18.On the introductory page for Audit Policy, tap or click Next. On the System Audit Policy page, configure the level of auditing you want. To disable auditing, select Do Not Audit. To enable auditing for successful events, select Audit Successful Activities. To enable auditing for all events, select Audit Successful And Unsuccessful Activities. Tap or click Next.
19.On the Audit Policy Summary page, review the settings that will be changed on the selected server if the security policy is applied. Note the current setting and the setting that will be applied by the policy. Tap or click Next.
20.On the introductory page for Save Security Policy, tap or click Next. On the Security Policy File Name page, you can configure options for saving the security policy and adding one or more security templates to the policy. To view the security policy in the SCW Viewer, tap or click View Security Policy. When you have finished viewing the policy, return to the wizard.
21.To add security templates to the policy, tap or click Include Security Templates. In the Include Security Templates dialog box, tap or click Add. In the Open dialog box, select a security template to include in the security policy. If you add more than one security template, you can prioritize them in case any security configuration conflicts occur between them. Settings from templates higher in the list have priority. Select a template, and then tap or click the Up and Down buttons to prioritize the templates. Tap or click OK.
22.By default, the security policy is saved in the %SystemRoot%\Security\Msscw\Policies folder. Tap or click Browse. In the Save As dialog box, select a different save location for the policy if necessary. After you enter a name for the security policy, tap or click Save. The default or selected folder path and file name are then listed in the Security Policy File Name text box.
23.Tap or click Next. On the Apply Security Policy page, you can choose to apply the policy now or later. Tap or click Next, and then tap or click Finish.
Читать дальшеИнтервал:
Закладка:
Похожие книги на «Windows Server 2012 R2 Storage, Security, & Networking Pocket Consultant»
Представляем Вашему вниманию похожие книги на «Windows Server 2012 R2 Storage, Security, & Networking Pocket Consultant» списком для выбора. Мы отобрали схожую по названию и смыслу литературу в надежде предоставить читателям больше вариантов отыскать новые, интересные, ещё непрочитанные произведения.


Обсуждение, отзывы о книге «Windows Server 2012 R2 Storage, Security, & Networking Pocket Consultant» и просто собственные мнения читателей. Оставьте ваши комментарии, напишите, что Вы думаете о произведении, его смысле или главных героях. Укажите что конкретно понравилось, а что нет, и почему Вы так считаете.